ASP.NET Web Site Projects and Foxit Quick PDF Library
Foxit Quick PDF Library can be used in ASP.NET Website projects to add rich PDF features to websites. It works in much the same way as it does for regular desktop or server applications.
Please note: there is a difference between a ASP.NET Website project and a ASP.NET Web Application project. This article deals with ASP.NET Website projects and we have another article for ASP.NET Web Application projects here. There’s some technical differences between an ASP.NET Web Site project and an ASP.NET Web Application project that you should know about if you are unsure which project type best suits your needs.
We’ll start from the very start in this tutorial. But you can skip a few steps ahead if you are adding Foxit Quick PDF Library to an existing project. This tutorial was done using Visual Studio 2013 and C#, but the steps are mostly the same if you are using Visual Basic and Visual Studio 2008 or 2012. We’re also going to use the DLL edition of Foxit Quick PDF Library.
Contents
Steps
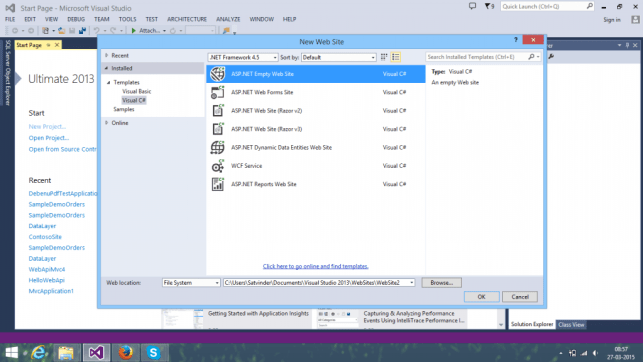
- Open Visual Studio and go to File > New > ASP.NET Empty Web Site… (for Visual Studio 2008 and 2012 choose ASP.NET Web Site.

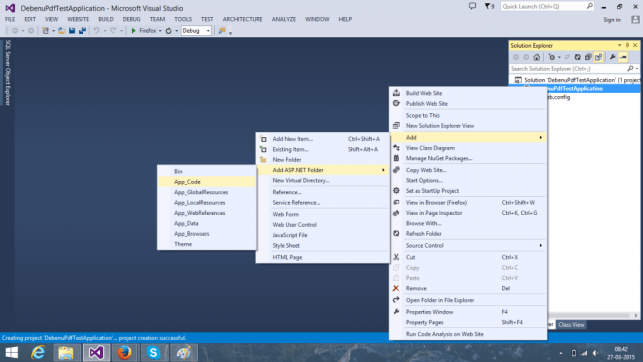
- In Solutions Explorer right-click on your project and select Add ASP.NET Folder > App_Code. This is where we will put the import files for the DLL edition of Foxit Quick PDF Library.
- Right-click on the project again and and select New Folder from the menu and name it Lib. This is where the Foxit Quick PDF Library 32-bit and 64-bit DLL’s will be stored.
- Make sure that you have downloaded and installed Foxit Quick PDF Library. The default installation location on 64-bit Windows machines is “C:\Program Files (x86)\Debenu\PDF Library” and for 32-bit Windows machines it is “C:\Program Files\Debenu\PDF Library“. Click on the DLL folder.
- You will now see two DLL’s, one for the 32-bit version (DebenuPDFLibraryDLL1113.dll) and one for the 64-bit version (DebenuPDFLibrary64DLL1113.dll). You should also see a folder called Import which contains import files for various programming languages including C# and Visual Basic to make interfacing with the DLL edition easier.
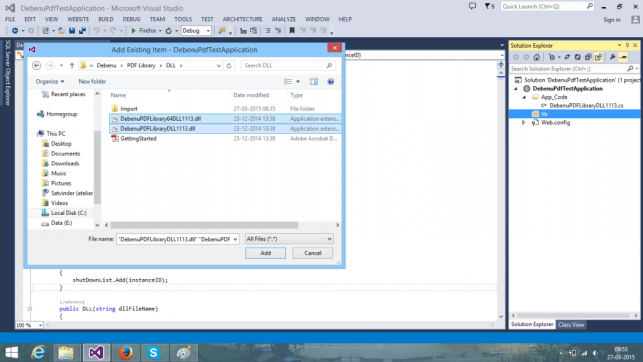
- In the Solutions Explorer right-click on the Lib folder and select Add Existing Item from the menu. Navigate to “C:\Program Files (x86)\Debenu\PDF Library\DLL\” and change the file types that the dialog is showing (bottom right) to include “All Files”. Now select the the 32-bit and 64-bit DLL’s from the DLL folder and click on Add.
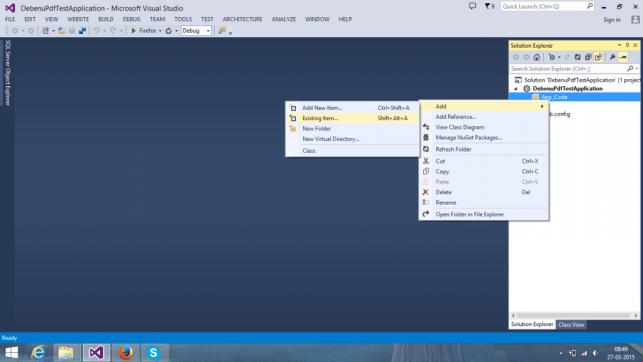
- Again in the Solutions Explorer right-click on the App_Code folder and select Add Existing Item from the menu. Navigate to the “C:\Program Files (x86)\Debenu\PDF Library\DLL\Import\CSharp” folder and select the DebenuPDFLibraryDLL1113.cs file and click Add.
- Again in the Solutions Explorer right-click on the Lib folder and select Add Existing Item from the menu. Navigate to “C:\Program Files (x86)\Debenu\PDF Library\DLL\” and change the file types that the dialog is showing (bottom right) to include “Assembly Files”. Now select the the 32-bit and 64-bit DLL’s from the DLL folder and click on Add.
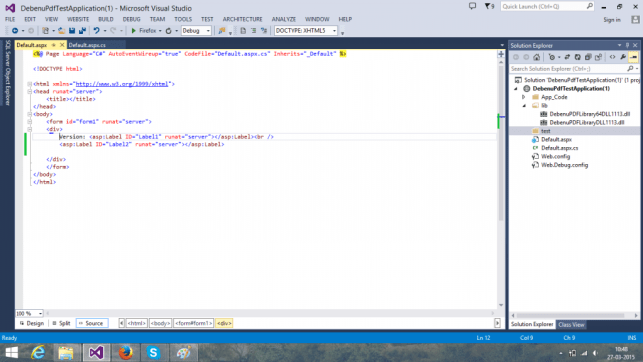
- Now it’s time to start adding some code to initialize Foxit Quick PDF Library so that you can use it in your project. In the Website add a new Webform called Default.aspx.
- On the Default.aspx Designer file add 2 labels. We’ll use this to write information about the library version and the unlock key status.
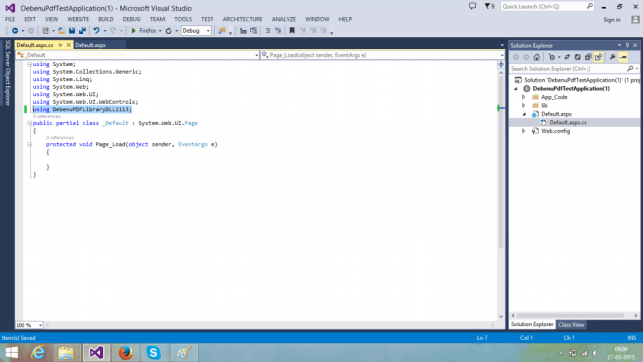
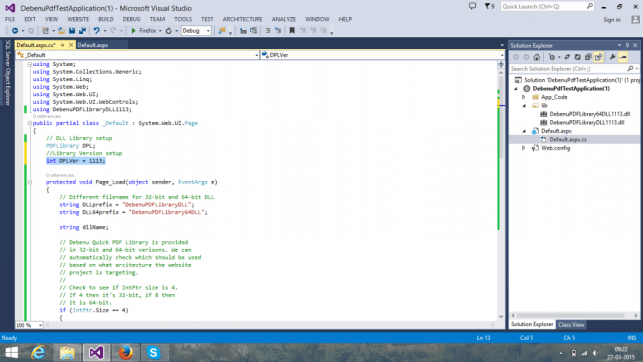
- In the Solutions Explorer expand Default.aspx item so that you can see the Default.aspx.cs file and double-click on it to open it. Add the DebenuPDFLibraryDLL1113 namespace to the using directives section at the top of your .cs file.
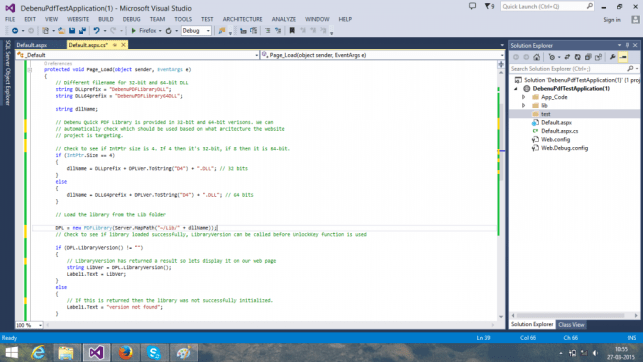
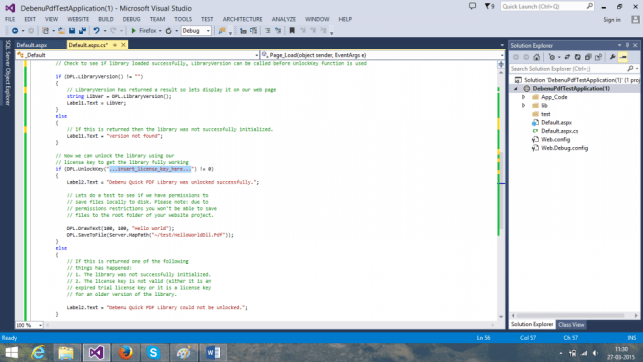
- Add the code shown in the screenshot to the Default.aspx.cs file under Page_Load Method. The code is also shown at the bottom of this article where you can copy and paste it from.
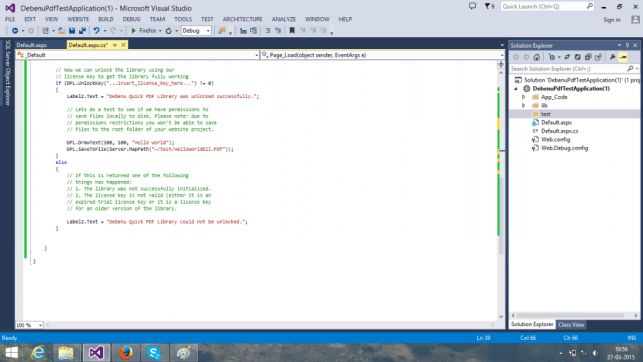
- Get your trial license key and add it to the code by navigating to “C:\Program Files (x86)\Debenu\PDF Library\ TRIAL_LICENSE_KEY.txt” copying the license key and then adding it to the UnlockKey function as shown below.
- We have used version 11.13 in this tutorial but it will work with other versions, just change the version numbers as required.
- You will run into permissions issues if you try to use functions such as SaveToFile to save files into the root directory of your project. For testing create a “Test” folder in the root project directory and then you can save a test file to it like this: DPL.SaveToFile(Server.MapPath(“~/test/HelloWorldDll.pdf”));
- Run the Website and you will see the library version and a HelloWorldDll.pdf file will be created under Test folder with Hello World written in it.
- That’s it. Here’s the sample code that we’ve used for this project. This sample code demonstrates how to use both the 32-bit and 64-bit versions, of course you can choose to only use one version or the other depending on your environment.
Sample Code
using System;
using System.Collections.Generic;
using System.Linq;
using System.Web;
using System.Web.UI;
using System.Web.UI.WebControls;
using DebenuPDFLibraryDLL1113;
public partial class _Default : System.Web.UI.Page
{
    // DLL Library setup
    PDFLibrary DPL;
    //Library Version setup
    int DPLVer = 1113;

    protected void Page_Load(object sender, EventArgs e)
    {
        // Different filename for 32-bit and 64-bit DLL
        string DLLprefix = "DebenuPDFLibraryDLL";
        string DLL64prefix = "DebenuPDFLibrary64DLL";

        string dllName;

        // Foxit Quick PDF Library is provided in 32-bit and 64-bit verisons. We can
        // automatically check which should be used based on what arcitecture the website
        // project is targeting.

        // Check to see if IntPtr size is 4. If 4 then it's 32-bit, if 8 then it is 64-bit.
        if (IntPtr.Size == 4)
        {
            dllName = DLLprefix + DPLVer.ToString("D4") + ".DLL"; // 32 bits
        }
        else
        {
            dllName = DLL64prefix + DPLVer.ToString("D4") + ".DLL"; // 64 bits
        }

        // Load the library from the Lib folder

        DPL = new PDFLibrary(Server.MapPath("~/Lib/" + dllName));
        // Check to see if library loaded successfully, LibraryVersion can be called before UnlockKey function is used

        if (DPL.LibraryVersion() != "")
        {
            // LibraryVersion has returned a result so lets display it on our web page
            string LibVer = DPL.LibraryVersion();
            Label1.Text = LibVer;
        }
        else
        {
            // If this is returned then the library was not successfully initialized.
            Label1.Text = "version not found";
        }

        // Now we can unlock the library using our
        // license key to get the library fully working
        if (DPL.UnlockKey("...Insert_License_Key_Here...") != 0)
        {
            Label2.Text = "Foxit Quick PDF Library was unlocked successfully.";

            // Lets do a test to see if we have permissions to
            // save files locally to disk. Please note: due to
            // permissions restrictions you won't be able to save
            // files to the root folder of your website project.

            DPL.DrawText(100, 100, "Hello world");
            DPL.SaveToFile(Server.MapPath("~/test/HelloWorldDll.Pdf"));
        }
        else
        {
            // If this is returned one of the following
            // things has happened:
            // 1. The library was not successfully initialized.
            // 2. The license key is not valid (either it is an
            // expired trial license key or it is a license key
            // for an older version of the library.

            Label2.Text = "Foxit Quick PDF Library could not be unlocked.";
        }
    }
}
Notes
- We have used version 11.13 in this tutorial but it will work with other versions, just change the version numbers as required.
- You will run into permissions issues if you try to use functions such as SaveToFile to save files into the root directory of your project. For testing create a “Test” folder in the root project directory and then you can save a test file to it like this: DPL.SaveToFile(Server.MapPath(“~/Test/test.pdf”));
- Add C# or VB import class to App_Code folder which makes the class automatically accessible throughout the application. If you add it at the project level then it is not automatically compiled and accessible.
- Use Server.MapPath to point to the DLL. After initializing the DLL make sure that the instanceID is not null. Incorrect paths, permissions issues, etc, can stop it from loading the library successfully.
- If ASP.NET website set to target AnyCPU then whether it is targeting 32-bit or 64-bit can change when deploying to new machines which means if you’re referencing a 32-bit DLL on your local dev machine it may break when you deploy to a server and the website tries to compile as a 64-bit website.
- It is NOT necessary to include both 32-bit and 64-bit DLLs in your project however you will then need to pay close attention when moving from a development environment to a production environment as to whether the website project and application pool that the project is running in are both targeting the same platform architecture.
- The ASP.NET default bin folder is for managed .NET DLLs. Foxit Quick PDF Library is not a managed DLL and so shouldn’t be included there.
This article refers to a deprecated product. If you are looking for support for Foxit PDF SDK, please click here.
Updated on May 16, 2022