How to create and configure a custom button in Foxit PDF SDK for Web
Foxit PDF SDK for Web provides powerful possibilities for viewing and manipulating PDFs online, connecting your documents to the web environment while allowing you to control functionality and customize your ready-to-go PDF viewer as you wish. With great power comes great responsibility (yes, a spider-man web pun!), and we are here to provide you with the means to customize your own buttons easily using Foxit PDF SDK for Web.
Contents
Modifying toolbar-config.bundle.js file
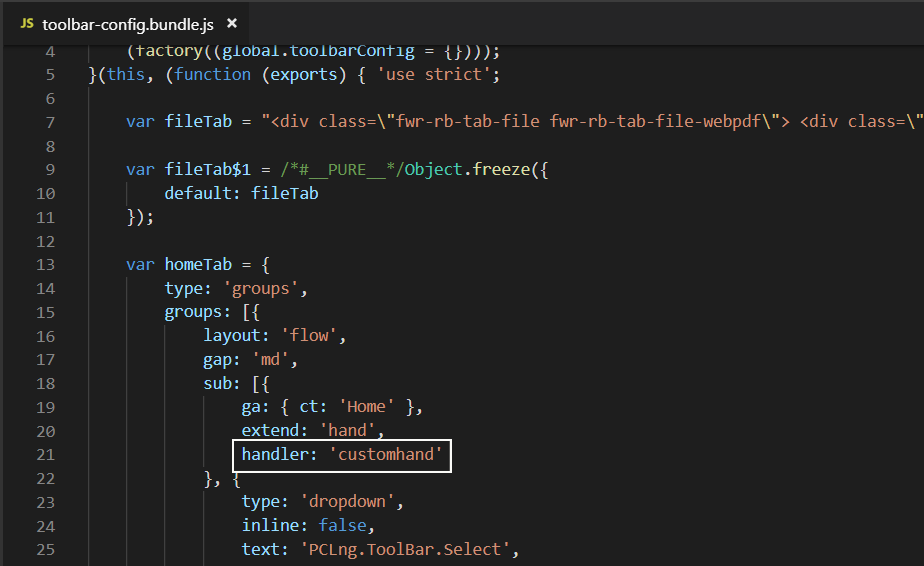
Let’s use the hand tool as an example and create a new button based on it. First, let’s extend the hand tool and add a new handler for it, we’ll call it “customhand“. See below:

Modifying Demo.js file
Our custom action will be to popup an alert message and enable/disable the hand tool on every click. On your ‘Demo.js’ file, this is the default code for loading the viewer as is:
/**
 * Event triggerred to initialize local language after DOM loaded.
 */
$(document).ready(function() {
    var optionsParams = {
        toolbarConfig: window.toolbarConfig,
        licenseKey: window.demoLicenseKey
    };
    var docViewerId = 'docViewer';

    WebPDF.ready(docViewerId, optionsParams, false).then(function(data) {
        initUser();
        bindEvents();
        openDocument();
    }, function(reason) {
        console.error(reason);
    });
We will do the respective changes to the code to add the custom hand tool and the events triggered when it is clicked:
- Comment out the default toolbar declaration: toolbarConfig: window.toolbarConfig
- Register the new handler
- Set Event Listener for click
- Initialize the toolbar
Your full Demo.js code should look like below:
* Event triggerred to initialize local language after DOM loaded.
 */
$(document).ready(function() {
    var optionsParams = {
        // STEP 1: Comment out the default toolbar declaration
        // toolbarConfig: window.toolbarConfig,
        licenseKey: window.demoLicenseKey
    };
    var docViewerId = 'docViewer';

    WebPDF.ready(docViewerId, optionsParams, false).then(function(data) {
        // STEP 2: Register the new handler
        WebPDF.Toolbar.getRegistry().registerController('customhand', {
            methods: {
                initialize: function(){
                    var that = this;
                    // STEP 3: Set Event Listener for click/alert message
WebPDF.ViewerInstance.on(WebPDF.EventList.DOC_MODIFY_STATE_CHANGED, function(){
                        that.components.forEach(function(component){
                            if(WebPDF.ViewerInstance.isDocModified()) {
                                component.enable();
                            } else {
                                component.disable();
                            }
                        });
                        that.updateComponentsPermission();
                    });
                    that.watchPermissionChange();
                },
                handle: function(){
                WebPDF.ViewerInstance.setModifyState(false);
                    alert('click hand tool');
                }
            }
        });
        // STEP 4: Initialize toolbar
        new WebPDF.Toolbar(window.toolbarConfig, docViewerId).initialize();
        initUser();
        bindEvents();
        openDocument();
    }, function(reason) {
        console.error(reason);
    });
});
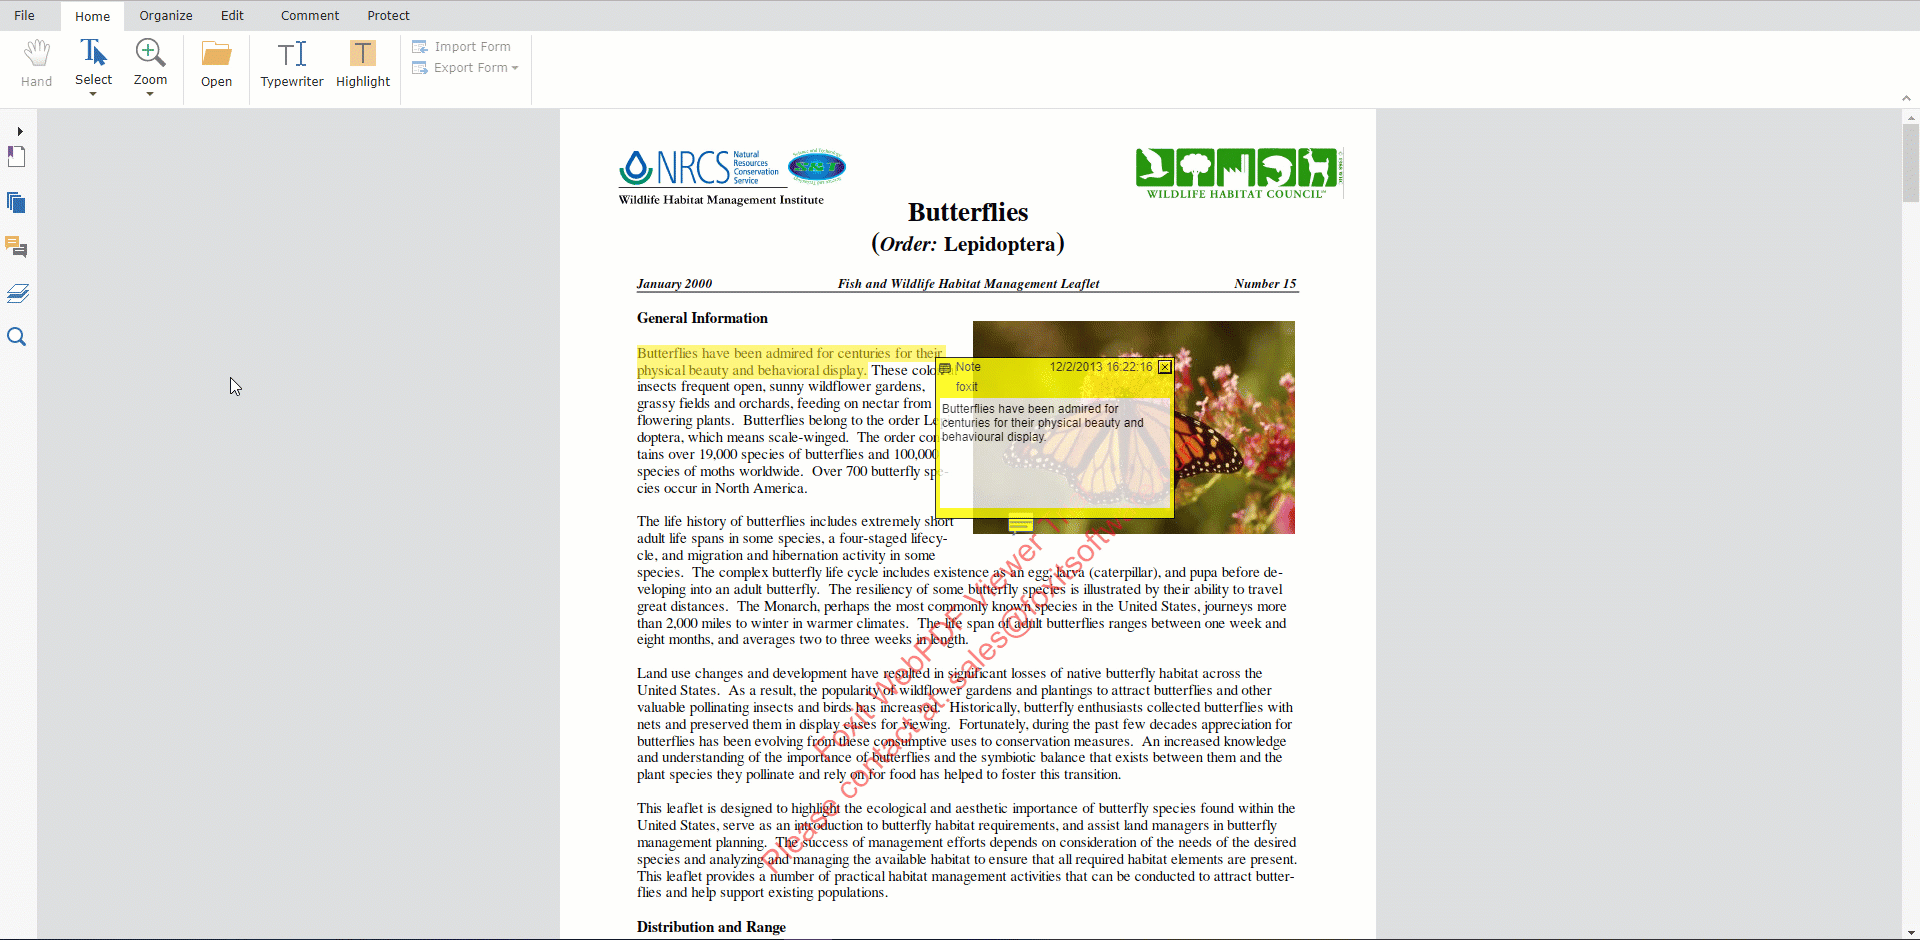
And done! Your viewer with the custom hand tool will be displayed as below:
We will go a step further and add a new button to the demo default toolbar. We will create a ‘Save User Data’ button to save whenever the PDF is changed. We will follow the same steps but with extended changes to the code.
Modifying toolbar-config.bundle.js file
Once again, we will modify the toolbar configuration file for our new button. This time, not only we will add a new handler, but we will add an entire new button. Let’s place the ‘Save’ button next to the ‘Open File’ button.
This is the default code for the ‘Open File’ configuration button:
{
            layout: 'flow',
            gap: 'md',
            sub: [{
                type: 'button',
                iconCls: 'fwr-rb-icons-32 fwr-rb-toolbar-openfile-32',
                tip: 'PCLng.ToolBar.OpenFile.OpenFile',
                tipdesc: 'PCLng.ToolBar.OpenFile.OpenFileTip',
                text: 'PCLng.ToolBar.Open',
                handler: 'openfiletab',
            }, ]
        },
Now we will add the ‘Save Button’ inside the ‘sub’ nested array. You will add the handler, type: button, the respective icon styling and other descriptions. Your toolbar config will look like this:
{
            layout: 'flow',
            gap: 'md',
            sub: [{
                type: 'button',
                iconCls: 'fwr-rb-icons-32 fwr-rb-toolbar-openfile-32',
                tip: 'PCLng.ToolBar.OpenFile.OpenFile',
                tipdesc: 'PCLng.ToolBar.OpenFile.OpenFileTip',
                text: 'PCLng.ToolBar.Open',
                handler: 'openfiletab',
            },{
                type: 'button',
                iconCls: 'fwr-rb-icons-32 fwr-rb-toolbar-save-32',
                tip: 'Save',
                tipdesc: 'Save document',
                text: 'PCLng.ToolBar.Save',
                handler: 'custom_save'
            }]
        },
Modifying Demo.js file
The toolbar configuration is done, now you’ll need to initialize the toolbar with the next ‘Save’ button and define the events. In this case, the button will automatically enable every time a change is made to the document.
We will show you two ways of using your handler to save your PDF file data:
Customizing the handler to save the data in a server
If you wish to save the PDF data to your remote server, use this code:
var optionsParams = {
        // toolbarConfig: window.toolbarConfig,
        licenseKey: window.demoLicenseKey
    };
    var docViewerId = 'docViewer';

    WebPDF.ready(docViewerId, optionsParams, false).then(function(data) {
        WebPDF.Toolbar.getRegistry().registerController('custom_save', {
            methods: {
                initialize: function(){
                    var that = this;
                    WebPDF.ViewerInstance.on(WebPDF.EventList.DOC_MODIFY_STATE_CHANGED, function(){
                        that.components.forEach(function(component){
                            if(WebPDF.ViewerInstance.isDocModified()) {
                                component.enable();
                            } else {
                                component.disable();
                            }
                        });
                        that.updateComponentsPermission();
                    });
                    that.watchPermissionChange();
                },
                handle: function(){
                    WebPDF.ViewerInstance.setModifyState(false);
                    WebPDF.ViewerInstance.exportDocumentStream(function(stream/*Uint8Array*/){
                        // upload this document stream to your remote server
                    })
                }
            }
        });
        new WebPDF.Toolbar(window.toolbarConfig, docViewerId).initialize();
        initUser();
        bindEvents();
        openDocument();
    }, function(reason) {
        console.error(reason);
    });
Customizing the handler to save into the browser storage
This method will save your changes (annotations, signatures) to your browser session storage.
WebPDF.Toolbar.getRegistry().registerController('SaveToSessionStorage', {
            methods: {
                initialize: function() {
                    var that = this;
                    WebPDF.ViewerInstance.on(WebPDF.EventList.DOC_MODIFY_STATE_CHANGED, function(){
                        that.components.forEach(function(component){
                            if(WebPDF.ViewerInstance.isDocModified()) {
                                component.enable();
                            } else {
                                component.disabled();
                            }
                        });
                        that.updateComponentsPermission();
                    });
                    that.watchPermissionChange();
                },
                handle: function() {
                    var exportAnnotAsync = WebPDF.ViewerInstance.exportAnnotsToJson();
                    var exportInkSignAsync = WebPDF.ViewerInstance.exportInkSigntoJson();

                    Promise.all([exportAnnotAsync, exportInkSignAsync]).then(function(results) {
                        var annotsJson = results[0];
                        var inkSignJson = results[1];
                        if (annotsJson) {
                            sessionStorage.setItem(WebPDF.ViewerInstance.getFileID() + '_userAnnotData', annotsJson);
                        }
                        if (inkSignJson) {
                            sessionStorage.setItem(WebPDF.ViewerInstance.getFileID() + '_userInkSignData', inkSignJson);
                        }
                        WebPDF.ViewerInstance.setModifyState(false);
                    }, function() {
                        WebPDF.ViewerInstance.setModifyState(true);
                    });

                    var formJson = WebPDF.ViewerInstance.exportFormToJson();
                    if (formJson) {
                        sessionStorage.setItem(WebPDF.ViewerInstance.getFileID() + '_userFormData', formJson);
                    }
                }
            }
        });
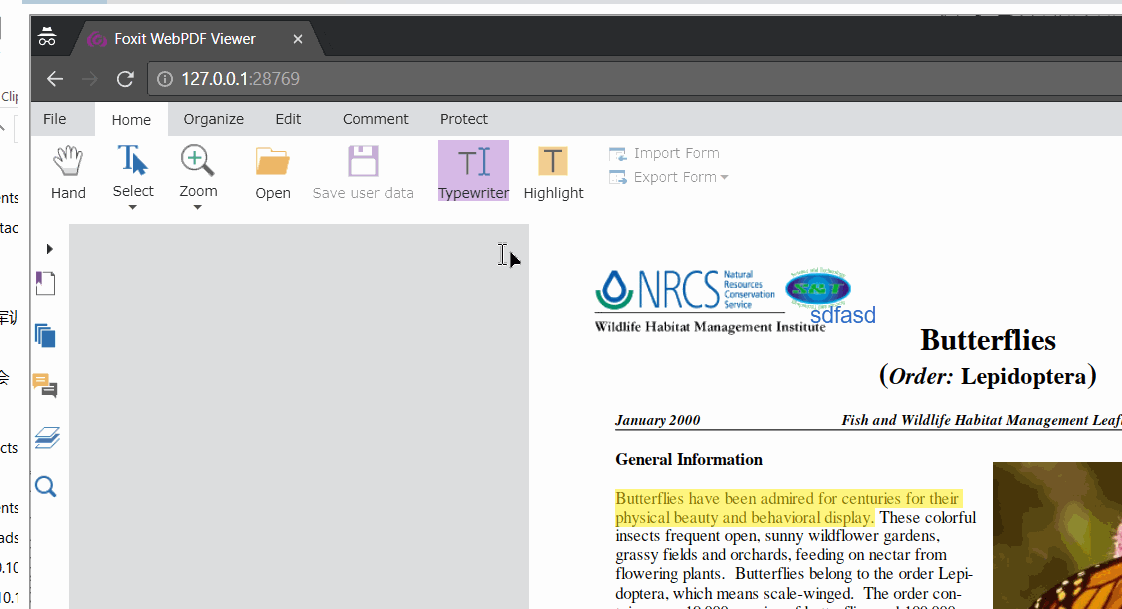
Congratulations, you have just created a custom button in your PDF SDK for Web toolbar! Once finished, it will look like this:
Updated on December 13, 2018

