Build a Custom-Text-to-Speech Tool Using a PDF SDK for Web

If your business makes frequent use of PDF files in your client-facing applications, ensure their accessibility for all types of users. Individuals who are visually impaired or have difficulty reading, for example, find text-to-speech web applications invaluable.
The Foxit PDF SDK is a lightweight, powerful library that can help you add read aloud support for your web applications. The Foxit PDF SDK takes advantage of Foxit’s signature core rendering engine and uses WebAssembly (Wasm) to power features like full-text search at lightning speeds. It ships with a PDF Viewer that can be used to display, read aloud, annotate, fill forms, and sign PDF documents.
In this article, you’ll learn how to implement a custom text-to-speech functionality for the Foxit PDF Viewer. You’ll do this in a React.js application using the Foxit SDK for web.
Setting Up the React App
This section sets up the React.js application, which is what you’ll use throughout this article. First, create a new React application using create-react-app. Then, navigate into the directory and start the local server. Find the commands below:
js
npx create-react-app foxit-text-to-speech-demo
cd foxit-text-to-speech-demo
npm start
Refer to GitHub’s instructions to install Foxit for React.
If you don’t want to set things up from scratch, simply clone the following GitHub repo and install dependencies.
bash
git clone https://github.com/vicradon/foxit-text-to-speech-demo.git
cd foxit-text-to-speech-demo
npm i
Configuring the SDK
Once you’ve installed the React app and Foxit, you need to configure your software development toolkit. This involves adding a license, a web worker for background processes, and the Foxit PDF Viewer.
Adding a License
You must have a Foxit license to use the Foxit SDK in your application, but the one provided here will work. To add a license to your application, create a license-key.js file in the src directory.
bash
touch src/license-key.js
Add the snippet below to the newly created license file:
js
(function (root, factory) {
if (typeof exports === "object" && typeof module === "object") {
module.exports = factory();
} else if (typeof define === "function" && define.amd) {
define([], factory);
} else {
var a = factory();
for (var i in a) (typeof exports === "object" ? exports : root)[i] = a[i];
}})(self, function () {
return {
licenseSN: "iiv0tcHTGWQ1eDeSWrSXT4h3fqCk4MwjWl2omqW+a2rXO5ZuYpnFnQ==",
licenseKey:
"PjwcmTawMSysb7uJGyG8Al+vUyI3/ya7Q7ZwVZMtG8/hjJJVFcM8QXmp5lUb
ED4ltJ2b8bqCHoCfDNHzqWtJBlxvhIkNci3QLoj6NE7nSSaw7vyVj6gA/QaJx
Y26kvV5z0173SXqpAw5PlPI8DyEkJFeoVIWQ3rFonZlICIGhWkim2+htaPwAX
Wv+Af8lbFWKY72Oh/tT8CE7jU6OVrx5YdxdbXfSs9DSW8cv2lhMcDopYOGlik
dXUxBhyF4fv8oHzoLT2zyVfBWCcbWHofgg7rdPVfaEt2y0gJJQCEnf/6UsWQb
guitjoqsVqSP7beorQ5QEnCHNqJ2nAKmsnarRo7uG4Ag6VJZlsjFdBWRk74oY
nHVgiG2RUMeBrdKUDWrdpPssKvIpOpFhwqP7SxwUSOzix6aEI97W7g9iASHJM
5ihj6fripXt01Lv+YjCm1P5+jqqRd0WvZEKlZxbbh/tp6AsBtt5x3QgDSf02v
gwnSDyys5BW6+9vJ0JpK8oxlTmBM6jNhpFM3g56dY0XxQGVNYIsv5PNyt88wn
7u6kZBCyzXLlmPQwvfEO6RUV2D0AU0IpFzP/09JIWXVptstolidOnabWLksPy
fXkbEw+5X+nURYmEn+Bhjuee7Epd8a+iQpn+UAUdohzshZC//qWj1aMmD8c/
98SLL6/eQIquFuFzHAUUGEsCfHFEAp+mOgfJdT6B4xwGUokvT6wz2WXfWCtJO
Jo3k6ZiYY65FWd2/SVbkRxrkdtBt1foLOzOrWKB2/kApZjkLuvB/6jrt9oRwI
1jMpYzMK5ii5u2+FTBnR+5/Yc91XZVGoBGSU4fu4eYoe53+PjW09GyHR/18zW
y5QQXsbWknByq0DCfMzTH+TM0bbSmzI8ilUG+ctqyA8/yXvzU1Ot4GvdeC4zQ
OrEi/S6swQP4CkULMB78JYV0sYGUxesCRPfD5STr5egPhig8pDslmQu2mPMPt
dkPCtL2F5rHXQ4mS2GKmLXnlSvitsgcOZCfDJM3JXlKVYEc627w/PhZuaOxE6/8
qsaTOe/M6i8NWztDS0DcjaLe1Mdg8DGm3Ot2Ka6F02TCDkHdxn1Ze262V73Z
2g+jEmDqpADRHeSUD999k3bPZlfmdy0c5N0hsuu5GWxcM56VQhW/uZMgxGc9
cZ+xPTKY7ewzCvyVqbxo1G1OS1s3f17NRbtypEkTkamZvLi9yCYSY0l7jwyM
fFDMkuds7MJXJ87hfV1oWrnyviKd3G2Xp+E",
};
});
Adding a Web Worker
Foxit uses a web worker to run background processes. Add this by creating a file called preload.js in the src directory and include the following content:
js
import preloadJrWorker from "@foxitsoftware/foxit-pdf-sdk-for-web-library/lib/preload-jr-worker";
import { licenseKey, licenseSN } from "./license-key";
const libPath = "/foxit-lib/";
window.readyWorker = preloadJrWorker({
workerPath: libPath,
enginePath: libPath + "/jr-engine/gsdk",
fontPath: "https://webpdf.foxit.com/webfonts/",licenseSN,
licenseKey,
});
Next, import the preload.js to your src/index.js to initialize the worker in React.
js
import "./preload.js"
Adding the Foxit Web Viewer
The Foxit PDF Web Viewer is a component from the Foxit PDF SDK library that mounts on a node on your React application. It allows users to view, annotate, and e-sign PDFs.
To set up the viewer, create a new folder, src/components/PDFViewer, and add an index.js file. Then add the following content:
```
js
import React, { useEffect, useRef } from "react";
import * as UIExtension from "@foxitsoftware/foxit-pdf-sdk-for-web-library/lib/UIExtension.full.js";
import "@foxitsoftware/foxit-pdf-sdk-for-web-library/lib/UIExtension.css";

export default function PDFViewer() {
  const elementRef = useRef();
  const element = elementRef.current;
  const libPath = "/foxit-lib/";

  useEffect(() => {
    const pdfui = new UIExtension.PDFUI({
      viewerOptions: {
        libPath,
        jr: {
          readyWorker: window.readyWorker,
        },
      },
      renderTo: element,
      appearance: UIExtension.appearances.adaptive,
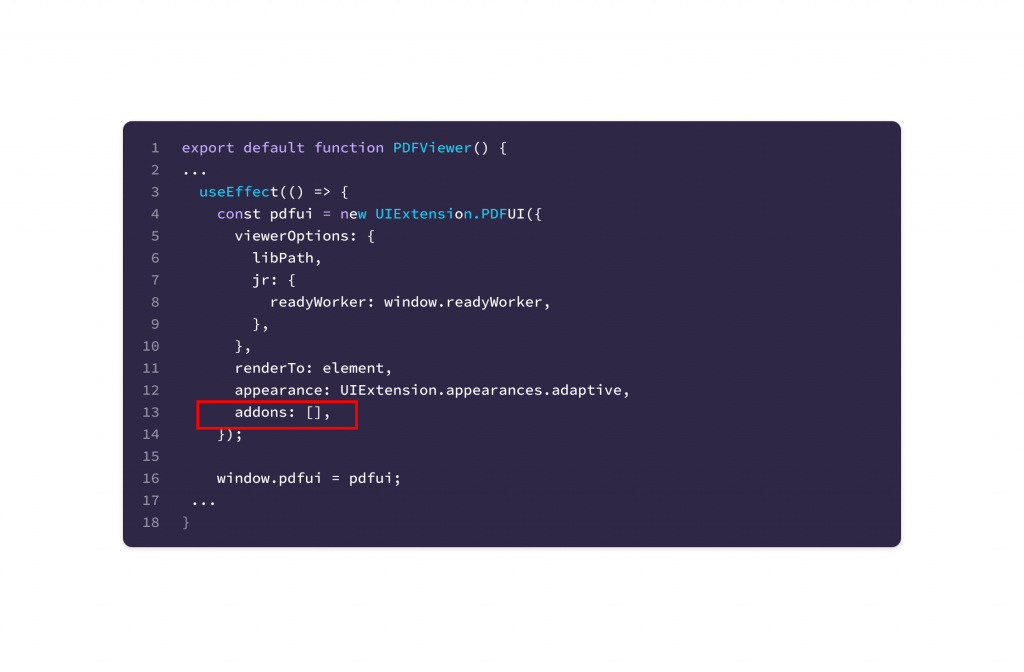
      addons: [],
    });

    window.pdfui = pdfui;

    return () => {
      pdfui.destroy();
    };
  }, []);

  return <div className="foxit-PDF" ref={elementRef} />;
}

```
This snippet above shows that the PDF Viewer component from Foxit is initialized on a DOM node, which is the variable called element.
To complete the setup, add the PDF Viewer component to src/App.js.
js
import "./App.css";
import PDFViewer from "./components/PDFViewer";
function App() {
return (
<div className="App">
<PDFViewer />
</div>
);
} export default App;
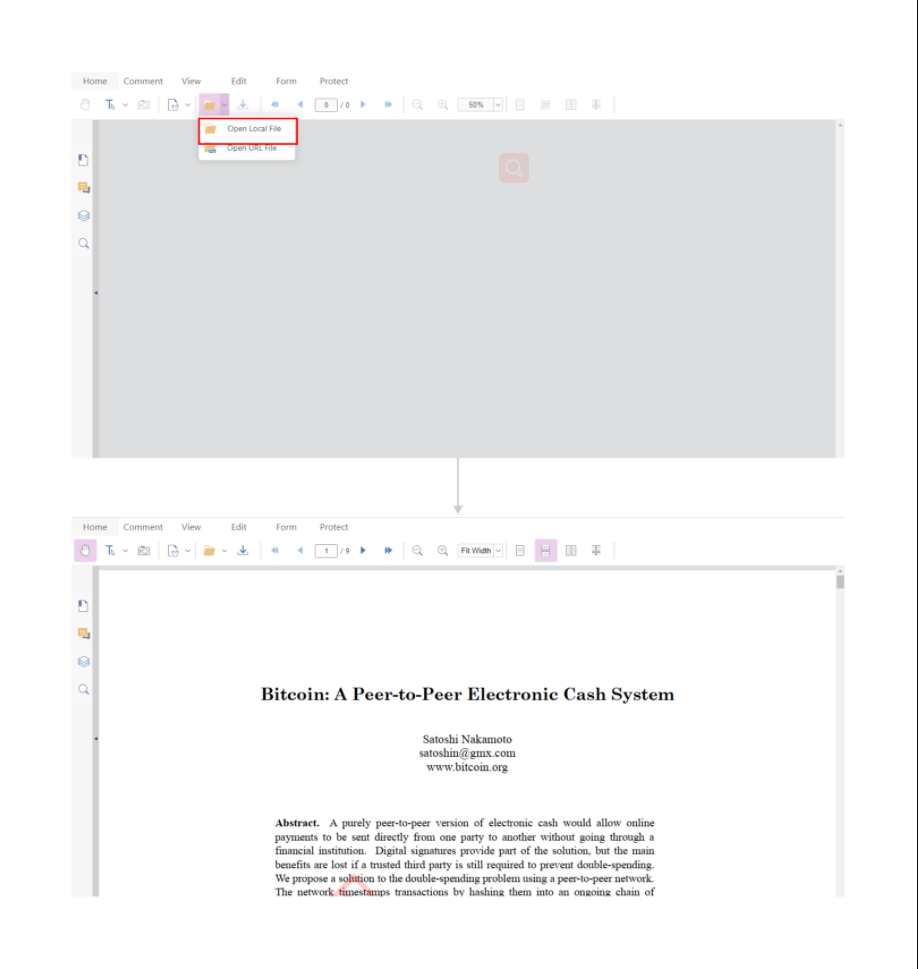
If you run your application on a browser, you should have a basic PDF viewer.

Implementing the Text-to-Speech Functionality
After adding the web viewer, you need to set up the text-to-speech functionality. Locate an addons array in the viewer PDF UI options object.

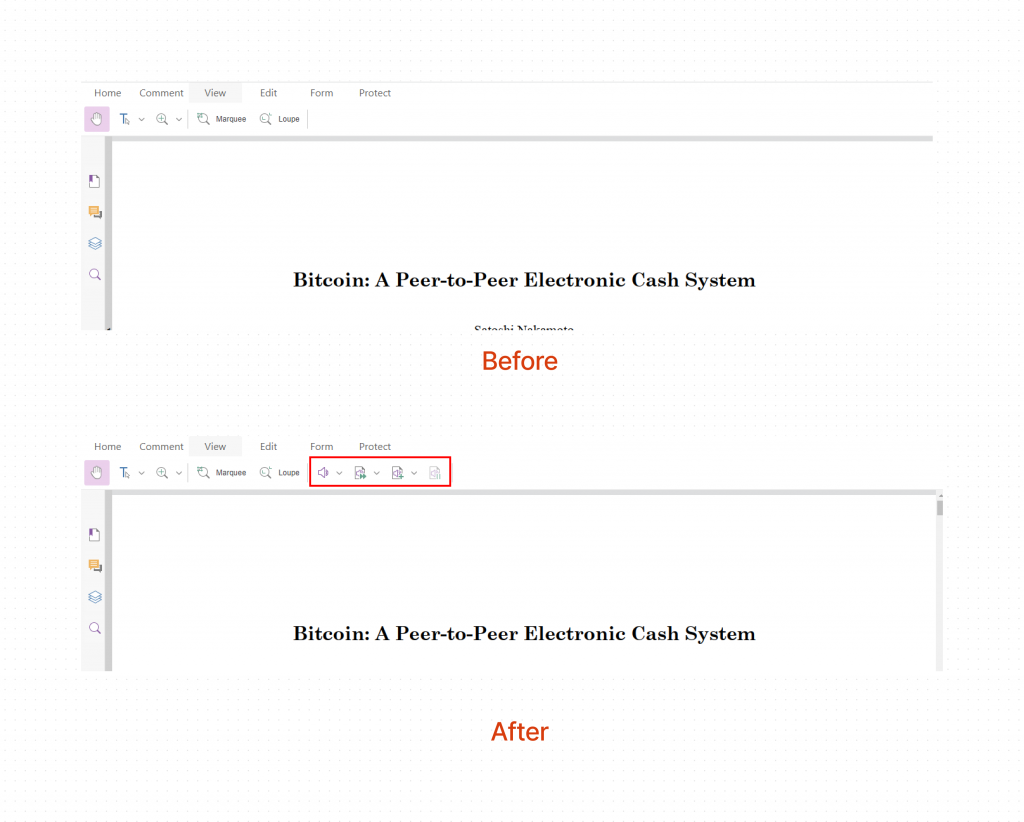
Next, add the read-aloud addon to the array of addons.
js
...
addons: [libPath + "/uix-addons/read-aloud"]
...
Check the view tab of the PDF Viewer. You should notice a set of new icons for text-to-speech.

If you activate and read the current page, you will notice that the native browser speech synthesis API has some irregularities. If you use the Bitcoin PDF, you’ll notice that it doesn’t voice it as gmx dot com and instead voices it as gmx com.
Customizing and Improving the Text-to-Speech Functionality
To fix the irregularities in speech from the synthesizer, you need to customize it. There are two ways to customize the synthesizer:
1. You can implement an interface provided by Foxit for speech synthesis. The interface, which you can call PDFTextToSpeechSynthesis, will be used as a PDF speech synthesis service.
2. You can create a custom class that inherits properties from a class defined in the Foxit PDF SDK called AbstractPDFTextToSpeechSynthesis. The custom class you define will be used as the PDF speech synthesis service.
The PDF synthesis service is a JavaScript object that extracts text from a PDF, arranges the text in-memory in a defined way, and voices the processed text. It can either be local like the current example or cloud-based using a provider like Google Cloud or Microsoft Azure.
Customizing the Native Speech Synthesizer
For this example, you will use the PDFTextToSpeechSynthesis interface to customize the default speech synthesizer. This interface defines methods such as play, pause, and resume that manage the state of the synthesizer.
js
interface PDFTextToSpeechSynthesis {
status: PDFTextToSpeechSynthesisStatus;
supported(): boolean;
pause(): void;
resume(): void;
stop(): void;
play(
utterances: IterableIterator<Promise<PDFTextToSpeechUtterance>>,
options?: ReadAloudOptions
): Promise<void>;
updateOptions(options: Partial<ReadAloudOptions>): void;
}
Implementing this interface means adding relevant code for all the placeholder properties in a JavaScript class. When set as the PDF synthesis service, it uses a for loop to chunk several words and utters each chunk as a spoken sentence.
To implement it, create a file in the PDFViewer folder called custom-speech-synthesis.js and add:
```
js
import * as UIExtension from "@foxitsoftware/foxit-pdf-sdk-for-web-library/lib/UIExtension.full.js";
const PDFTextToSpeechSynthesisStatus =
  UIExtension.PDFViewCtrl.readAloud.PDFTextToSpeechSynthesisStatus;

class CustomPDFTextToSpeechSynthesis {
  constructor() {
    this.playingOptions = {};
    this.status = PDFTextToSpeechSynthesisStatus.stopped;
  }
  supported() {
    return typeof window.speechSynthesis !== "undefined";
  }
  pause() {
    this.status = PDFTextToSpeechSynthesisStatus.paused;
    window.speechSynthesis.pause();
  }
  resume() {
    this.status = PDFTextToSpeechSynthesisStatus.playing;
    window.speechSynthesis.resume();
  }
  stop() {
    this.status = PDFTextToSpeechSynthesisStatus.stopped;
    window.speechSynthesis.cancel();
  }
  /**
   * @param {IterableIterator<Promise<PDFTextToSpeechUtterance>>} utterances
   * @param {ReadAloudOptions} options
   *
   */
  async play(utterances, options) {
    for await (const utterance of utterances) {
      const nativeSpeechUtterance = new window.SpeechSynthesisUtterance(
        utterance.text
      );
      const { pitch, rate, volume } = Object.assign(
        {},
        this.playingOptions,
        options || {}
      );
      if (typeof pitch === "number") {
        nativeSpeechUtterance.pitch = pitch;
      }
      if (typeof rate === "number") {
        nativeSpeechUtterance.rate = rate;
      }
      if (typeof volume === "number") {
        nativeSpeechUtterance.volume = volume;
      }
      await new Promise((resolve, reject) => {
        nativeSpeechUtterance.onend = resolve;
        nativeSpeechUtterance.onabort = resolve;
        nativeSpeechUtterance.onerror = reject;
        speechSynthesis.speak(nativeSpeechUtterance);
      });
    }
  }
  updateOptions(options) {
    Object.assign(this.playingOptions, options);
  }
}

export default CustomPDFTextToSpeechSynthesis;

```
The most important part of the code above is the loop that converts each word to speech. The code below shows the for loop that chunks words into groups for synthesis.
js
for await (const utterance of utterances) {
const nativeSpeechUtterance = new window.SpeechSynthesisUtterance(
utterance.text
);
After creating the CustomPDFTextToSpeechSynthesis class in the custom-speech-synthesis.js file, import it into src/components/PDFViewer/index.js and use it as a speech synthesis service.
js
...
window.pdfui = pdfui;
pdfui.getReadAloudService().then(function (service) {
service.setSpeechSynthesis(new CustomPDFTextToSpeechSynthesis());
});
return () => {
pdfui.destroy();
};
}, []);
...
Customizing the PDF Speech Synthesis Service
You can also customize the native speech synthesizer by defining a custom class and inheriting properties from Foxit’s AbstractPDFTextToSpeechSynthesis class. Unlike the PDFTextToSpeechSynthesis interface, this class doesn’t manage the state. Instead, it performs internal merging of words to utter speech.
Extending the AbstractPDFTextToSpeechSynthesis offers less precise speech synthesis than implementing the PDFTextToSpeechSynthesis interface.
To set a child class of AbstractPDFTextToSpeechSynthesis, create a file called
abstract-speech-synthesizer.js under src/components/PDFViewer and add the following:
```
js
import * as UIExtension from "@foxitsoftware/foxit-pdf-sdk-for-web-library/lib/UIExtension.full.js";

const AbstractPDFTextToSpeechSynthesis =
  UIExtension.PDFViewCtrl.readAloud.AbstractPDFTextToSpeechSynthesis;

const CustomPDFTextToSpeechSynthesis = AbstractPDFTextToSpeechSynthesis.extend({
  init() {},
  supported() {
    return typeof window.speechSynthesis !== "undefined";
  },
  doPause() {
    window.speechSynthesis.pause();
  },
  doResume() {
    window.speechSynthesis.resume();
  },
  doStop() {
    window.speechSynthesis.cancel();
  },
  /**
   * @param {string} text
   * @param {ReadAloudOptions | undefined} options
   */
  async speakText(text, options) {
    const nativeSpeechUtterance = new window.SpeechSynthesisUtterance(text);
    const { pitch, rate, volume } = Object.assign(
      {},
      this.playingOptions,
      options || {}
    );
    if (typeof pitch === "number") {
      nativeSpeechUtterance.pitch = pitch;
    }
    if (typeof rate === "number") {
      nativeSpeechUtterance.rate = rate;
    }
    if (typeof volume === "number") {
      nativeSpeechUtterance.volume = volume;
    }
    await new Promise((resolve, reject) => {
      nativeSpeechUtterance.onend = resolve;
      nativeSpeechUtterance.onabort = resolve;
      nativeSpeechUtterance.onerror = reject;
      speechSynthesis.speak(nativeSpeechUtterance);
    });
  },
});

export default CustomPDFTextToSpeechSynthesis;

```
Now, replace the import path of the CustomPDFTextToSpeechSynthesis in the
src/PDFViewer/index.js file from ./custom-speech-synthesis to
./abstract-speech-synthesizer.js.
If you test the text-to-speech feature on the React application, you’ll notice that the abstract
speech synthesizer doesn’t produce speech as distinct as one produced by the PDFTextToSpeechSynthesis interface.
Integrating Google Cloud Text-to-Speech Service
Google Cloud offers a text-to-speech service that’s more advanced than a browser’s text-to-speech service. It uses machine learning powered by Google DeepMind to synthesize speech with human-like intonation. Google Cloud Text-to-Speech offers over 200 voices in more than forty languages.
In this section, you’ll learn how to integrate Google Cloud’s Text-to-Speech service into your Foxit application.
Implementing Google Cloud Text-to-Speech Service
Before you begin, you will need a Google Cloud account and a text-to-speech service inside a project.
Once your account is ready, create a file called google-cloud-text-to-speech.js under
src/components/PDFViewer. Then add the following to it:
```
js
import * as UIExtension from "@foxitsoftware/foxit-pdf-sdk-for-web-library/lib/UIExtension.full.js";

var readAloud = UIExtension.PDFViewCtrl.readAloud;
var PDFTextToSpeechSynthesisStatus = readAloud.PDFTextToSpeechSynthesisStatus;
var AbstractPDFTextToSpeechSynthesis =
  readAloud.AbstractPDFTextToSpeechSynthesis;
var SPEECH_SYNTHESIS_URL = "<server url>"; // the server API address

var ThirdpartyPDFTextToSpeechSynthesis =
  AbstractPDFTextToSpeechSynthesis.extend({
    init: function () {
      this.audioElement = null;
    },
    supported: function () {
      return (
        typeof window.HTMLAudioElement === "function" &&
        document.createElement("audio") instanceof window.HTMLAudioElement
      );
    },
    doPause: function () {
      if (this.audioElement) {
        this.audioElement.pause();
      }
    },
    doStop: function () {
      if (this.audioElement) {
        this.audioElement.pause();
        this.audioElement.currentTime = 0;
        this.audioElement = null;
      }
    },
    doResume: function () {
      if (this.audioElement) {
        this.audioElement.play();
      }
    },
    onCurrentPlayingOptionsUpdated: function () {
      if (!this.audioElement) {
        return;
      }
      var options = this.currentPlayingOptions;
      if (this.status === PDFTextToSpeechSynthesisStatus.playing) {
        if (options.volume >= 0 && options.volume <= 1) {
          this.audioElement.volume = options.volume;
        }
      }
    },
    speakText: function (text, options) {
      var audioElement = document.createElement("audio");
      this.audioElement = audioElement;
      if (options.volume >= 0 && options.volume <= 1) {
        audioElement.volume = options.volume;
      }
      return this.speechSynthesis(text, options).then(function (src) {
        return new Promise(function (resolve, reject) {
          audioElement.src = src;
          audioElement.onended = function () {
            resolve();
          };
          audioElement.onabort = function () {
            resolve();
          };
          audioElement.onerror = function (e) {
            reject(e);
          };
          audioElement.play();
        }).finally(function () {
          URL.revokeObjectURL(src);
        });
      });
    },
    // If the server API request method or parameter form is not consistent with the following implementation, it will need to be adjusted accordingly.
    speechSynthesis: function (text, options) {
      var url =
        SPEECH_SYNTHESIS_URL + "?" + this.buildURIQueries(text, options);
      return fetch(url)
        .then(function (response) {
          if (response.status >= 400) {
            return response.json().then(function (json) {
              return Promise.reject(JSON.parse(json).error);
            });
          }
          return response.blob();
        })
        .then(function (blob) {
          return URL.createObjectURL(blob);
        });
    },
    buildURIQueries: function (text, options) {
      var queries = ["text=" + encodeURIComponent(text)];
      if (!options) {
        return queries.join("&");
      }
      if (typeof options.rate === "number") {
        queries.push("rate=" + options.rate);
      }
      if (typeof options.spitch === "number") {
        queries.push("spitch=" + options.spitch);
      }
      if (typeof options.lang === "string") {
        queries.push("lang=" + encodeURIComponent(options.lang));
      }
      if (typeof options.voice === "string") {
        queries.push("voice=" + encodeURIComponent(options.voice));
      }
      if (typeof options.external !== "undefined") {
        queries.push(
          "external=" + encodeURIComponent(JSON.stringify(options.external))
        );
      }
      return queries.join("&");
    },
  });

export default ThirdpartyPDFTextToSpeechSynthesis;

```
Import the ThirdpartyPDFTextToSpeechSynthesis into src/PDFViewer/index.js and replace
the CustomPDFTextToSpeechSynthesis with ThirdpartyPDFTextToSpeechSynthesis. See the
snippets below as a guide.
js
import ThirdpartyPDFTextToSpeechSynthesis from './google-cloud-text-to-speech.js`...
pdfui.getReadAloudService().then(function(service) {
serivce.set(new ThirdpartyPDFTextToSpeechSynthesis());
});
You should now be able to synthesize text using Google Cloud.
Conclusion
Accessibility is vitally important to keep in mind as you build web applications. Accessibility
ensures every type of user can use your application, and text-to-speech functionality in
particular allows visually impaired users to use your application.
The Foxit text-to-speech SDK is a leader in PDF manipulation and simplifies the process of making documents accessible. By leveraging the native browser text-to-speech functionality as well as a third-party service like Google Cloud, Foxit helps those with reading disabilities or users interested in listening to content on-the-go have the capability to do just that.
Author: Osinachi Chukwujama