Build Your Own PDF App Using Python and PDF SDK
Originally developed by Adobe in the 1990s, portable document format (PDF) has emerged as one of the most popular formats for electronic documents in the world. Monthly archives from Common Crawl show that PDF is second only to HTML in its crawled web content. At the PDF Technical Conference 2015, Phil Ydens, VP of Engineering for the Adobe Document Cloud, estimated that there were 2.5 trillion and growing PDF files in existence.
The wide use of the PDF standard means there’s a high probability that an app you’re planning will require PDF handling to be built in. This is especially true if your app will publish reports and invoices or distribute documentation and creative work.
In this tutorial, you’ll create a Python app that generates an HTML web page and converts it to PDF. Generally speaking, conversion from HTML to PDF is used to save web content for offline use and archiving, as the HTML format is unsuitable for these purposes. Once converted to PDF, the document maintains its original integrity while gaining additional PDF-specific features and enhancements. This makes the PDF format the preferred choice for most electronic document publishing scenarios.
What Is Foxit?
Foxit is a leading provider of innovative PDF and eSignature products and services, helping knowledge workers to increase their productivity and do more with documents. Foxit delivers easy-to-use desktop software, mobile apps, and cloud services that allow users to create, edit, fill, and sign documents through their integrated PDF Editor and eSign offerings. Foxit enables software developers to incorporate innovative PDF technology into their applications via powerful, multi-platform Software Developer Kits (SDK).
Foxit has over 700 million users and has sold to over 485,000 customers, ranging from SMBs to global enterprises, located in more than 200 countries. The company has offices all over the world, including locations in the U.S., Europe, Australia, and Asia. For more information, please visit https://foxit.com.
The Foxit PDF SDK for Windows provides a wrapper library for the Python 2 and Python 3 programming languages on the Windows operating system. For Python 3, the wrapper library is called FoxitPDFSDKPython3, and it allows the full power of the Foxit PDF SDK to be harnessed from within Python code. All PDF specific functions—including conversion from other formats to PDF, PDF forms, formatting, watermarking, annotation, digital signing, highlighting, image conversion, adding barcodes, encryption, and more—are presented by the wrapper library as a series of Python functions that are invoked as needed.
Implementing a PDF App Using Python
The following steps will show you how to use the Foxit PDF SDK in a Python Flask web app to publish a report. There are two main parts to this process:
– Publishing a report in HTML format from sample sales data in a flat file on disk
– Converting the HTML report to PDF
The full code for this tutorial can be found in this GitHub repo.
Set Up the Environment
The first step is to prepare the environment. You’ll need the following:
– A workstation or virtual machine (VM) running Windows 10; Windows 11 may work also
– (Optional) Microsoft Visual C++ Redistributable packages for 64-bit and 32-bit versions of Visual Studio 2015, 2017, 2019, and 2022
– Python 3.9 or higher
– Flask version 2.2.2 or higher
– Other required Python libraries
– Visual Studio Code or another code editor
Because you’ll be using the Python wrapper library for the Foxit PDF SDK for Windows, you must first have Windows 10 installed on the workstation or VM to continue. The code and environment setup in this tutorial have not been tested on it, but Windows 11 may also work.
Once Windows 10 is up and running, you can optionally download and install the Microsoft Visual C++ Redistributable. This may not be necessary, but some Python libraries may not work if it isn’t installed.
Next, consult the Python documentation for instructions on how to download and install Python on Windows. Python 3.9 is preferred, but a more recent version may work as well. Installing Python using the provided instructions also installs pip, the Python package manager. You’ll also need to manually add Python and pip to the system path.
The Foxit PDF SDK prefers a single version of Python on the system, as well as python3 being the default executable for Python 3. You can guarantee the latter by creating a symbolic link on the Windows command line, making sure to put in the real path to the installed instance of python.exe:
bash
mklink "X:\path\to\Python\Python39\python3.exe" "X:\path\to\Python\Python39\python.exe"
The first parameter above is the symbolic link, and the second is the link’s target directory. Note that the only difference between the two is the actual name of the executable. If properly created, using the command python3 –version on the command line should give something similar to the following:
bash
X:\scripts>python3 --version
Python 3.9.0
The next step is to install Flask, a micro web framework written in Python. The Flask documentation lists the instructions, but installing Flask is usually as simple as issuing the following command:
bash
pip install Flask
Next, install the Python wrapper library for the Foxit PDF SDK:
bash
pip install FoxitPDFSDKPython3
Also install all of the other Python libraries that will be needed:
bash
pip install cryptography
pip install pyOpenSSL
pip install pywin32
pip install uuid
pip install pandas
The first four third-party libraries are needed by the SDK, while pandas will be used to extract and manipulate rows from a CSV file.
Finally, download a code editor that recognizes Python syntax. This tutorial uses VS Code.
Create the Flask App
It’s now time to begin writing the Flask app. The app requires two additional items that can only be provided by Foxit: the license information (the sn and the key) and the PDF to HTML engine files package.
Download the Python Library version of the Foxit PDF SDK for Windows:
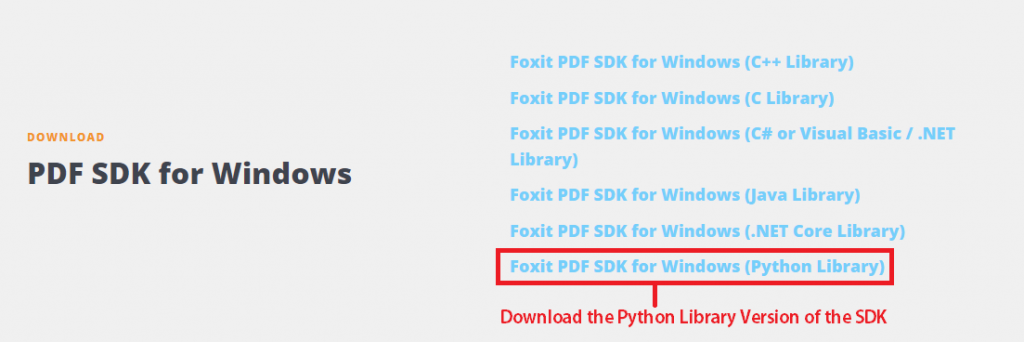
You already installed the Python wrapper library for the SDK via pip, but the downloaded ZIP archive will contain the sn and the key that you need. Note that this is a limited trial version of the SDK for development only, and you’ll need to contact Foxit if you need a production license.
The next critical piece that isn’t provided in the SDK is the HTML to PDF engine files package, which will be used by the PDF SDK to convert the HTML page to PDF format. Specifically, you’ll require the fxhtml2pdf.exe file and its dependencies. The only way to get this package is to create a support ticket with the Foxit Support Center, indicating that you’re working on a Python web app and need the fxhtml2pdf.exe engine to test the HTML to PDF function. The support engineers are usually responsive and should get back to you in a day or two with a link to a ZIP archive with the required files. Keep in mind that the copy you’ll receive is an evaluation version; you’ll have to pay for a production license if you intend to use this commercially.
You’re now going to build out the app by adding functionality.
Initialize the Foxit PDF SDK
The first thing the app should do is initialize the Foxit PDF SDK in order to ensure that the SDK loads properly in the app.
The Flask quickstart guide gives a great overview of the framework features that will be used, including debug mode, routing, HTTP methods, and rendering templates. Please consult the guide for further explanations.
Locate the gsdk_key.txt and gsdk_sn.txt files in the ZIP archive you downloaded. They should be in the FoxitPDFSDKPython2 subfolder or similar. Retrieve the sn and key values from these files and keep them handy:
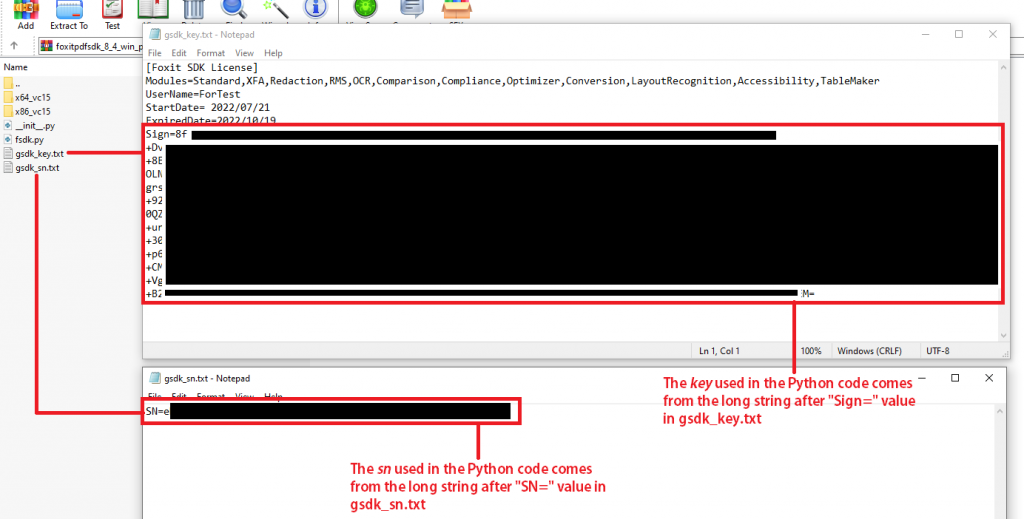
Next, create a new folder for your Python app. In that folder, create a new Python file called app.py and a subfolder called templates. In templates, create another new file called loadSDK.html. Flask will also automatically create a __pycache__ folder for your project. When complete, the folder structure should look like the following:

Add the following code to your app.py file to initialize the SDK:
python
from flask import Flask
from FoxitPDFSDKPython3 import *

app = Flask(__name__)

sn = r"XXXXXXXXXXXXXXXXXXXXXXXXXX"
key = r"XXXXXXXXXXXXXXXXXXXXXXXXXX"
key =  key + r"XXXXXXXXXXXXXXXXXXXXXXXXXX"
key =  key + r"XXXXXXXXXXXXXXXXXXXXXXXXXX"
key =  key + r"XXXXXXXXXXXXXXXXXXXXXXXXXX"
key =  key + r"XXXXXXXXXXXXXXXXXXXXXXXXXX"
key =  key + r"XXXXXXXXXXXXXXXXXXXXXXXXXX"
key =  key + r"XXXXXXXXXXXXXXXXXXXXXXXXXX"
key =  key + r"XXXXXXXXXXXXXXXXXXXXXXXXXX"
key =  key + r"XXXXXXXXXXXXXXXXXXXXXXXXXX"
key =  key + r"XXXXXXXXXXXXXXXXXXXXXXXXXX"
key =  key + r"XXXXXXXXXXXXXXXXXXXXXXXXXX"
key =  key + r"XXXXXXXXXXXXXXXXXXXXXXXXXX"
key =  key + r"XXXXXXXXXXXXXXXXXXXXXXXXXX"
key =  key + r"XXXXXXXXXXXXXXXXXXXXXXXXXX"
key =  key + r"XXXXXXXXXXXXXXXXXXXXXXXXXX"
key =  key + r"XXXXXXXXXXXXXXXXXXXXXXXXXX"

@app.route('/')
def initPdfSdk():
    sdkloaded = None
    code = Library.Initialize(sn, key)
    if code != e_ErrSuccess:
        sdkloaded = False
    else:
        sdkloaded = True
    return render_template("loadSDK.html", sdkloaded = sdkloaded)
The code above begins with the mandatory imports for Flask and the Foxit PDF SDK (FoxitPDFSDKPython3). You should substitute the sn and key values in the above code with the values retrieved from the ZIP archive. Here, the very long key value is broken up into pieces and appended in sequence for readability.
The @app.route(‘/’) decorator tells the Flask framework the specific URL that will trigger the function defined immediately after it, which in this case is initPdfSdk().
The Library.Initialize() function will load the SDK, but it will only be successful if the sn and key are valid and correctly transcribed. If the return value from this call isn’t equal to e_ErrSuccess, then the SDK will fail to load and you’ll need to retrace your steps. Remember that this is an evaluation copy of the license, so it will expire after the ExpiredDate indicated in the gsdk_key.txt file.
The render_template() function is used to pass template variables like sdkloaded from the backend Python code to loadSDK.html.
The loadSDK.html file is a Jinja2 template file. Jinja templates are text files that can generate HTML or other types of file formats. The Jinja2 template engine is part of the Flask framework, and you can learn about using the engine in the official documentation.
Here, the loadSDK.html file serves as the frontend of the web app and should contain the following code:
html
<!DOCTYPE html>
<html>
<!-- code omitted -->
  <body>
    {% if sdkloaded == True %}
      <h1 style="color: #0e0c36">⚡Foxit PDF SDK loaded successfully!⚡</h1>
      <h2 style="color: #f36b16">Welcome To The PDF App</h2>
      <a href={{url_for('selectFile')}}>CONTINUE</a>
    {% elif sdkloaded == False %}
      <h1 style="color: #0e0c36">
        ❌Foxit PDF SDK was not loaded. Verify the SN and KEY.❌
      </h1>
    {% else %}
      <h1 style="color: #0e0c36">
      ❓Foxit PDF SDK not found. Ensure the Python Library was installed
      with pip and included in the import statement.❓
      </h1>
    {% endif %}
  </body>
</html>
You’ll notice that the loadSDK.html file contains the usual HTML syntax and also some Jinja2 syntax delimited by the {% … %} construct. This template file conditionally renders a message that indicates if the SDK loaded properly or not.
Going forward, all HTML files will be created in the templates folder.
If the SDK loads properly, the application title, a welcome message, and a link to continue are displayed.
Flask apps are executed for debugging with the following command:
bash
flask --debug run
When this command executes, you should see:
shell
X:\PYTHON_APP>flask --debug run
 * Debug mode: on
WARNING: This is a development server. Do not use it in a production deployment. Use a production WSGI server instead.
 * Running on http://127.0.0.1:5000
Press CTRL+C to quit
 * Restarting with stat
 * Debugger is active!
 * Debugger PIN: 999-999-999
The app will now be available for testing at the http://127.0.0.1:5000 address. If all goes well, you should see the following text on the web page:

Generate a Report in HTML Format
You’ll now add functionality to read rows from a CSV file containing financial data and generate an HTML page with the rows formatted as a table.
The financial data set you’ll use is the Supermarket sales data set from Kaggle. Download the ZIP archive and extract the supermarket_sales – Sheet1.csv file to a convenient location on your workstation.
You’ll add one route and two additional functions to the app.py file at this stage: selectFile() and loadRowsToHtml(). The CONTINUE link on the first page of the app links to the /loadData URL and triggers the selectFile() function.
The following is the code for the selectFile() function that renders the HTML template:
python
# code snippet
@app.route('/loadData')
def selectFile():
    sdkloaded = None
    code = Library.Initialize(sn, key)
    if code != e_ErrSuccess:
        sdkloaded = False
    else:
        sdkloaded = True
    return render_template("selectFile.html", sdkloaded = sdkloaded)
#code snippet
The selectFile() function verifies that the SDK is loaded and allows the user to browse the file system for the supermarket_sales – Sheet1.csv file. The template file selectFile.html, which lives in the templates folder, will present an HTML form with a Choose File button (that only allows CSV files to be selected by default) and a submit button labeled LOAD ROWS.
This is the code in the selectFile.html template file:
html
<!DOCTYPE html>
<!-- code omitted -->
  <body>
    <h2 style="color: #f36b16">SELECT CSV FILE:</h2>
    <form method="POST" action="" enctype="multipart/form-data">
      {% if sdkloaded == True %}
      <p><input type="file" name="fin_file" accept=".csv" /></p>
      <p><input type="submit" value="LOAD ROWS" /></p>
      {% endif %}
    </form>
  </body>
</html>
This is the page that the user will see:

This app is designed to only work with the Supermarket sales CSV data set from Kaggle. Once you locate the CSV file, click LOAD ROWS to trigger the other function loadRowsToHtml():
python
@app.route('/loadData', methods = ['POST'])
def loadRowsToHtml():
    sdkloaded = None
    code = Library.Initialize(sn, key)
    if code != e_ErrSuccess:
        sdkloaded = False
    else:
        sdkloaded = True

    file_to_convert = request.files['fin_file']
    if file_to_convert.filename != '':
        file_to_convert.save(file_to_convert.filename)
        df = pd.read_csv(str(file_to_convert.filename),
                        nrows=300,
                        usecols=["Invoice ID", "Product line", "Unit price","Quantity","Total","Date"],
                        parse_dates=["Date"])
        total_sales = df["Total"].sum()
        total_sales = "$ {:,.2f}".format(total_sales)
        with open('styles.txt', 'r') as myfile: styles = myfile.read()
        htmlfile = open("export.html","w")
        htmlfile.write("""<!DOCTYPE html>
                        <html>
                        <head>{1}</head>
                        <body>
                        <div class="resultTable">
                        <h1 style="color: #f36b16">SALES REPORT 2019</h1>
                        <h2 style="color: #f36b16">Total Sales = {3}</h1>
                        <h3 style="color: #f36b16">Extracted from: {2}</h3>
                        {0}
                        </div>
                        </body>
                        </html>""".format(df.to_html(classes="resultTable"),
                                            styles,
                                            str(file_to_convert.filename),
                                            total_sales))
        htmlfile.close()

    return render_template("loadToHtml.html",
                            filename = str(file_to_convert.filename),
                            preview_rows = df,
                            sdkloaded = sdkloaded,
                            total_sales = total_sales)
The loadRowsToHtml() function first checks that the SDK is loaded, as usual. Then, it receives the fin_file variable that is passed to it via the POST request from the selectFile() function. It saves a copy of the CSV file in the root of the app folder (in the same folder as the app.py file).
The rows are read into a pandas DataFrame (df). Only five of the columns and 300 rows are read into the DataFrame df for demonstration purposes. When you run the code, feel free to read all the rows from the CSV file.
This is financial data, so it makes sense to calculate the total sales as total_sales.
Recall that the aim is to export the rows to an HTML file, as an HTML table is the best option to display the rows in a structured and readable manner. The code creates a file called styles.txt in the app root folder to contain the CSS table styles.
The format() function is used to construct the HTML code by using placeholders to insert the DataFrame df as HTML, the table styles, the filename, and the total_sales into a string that will be written to a new file on disk called export.html.
The render_template() function passes several variables to the loadToHtml.html template file to enable it to render a preview of the export.html file in the browser. Below is the code of the loadToHtml.html file:
html
<!DOCTYPE html>
<html>
<!-- code omitted -->
  </head>
  <body>
    <p>
      {% if sdkloaded == True %}
        <a href={{url_for('selectFile')}}>CONTINUE TO GENERATE PDF</a>
        <h1 style="color: #f36b16">SALES REPORT 2019</h1>
        <h2 style="color: #f36b16">Total Sales = {{ total_sales }}</h1>
        <h3 style="color: #f36b16">Extracted from: {{ filename }}</h3>
        <p>{{ preview_rows.to_html(classes="resultTable") | safe}}</p>
      {% endif %}
    </p>
  </body>
</html>
The expression {{ preview_rows.to_html(classes=”resultTable”) | safe}} means that the string expression to the left of the reserved word safe won’t be automatically escaped, which is the default behavior in Jinja templates.
If all goes well, when you click the LOAD ROWS button and the loadRowsToHtml() function is executed, loadToHtml.html will render a preview of the export.html file in the browser along with a link that will take you to the third and final function to be added to the app:
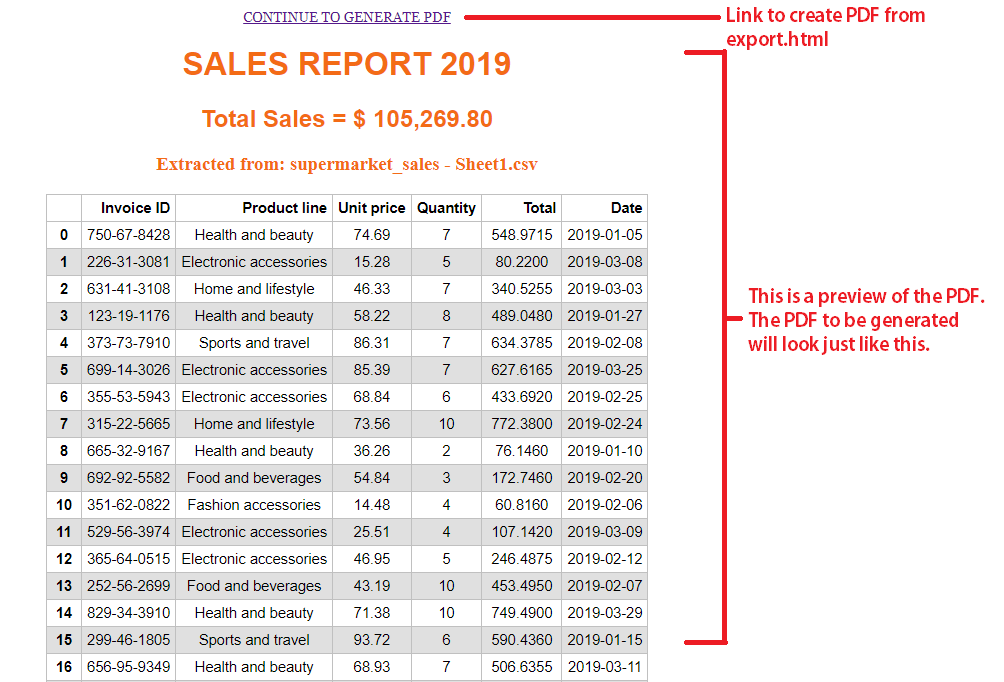
Generate a Report in PDF Format
This is where you invoke the Foxit PDF SDK HTML to PDF functionality to convert the HTML to PDF.
Once the CONTINUE TO GENERATE PDF link is clicked, it will trigger the htmlToPdf() function:
python
@app.route('/generatePDF')
def htmlToPdf():
    sdkloaded = None
    code = Library.Initialize(sn, key)
    if code != e_ErrSuccess:
        sdkloaded = False
    else:
        sdkloaded = True

    html = "X:/path/to/export.html" #change this
    output_path =  "X:/path/to/Report2019.pdf" #change this
    engine_path = "X:/path/to/fxhtml2pdf.exe" #change this
    cookies_path = ""
    time_out = 50

    pdf_setting_data = HTML2PDFSettingData()
    pdf_setting_data.page_height = 640
    pdf_setting_data.page_width = 900
    pdf_setting_data.page_mode = 1
    pdf_setting_data.scaling_mode = 2

    Convert.FromHTML(html, engine_path, cookies_path, pdf_setting_data, output_path, time_out)

    doc = PDFDoc("Report2019.pdf")
    error_code = doc.Load("")
    if error_code!= e_ErrSuccess:
        return 0

    settings = WatermarkSettings()
    settings.flags = WatermarkSettings.e_FlagASPageContents | WatermarkSettings.e_FlagOnTop
    settings.offset_x = 0
    settings.offset_y = 0
    settings.opacity = 50
    settings.position = 1
    settings.rotation = -45.0
    settings.scale_x = 8.0
    settings.scale_y = 8.0

    text_properties = WatermarkTextProperties()
    text_properties.alignment = e_AlignmentCenter
    text_properties.color = 0xF68C21
    text_properties.font_style = WatermarkTextProperties.e_FontStyleNormal
    text_properties.line_space = 2
    text_properties.font_size = 14.0
    text_properties.font = Font(Font.e_StdIDTimesB)
    watermark = Watermark(doc, "CONFIDENTIAL", text_properties, settings)

    nPageCount = doc.GetPageCount()
    for i in range(0, nPageCount):
        page = doc.GetPage(i)
        page.StartParse(PDFPage.e_ParsePageNormal, None, False)
        watermark.InsertToPage(page)
    doc.SaveAs("Report2019.pdf", PDFDoc.e_SaveFlagNoOriginal)

    print("Converted HTML to PDF successfully.")

    success = True

    return render_template("generatePDF.html", sdkloaded = sdkloaded, success = success )
After ensuring the SDK is loaded properly, several important variables are defined:
– html: The path to the export.html file generated in the previous step, which defaults to the same path as app.py (application root). This needs to be changed to the path on your local workstation.
– output_path: The path the PDF file will be generated to, which defaults to the same path as app.py (application root). This needs to be changed to the path on your local workstation.
– engine_path: The path to fxhtml2pdf.exe, which is the HTML to PDF engine files package provided by Foxit. This must exist for the app to do its job. Once you’ve received the package, set this value and extract it to the engine folder, which is in the same path as app.py (application root).
– cookies_path: The path to the cookies file exported from the URL to convert. This is going to be left empty this time because the HTML page is generated locally.
– time_out: The time in seconds to wait for loading the web page. The HTML page is generated locally, so it should rarely exceed this value unless it’s a large web page.
Next, the dimensions of the PDF file to be created are set. The PDF will be created as a multipage document with the contents rendered big enough to read.
The Convert.FromHTML() method is called, which will convert the HTML file to PDF. When this executes, there will be a new file in the root folder called Report2019.pdf.
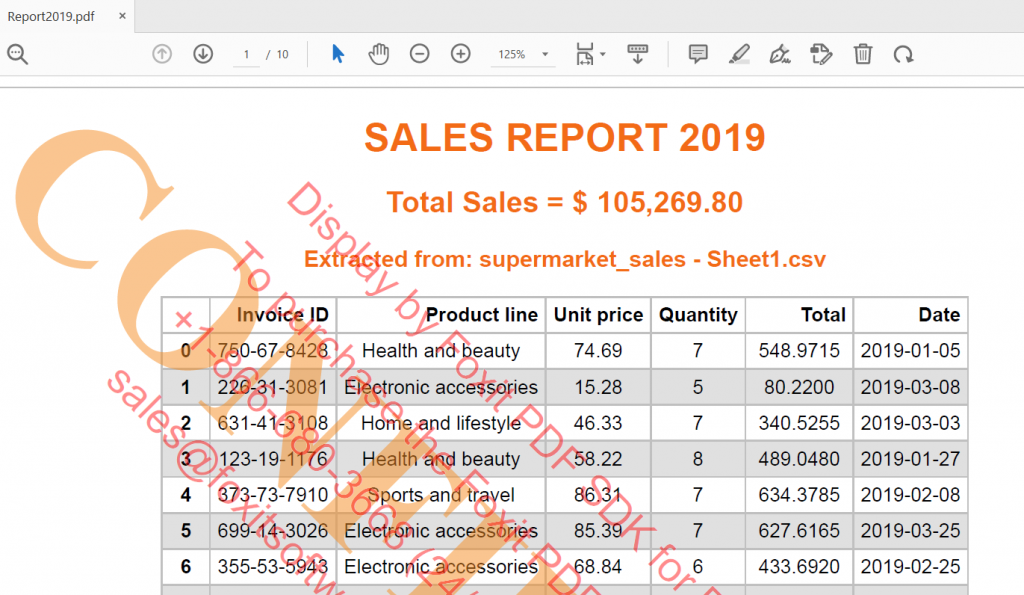
After its initial creation, the PDF file is again reloaded using the PDFDoc() method so that a watermark can be added on each page. The watermark settings such as location, size, and opacity are configured first, followed by the watermark color, font size, and text. In this case, the text CONFIDENTIAL will be written diagonally across the middle of each page.
The watermark is added to each page one by one using the Watermark() and watermark.InsertToPage() methods. Finally, the PDF is saved again with the new changes, overwriting the previous file with the same name.
If all goes well, you should see a success message on the next template page (generatePDF.html) after a few minutes:
html
<!DOCTYPE html>
<html>
  <!-- code omitted -->
  <body>
    {% if success == True %}
    <h3 style="color: #f36b16">
      PDF SUCCESSFULLY GENERATED TO Report2019.pdf IN APPLICATION ROOT
    </h3>
    {% endif %}
  </body>
</html>
When rendered in the browser, it will look like the following:

The new PDF file with watermarks will be in the application root folder, meaning in the same folder as the app.py file. Here is a preview:
In the end, this is what the root of the app folder should look like:

Wrapping Up
You just created a PDF app using Python and the Foxit PDF SDK. Congratulations! You learned:
– How to create a Flask web app and make use of Jinja2 templates to render HTML in the browser
– How to check if the Foxit PDF SDK is loaded properly
– How to publish an HTML file from a CSV file using the pandas library
– How to generate a PDF file from an HTML file using the Foxit PDF SDK
– How to add watermarks to a PDF document using the Foxit PDF SDK
This article explored only a fraction of the full potential of the PDF SDK. To learn more, the Developer Guide details all the other capabilities of the Foxit PDF SDK. Sample code and demos are also available for most popular platforms and programming languages.
Foxit’s PDF SDK is prolific indeed. Regardless of the use case, you’ll find that it’s more than sufficient to meet your PDF handling needs. Be sure to check out Foxit’s official website. Thanks for reading!
Author: Khaleel O’Brien