Create an Automated File Merging Service Using Foxit PDF SDK
In addition to saving paper, one of the best aspects of working exclusively with electronic documents is convenience. There are so many efficient ways to manipulate and manage text files. To further streamline your workload, you can also automate tasks such as file merging.
If you need to combine attachments from emails or direct messages, add pages to a resume, or combine loose notes into a single document, you can use a background merging service to do this without ever editing the files directly.
This tutorial will explain the benefits of a file merging service and demonstrate how to create one using Foxit’s .NET PDF SDK.
To follow along with the tutorial, check this repository.
Contents
What Is an Automated File Merging Service?
A file merging service is a program or background application that automatically combines files after an event activates it. This event can be time or operation-based. For instance, you could configure the service to scan a directory for new files at a certain time during the day.
If the service finds new files in the directory, it automatically combines them into a single file. It can also delete the original unmerged files. Alternatively, the file merging service can feature a directory listening mechanism that activates when a file is added to a specific folder.
There are several common use cases for a file merging service.
Managing Invoices
Your business may require you to email multiple sales invoices to a single client. It would be better to send these invoices in a single file instead of as multiple files that their email client would most likely compress into a ZIP file. An automatic file merging service would combine the invoices into a single file, making sending or printing them easier.
Archiving Files
If you have a folder of old files that are no longer in use, you can merge and store them in a single file that’s easier to analyze for key information. It’s also easier to delete once it’s obsolete. Of course, you don’t have to merge all the files into one file. You can merge them into separate files by year or date.
Signing Documents
Lawyers and real estate agents, among others, regularly work with a lot of digital paperwork related to multiple parties. For instance, some contracts may require signatures from a buyer, a seller, and a third party.
You must send separate copies or pages of these contracts to each of these entities. Once they return the documents with their signatures, you must merge them. An automatic merging service would make this process more efficient.
One solution to build such a merging service is to use Foxit.
Creating a File Merging Service with Foxit
This tutorial will show you how to use the Foxit PDF SDK to create and implement a custom automated file merging system. The service will monitor a directory for changes—specifically, for files added. If it finds any new PDF files in the folder, it will merge them into a single file.
The tutorial uses C# (.NET) as a programming language and Microsoft Windows (10/11) as a target operating system. However, you can adapt it to nearly any language or platform that allows you to develop services for Windows.
Prerequisites
You’ll need the following for this tutorial:
* Microsoft Visual Studio: Ideally, you should use the latest version of the community edition, but any version from the past decade should work.
* Foxit .NET PDF SDK: You can use NuGet to download the library and add a reference to the project. However, consider downloading the SDK from Foxit’s official download page so that you can get the license files (gsdk_sn.txt and gsdk_key.txt).
Creating the Project
First, you need to create a directory listener. You’ll then implement a function that merges files after the directory listener detects changes to the folder structure.
Click the Create a new project button on the Visual Studio start-up screen. Alternatively, you can create a new project by using the File menu.
Search for Service in the list of project types, then select the C# version of the Windows Service (.NET Framework) from the list and click Next:

Name the project FoxitPDFMerger and select which folder you’d like to place it in. You can also choose which version of the .NET Framework you would like to use. Then, click on Create:

Right-click Service1.cs under the Solution Explorer and select Rename from the context menu. Name it PDFMergingService.cs. Visual Studio will display a confirmation pop-up dialog. Click the Yes button.
Lastly, click the Service’s design tab in the main Window panel (where it says PDFMergingService.cs [Design]):

Adding the Foxit PDF SDK to the Project Using NuGet
Click the Tools menu and hover over NuGet Package Manager. Select Manage NuGet Packages for Solution…:

Make sure you’re on the Browse tab and that Package source is set to All. Use the search field to look for Foxit.SDK.Dotnet and select the first result that matches it, then tick the checkbox next to your project under the list of open projects.
Finally, select the latest stable release of the SDK from the drop-down box and click the Install button:

Visual Studio should launch a screen previewing the changes. Click OK and wait for Visual Studio to download and configure the library.
Configuring the Solution Platform
In Visual Studio, click the Build menu, then select Configuration Manager… and choose <New…> from the Active solution platform drop-down menu:

Select the platform that matches the Foxit SDK’s intended architecture for your machine, tick the option marked Create new project platforms, then click OK:

Close the Configuration Manager.
Adding Functionality to the Service
Right-click the PDFMergingService.cs file in the Solution Explorer and select View Code from the context menu:

Follow these steps for your code:
* Import the necessary namespaces and classes into the project, then create class variables and attributes for the service to function correctly—mainly, a FileSystemWatcher to monitor your directory and a Timer for polling.
* Initialize and configure the FileSystemWatcher in the service constructor. Make sure to place this code between try…catch statements. Your code should handle any IO exceptions that the FileSystemWatcher may throw.
* Next, add an OnChanged event handler that’s triggered when a file is added to a monitored directory. This method is where your service’s key functionality goes. Initialize the Foxit SDK in the OnChanged method using your license keys and use the Directory class to fetch the paths of all the PDFs in the folder.
* Check if your file path array is empty before merging. Instantiate a CombineDocumentInfoArray object to tell the Foxit SDK’s Combination module which files to concatenate.
* Set an output path for your combined PDFs, then set the CombineDocsOptions to select which attributes will be merged from the original documents.
* Create a for loop that appends all the PDF file paths to your CombineDocumentInfoArray. Use the Combination class’s StartCombineDocuments method to combine the documents. It will return a Progressive object, which you can use to determine the progress of the merging process.
Your code should resemble the following:
csharp
using System;
using System.Collections.Generic;
using System.ComponentModel;
using System.Data;
using System.Diagnostics;
using System.Linq;
using System.ServiceProcess;
using System.Text;
using System.Threading.Tasks;
//Add the following namespaces from Foxit library
using foxit.pdf;
using foxit.common;
using System.IO; //For file watcher class
using System.Timers; //For Timer class
namespace FoxitPDFMerger
{
    public partial class PDFMergingService : ServiceBase
    {
        //Create a new filesystem watcher object to listen for changes in the PDF directory
        FileSystemWatcher watcher;
        //Hard-code the folder path for filesystem watcher
        private static String path = "C:\\downloads";
        Timer timer = new Timer(); //Create a new Timer for service polling
        public PDFMergingService()
        {
            try
            {
                watcher = new FileSystemWatcher(); //Initialize the filesystem watcher
                watcher.IncludeSubdirectories = false; //Watch for changes in the immediate folder
                watcher.Path = path; //Set path
                //Set types of file attributes to listen for. You can optimize this list accordingly.
                watcher.NotifyFilter = NotifyFilters.Attributes |
                NotifyFilters.CreationTime |
                NotifyFilters.DirectoryName |
                NotifyFilters.FileName |
                NotifyFilters.LastAccess |
                NotifyFilters.LastWrite |
                NotifyFilters.Security |
                NotifyFilters.Size;
                watcher.Filter = "*.pdf"; //Set filter to PDFs
                //Assign an event handler to monitor the directory
                watcher.Changed += new FileSystemEventHandler(OnChanged);

                //Allow the watcher to raise events
                watcher.EnableRaisingEvents = true;
            }
            catch (IOException e)
            {
                Console.WriteLine("A Exception Occurred :" + e);
            }
            catch (Exception oe)
            {
                Console.WriteLine("An Exception Occurred :" + oe);
            }
            InitializeComponent();
        }
        public void OnChanged(object source, FileSystemEventArgs e)
        {
            try
            {
                //Initialize Foxit SDK Library
                //You can find the "sn" parameter in gsdk_sn.txt (the string after "SN=")
                //You can find the "key" parameter in gsdk_key.txt (the string after "Sign=")
                string sn = "hrBJizJACria7/Su9tny8LDEswtXOF72Ir/48Ufy8EK6CPvyFbyH1w==";
                string key = "8f0YFcONvRkN+ldwlpAFW0NF+Q/jOhOBvj26/zxAesuepbv1tfFx4BIOZ+JmjBCKyf2Eg0z6HxMFo1CEybQs/zwgZ/mEdwb3fmyk9wxo4N6uU31YKjEO/Lqm9RsgOPTnD98IK4XZlOPhkApEaRP+1B4P4cBLglhaHTjAH18NSeTe+9AHUUsNvrQ8IPlXrkaQEOo1saDGaBKxB2mKyhc/+Ho30bGUcmScR0xnydcXG513bDLW8zwj3tXOIcVpRA5AQf0/i4fifWebLsApc5lGjZOqMBI0BIGT1B4EROrJBX4GOjK5lXdNhG5iEQYDlIldKeYGojrMmQ6vFPQHW+3rAhxO4hMA6/Iidf2CPzGibgvU0mezuol1xLoUGEpN7i3AO7izaB5sM3T95Em9Q/NcOoZO1v6cxJvWkxSLD3nXXKawgQ2G9Q3BaD7gz0fQhQQUFYwIZg14t7c0AtbY0h5wYAvNySDzMR126UtlrhKH7jxuB7Ie9gs2iuTVOZh2pvofPLGvWS/07hfEmbHjCDsi2aIvI93hM8cd95FZZLyv84pDbVw83bXdQsTojHPyfKbbYXFyc88QlaTelyl2VsYfrFgc6nM6S7oadCrMk3quZOcosJcesmgWgdOiznY/JXq/mX3HoaFqHqkmPs91GK07Vh/h7QJw9bDpCuwE6hhx628DaKmbpOtpn+5l0Nypy926YsZzq9Yywm4kUqNg1UmJqh1CRbcgAdmKNFrHOf7K8dayX9I6AzeCTEDpy7Y+53TdC4xGv2Q0Iy7xa6s7XOSrrLV6vIn0Vybo+z9ohMPgI1cbCYTU4/J256ivRNJmHN7SSzFpt4xlmw8dTltuh+Vd5OkE5WgUN2ce6y0RHH1hOZL5kUQZyAaWdgTVnTKiCat8Uio0lhLWCmz2osdqr/l1+D5BtkPvpoVCo5tlNpnBu3qyXLO72ZsW+UHrJsCsRqms7NrKMzjNSET6V3d7f1vSsgh9w6dTu7E8Vk2c3hjf6TVKOaoJJP14vKt/ZXDoaPp+MkA+b9r8TkmvYe5KH7Px2FryVKQ4sK4l8rbghuhJs0FYr2UKKEfD5MZin02xiCY096FpDDiJ5VOEw6kmjhkvrzNuXJV1NnFVNbEfunzjtuETIwUx6ChXF6N/KhwnUAgGHjn24pJTITtuvOacQceEaCjEDdtF40SjoqLFCXZoN4d5KCpL84muYKBJ41FnMJL5KLJ6QNLX1Gpwt/eYExjvW3PuqdviUWBnUlRR3WJlxFnJDZwrzMEoX9dsk9GoyLH8f5BISUjg2XuyUZVReWK/fV6lXTsnrAjYTJElVXAMlSWVd4qJnhr2BDg=";
                ErrorCode error_code = Library.Initialize(sn, key);
                //If the library fails to initialize, the application will exit the method
                if (error_code != ErrorCode.e_ErrSuccess)
                    return;
                string[] filePaths = Directory.GetFiles(path, "*.pdf", SearchOption.TopDirectoryOnly);
                if (filePaths.Length > 1)
                {
                    CombineDocumentInfoArray info_array = new CombineDocumentInfoArray();
                    String savepath = path + "\\combined files\\";
                    if (!Directory.Exists(savepath))
                    {
                        Directory.CreateDirectory(savepath);
                    }
                    int option = (int)(Combination.CombineDocsOptions.e_CombineDocsOptionBookmark |
                    Combination.CombineDocsOptions.e_CombineDocsOptionAcroformRename |
                    Combination.CombineDocsOptions.e_CombineDocsOptionStructrueTree |
                    Combination.CombineDocsOptions.e_CombineDocsOptionOutputIntents |
                    Combination.CombineDocsOptions.e_CombineDocsOptionOCProperties |
                    Combination.CombineDocsOptions.e_CombineDocsOptionMarkInfos |
                    Combination.CombineDocsOptions.e_CombineDocsOptionPageLabels |
                    Combination.CombineDocsOptions.e_CombineDocsOptionNames |
                    Combination.CombineDocsOptions.e_CombineDocsOptionObjectStream |
                    Combination.CombineDocsOptions.e_CombineDocsOptionDuplicateStream);
                    for (int i = 0; i < filePaths.Length; i++)
                    {
                        info_array.Add(new CombineDocumentInfo(filePaths[i], ""));
                    }
                    Progressive progress = Combination.StartCombineDocuments(savepath + "\\combined.pdf", info_array, option, null);
                    Progressive.State progress_state = Progressive.State.e_ToBeContinued;
                    while (Progressive.State.e_ToBeContinued == progress_state)
                    {
                        progress_state = progress.Continue();
                    }
                }
            }
            catch (foxit.PDFException ex)
            {
                WriteToFile(ex.StackTrace);
                WriteToFile(ex.Message);
            }
            catch (foxit.Exception ex)
            {
                WriteToFile(ex. StackTrace);
                WriteToFile(ex. Message);
            }        }
    }
}
Adding Logging (Optional)
You can add logging to see the progress of the combination process. This will also allow you to debug the application.
First, you’ll create a new method called WriteToFile that accepts a string as an argument. The method will use the AppDomain class to find your project’s current directory so that it can create a log folder and log files. It will then use a StreamWriter to create and write to a file. Your method should look like this:
csharp
        public void WriteToFile(string Message)
        {
            string path = AppDomain.CurrentDomain.BaseDirectory + "\\Logs";
            if (!Directory.Exists(path))
            {
                Directory.CreateDirectory(path);
            }
            string filepath = AppDomain.CurrentDomain.BaseDirectory + "\\Logs\\ServiceLog_" + System.DateTime.Now.Date.ToShortDateString().Replace('/', '_') + ".txt";
            if (!File.Exists(filepath))
            {
                //Create a file to write to.
                using (StreamWriter sw = File.CreateText(filepath))
                {
                    sw.WriteLine(Message);
                }
            }
            else
            {
                using (StreamWriter sw = File.AppendText(filepath))
                {
                    sw.WriteLine(Message);
                }
            }
        }
You can then add code for logging. It can use the Timer object you created earlier to poll and check the status of the service every five seconds. You’ll need to create three methods that raise events when the service starts (OnStart), in five second intervals during the service’s run time (OnElapsedTime), and when the service stops (OnStop), respectively.
The OnStart method will log the date and start time of the service, initiate the timer and add an event handler to it (ElapsedEventHandler). Additionally, it will set the timer’s interval property (5000 milliseconds) and enable it. The OnElapsedTime method will log a message every five seconds to indicate that the service is still running. Finally, the OnStop method will record when the service was stopped. The methods should look like this:
private void OnElapsedTime(object source, ElapsedEventArgs e)
        {
            WriteToFile("Service is recall at " + System.DateTime.Now); //called every five seconds
        }
        protected override void OnStart(string[] args)
        {
            WriteToFile("Service is started at " + System.DateTime.Now); //Records when the service was started
            timer.Elapsed += new ElapsedEventHandler(OnElapsedTime);
            timer.Interval = 5000; //number in milisecinds
            timer.Enabled = true;
        }

        protected override void OnStop()
        {
            WriteToFile("Service is stopped at " + System.DateTime.Now); //Records the time and date of when the service was stopped
        }
With the added feature, your PDFMergingService.cs file should look similar to this.
Adding Installers to Your Service
Right-click your service’s CS file and select View Designer from the context menu:

Right-click in the main panel and select Add Installer from the context menu:

A new class will be added to your project called ProjectInstaller.cs. It contains two installers for your service and the associated process (program).
While still in the Design view, right-click the element labeled serviceInstaller1 and click Properties from the context menu. This should open the properties panel on the bottom right side of the Visual Studio graphical user interface.
Scroll through the list of properties until you find ServiceName. Make sure that it’s named after your service. Give a short description of your service next to the Description field, such as A service that automatically merges PDF files. Then, add text to the DisplayName field, such as PDF Merger, and set the StartType to Automatic:
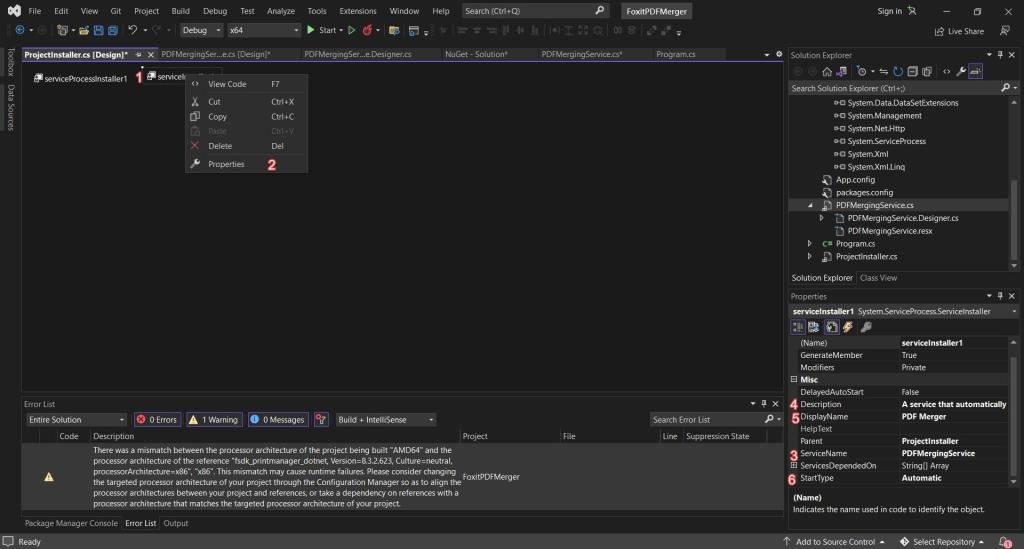
While still in the Design view, click the element labeled serviceProcessInstaller1. This should automatically open the Properties panel on the bottom right-hand of the screen. Set the Account property to LocalSystem. When you install the service, it will use the local system account.
Building and Installing Your Service
Click the Build menu and select the Build Solution option. Alternatively, you can press the F6 key. This will build your project and package it into an executable:

Make sure your build matches your own machine’s architecture by following the correct build instructions as below:
32-bit (x86) environment: Run the Developer Command Prompt for Visual Studio as administrator by going to Start > Visual Studio 2022 > Developer Command Prompt for VS 2022:
64-bit (x64) environment: Run the x64 Native Tools Command Prompt for Visual Studio as administrator by going to Start > Visual Studio 2022 > x64 Native Tools Command Prompt for VS 2022:

Use the console window to navigate to where your project’s packaged executables are located, such as C:/Users/[username]/source/repos/FoxitPDFMerger/bin/<your-machine-env>/Debug.
Run the command Installutil.exe [YourServiceName.exe], replacing [YourServiceName.exe] with the name of your service, for example Installutil.exe FoxitPDFMerger.Exe:

This command will install the service. If it’s successful, your terminal screen will look similar to this:

Next, open the Windows Service Manager. One way to do so is by entering services.msc in the Run command window:

Find your PDF Merger service from the list of services, right-click it, and select Start from the context menu:

Your service should now be running. You can find its logs in the same folder as your service executables:

You can now place PDF files into the directory you hard-coded into the service application (C:\\downloads):

The service should automatically combine your PDFs and place them in an output folder in the same directory. The output folder will be called combined files (or whatever you named it in your source code):
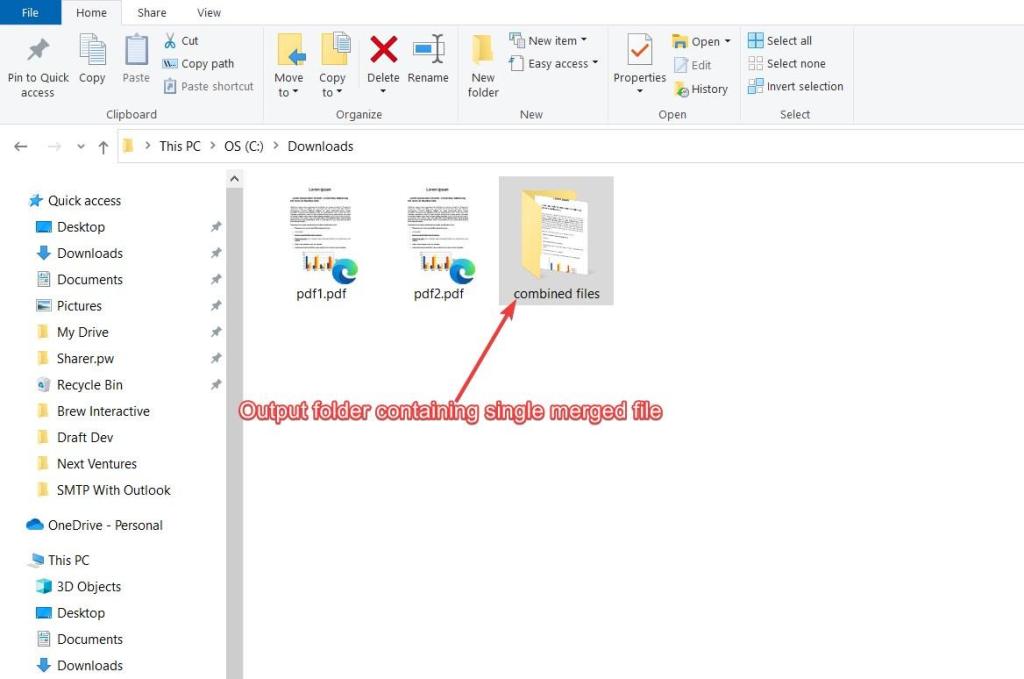
If you open the output folder, you’ll find a single PDF document that contains all the pages and information from the original unmerged files:

The service uses the static method Directory.GetFiles from the Directory class, which retrieves a list of files using an order determined by your filesystem. The resulting structure of the PDF may seem unpredictable. You can force the order in which files are appended and merged by adding a sorting function to the Directory.GetFiles operation:
csharp
string[] filePaths = Directory.GetFiles(path, "*.pdf", SearchOption.TopDirectoryOnly).OrderBy(f => f);  //Sorts files alphanumerically
Every new file you add to the directory will create a new combined file overwriting the previously created combined file. Thus, there should always be a single file in your output folder.
You can also check the results of the combination process by checking the log text file:

If you encounter any issues with the service and would like to uninstall it, you can execute the sc.exe delete YourServiceName command from Windows PowerShell or Command Prompt. Make sure that you run these terminals with administrator rights before you attempt to execute the command.
Notes
Make sure to always check your log files to see what is wrong if the merge folder is not working. Here are a few notes to assist you with debugging:
- Make sure the folder is always empty at start of the service
- Copy and Paste files into the folder rather than modifying and saving to the folder
- Files with advanced forms (XFA) will not be merged correctly
Conclusion
An automated file merging service offers benefits across multiple industries. As you saw, building your own PDF merging system is a straightforward process. You could also refine the above code by creating a logging screen to see the PDF merger’s progress in real time, or by using a library like Topshelf for easier debugging and deployment.
This is just one example of how you can utilize the Foxit PDF SDK. You can also use it to extract text from a PDF, edit PDFs, export embedded attachment files, retrieve hyperlinks, or find and list all bookmarks. Foxit also offers enterprise and commercial-grade cross-platform solutions for creating, editing, signing, and securing PDFs and other digital files. If you aren’t going to code your own solution, one of Foxit’s prepackaged applications is sure to offer one. Check the documentation for more on Foxit’s PDF SDK.
To check your work on this tutorial, consult the repository.
Author: Mdu Sibisi