How to Create your own Android Mobile PDF Scanning Tool

Mobile scanning direct to PDF can transform your document workflows. With features such as automatic page detection, light flash functionality, color management and settings for camera-captured documents to be enterprise-quality PDFs, you can get a lot from just a couple of gestures on a phone when you have the right technology behind it.
The guide below describes how you can use Foxit’s Android PDF SDK to quickly create an app with powerful scanning functionality. By taking multiple photos or by selecting multiple images from an album, a PDF can be generated with just one click. You can use this project to integrate scanning into your own workflows and make this a powerful addition to your mobile application.
Quickly add your own business or application branding without having to enable/disable elements and/or modify the user interface. It’s a blank PDF viewer with a mobile scan button for you to build your app on top.
You can fully customize the controls of the camera interface and implement additional features using the callback methods should you require to. Although simple, this project provides all of Foxit SDK’s advanced features such as flashing, image processing and rendering, dynamic monitoring and capturing, setting of image size, and saving the generated PDF file to a specified directory. Enjoy!
System Requirements
Android devices’ requirements:
• Android 4.4 (API 19) or higher
• 32/64-bit ARM (armeabi-v7a/arm64-v8a) or 32/64-bit Intel x86 CPU
Android Studio 3.2 or newer (supports AndroidX)
The runtime environment for our demos:
• Android Studio 3.2
• JDK 1.8
• Gradle Version 4.6
• Gradle Build Tool 3.2
Note: Starting with version 8.2, Foxit PDF SDK for Android will only support AndroidX, and no longer
service the Android support library.
Development Configuration
Start up Android Studio and open the androidrdk/samples/viewer_ctrl_demo project.

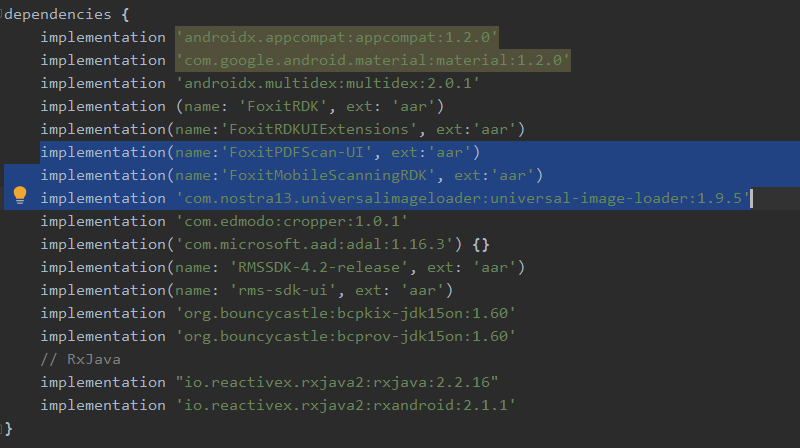
Add the scanning dependency library in the gradle file (view_ctrl_demo/app/build.gradle) as below:
implementation(name:'FoxitPDFScan-UI', ext:'aar')
implementation(name:'FoxitMobileScanningRDK', ext:'aar')
implementation 'com.nostra13.universalimageloader:universal-image-loader:1.9.5'
Define permission settings
Before calling the Scan function, you need to obtain storage permission and permission to take pictures. If the permission to use the camera and photo album is not obtained before calling the Scan function, the app will not run correctly. Follow the steps below to set permissions.
Add permission-related declarations in the AndroidManifest file using the code below:
<manifest xmlns:android="http://schemas.android.com/apk/res/android">

     <uses-permission android:name="android.permission.VIBRATE"/>

     <uses-permission android:name="android.permission.WRITE_EXTERNAL_STORAGE"/>

     <uses-permission android:name="android.permission.READ_EXTERNAL_STORAGE"/>

     <uses-permission android:name="android.permission.RUN_INSTRUMENTATION"/>

     <uses-permission android:name="android.permission.RECORD_AUDIO" />

     <uses-permission android:name="android.permission.CAMERA" />
Then add the following permission request code in MainActivity.java:
if (Build.VERSION.SDK_INT >= Build.VERSION_CODES.KITKAT) {

    int permission = ContextCompat.checkSelfPermission(this.getApplicationContext(), Manifest.permission.WRITE_EXTERNAL_STORAGE);

    if (permission != PackageManager.PERMISSION_GRANTED) {

        ActivityCompat.requestPermissions(this, PERMISSIONS_STORAGE, REQUEST_EXTERNAL_STORAGE);

@Override

public void onRequestPermissionsResult(int requestCode, @NonNull String[] permissions, @NonNull int[] grantResults) {

    super.onRequestPermissionsResult(requestCode, permissions, grantResults);

    if (requestCode == REQUEST_EXTERNAL_STORAGE) {

        if (grantResults[0] == PackageManager.PERMISSION_GRANTED) {

         //Application permission is successful

        } else {

            UIToast.getInstance(getApplicationContext()).show(getString(R.string.fx_permission_denied));

            finish();

        }

    }
Now, let’s add the code related to the Scan function:
Add a button to the UI to call the Scan function.
First, write some code to add the camera button icon. You’ll define the layout, positioning and image resource for the button. This code is added to the onCreate method of the MainActivity file to make sure that the button is displayed as soon as the project loads. Make sure to add this after:
protected void onCreate(Bundle savedInstanceState) {

   (...)

// Make sure to add this block of code after all the already existing          // view_ctrl_demo onCreate code is loaded

    mRootView=uiExtensionsManager.getContentView();

    RelativeLayout.LayoutParams layoutParams = new RelativeLayout.LayoutParams(RelativeLayout.LayoutParams.WRAP_CONTENT, RelativeLayout.LayoutParams.WRAP_CONTENT);

    mIvScan = new ImageView(this);

    mIvScan.setImageResource(R.drawable.fx_floatbutton_scan);

    layoutParams.bottomMargin = 80;

    layoutParams.rightMargin = 50;

    layoutParams.addRule(RelativeLayout.ALIGN_PARENT_BOTTOM);

    layoutParams.addRule(RelativeLayout.ALIGN_PARENT_RIGHT);

    mIvScan.setLayoutParams(layoutParams);

    mRootView.addView(mIvScan);

    setContentView(mRootView);

    initScan();

}
Now, let’s set the foundation for the app’s scanning feature. The last line of code in the onCreate method above is a call to initScan(), which is the method we’ll use to initialize the relevant classes for the project.
The code below shows how you will instantiate an object from Foxit’s main PDF Scan class (PDFScanManager), then use that class to initialize the scanner and the compression features. The final method displays the scan functionality once you click the camera button.
PDFScanManager pdfScanManager = PDFScanManager.instance()

if (!PDFScanManager.isInitializeScanner()) {

    long framework1 = 0;

    long framework2 = 0;

    PDFScanManager.initializeScanner(App.inst().getAppActivity().getApplication(), framework1, framework2);

}

if (!PDFScanManager.isInitializeCompression()) {

    long compression1 = 0;

    long compression2 = 0;

    PDFScanManager.initializeCompression(App.inst().getAppActivity().getApplication(), compression1, compression2);

}

if (PDFScanManager.isInitializeScanner() && PDFScanManager.isInitializeCompression()) {

    //Loaded Successfully

        pdfScanManager.showUI(activity.this);

}
The initialization code is then added to the initScan method as follows. This method will also be added to the MainActivity class and called as soon as the project loads. This ensures your project will have all the scanning libraries and functionality available.
The following imports and variables are necessary for the project:
import com.foxit.pdfscan.PDFScanManager;


private ImageView mIvScan;

 private ViewGroup mRootView;


private  void  initScan(){

        final PDFScanManager pdfScanManager = PDFScanManager.instance();

        mIvScan.setOnClickListener(new View.OnClickListener() {

            @Override

            public void onClick(View v) {

                if (!PDFScanManager.isInitializeScanner()) {

                    long framework1 = 0;

                    long framework2 = 0;

                    PDFScanManager.initializeScanner(getApplication(), framework1, framework2);

                }

                if (!PDFScanManager.isInitializeCompression()) {

                    long compression1 = 0;

                    long compression2 = 0;

                    PDFScanManager.initializeCompression(getApplication(), compression1, compression2);

                }

                if (PDFScanManager.isInitializeScanner() && PDFScanManager.isInitializeCompression()) {


                    pdfScanManager.showUI((Activity) mContext);


                } else {

                    UIToast.getInstance(getApplicationContext())

                            .show(AppResource.getString(getApplicationContext(), R.string.rv_invalid_license));

                }

            }

        });

    }
Now that we have initialized the library and the foundation has been set, we will write two basic callback interfaces that will be used to save the document after it’s scanned: the first, ScanPDFDoneCallBack, which is entirely custom, and the second is IPDFScanManagerListener, which is available out-of-the-box in the SDK. See both below:
public interface ScanPDFDoneCallBack {


    /** Success, and no error occurs */

    int e_ErrSuccess = 0;

    /** Failed, any unknown error occurs. */

    int e_ErrUnknown = 1;


    /**

     * After saving PDF successfully, return to the saving path

     *

     * @param errorCode if the scanned file is successfully saved as a pdf document, the errorCode is {@link #e_ErrSuccess}, otherwise is {@link #e_ErrUnknown}

     * @param savePath the document file path.

     */

    void doneCallBack(int errorCode, String savePath);

}

public interface IPDFScanManagerListener {

    /**

     * Success, and no error occurs

     */

    int e_ErrSuccess = 0;

    /**

     * Failed, any unknown error occurs.

     */

    int e_ErrUnknown = 1;


    /**

     * Called when if the scanned file is successfully saved as a pdf document.

     *

     * @param errorCode if the scanned file is successfully saved as a pdf document, the errorCode is {@link #e_ErrSuccess}, otherwise is {@link #e_ErrUnknown}

     * @param path      the document file path.

     */

    void onDocumentAdded(int errorCode, String path);

}
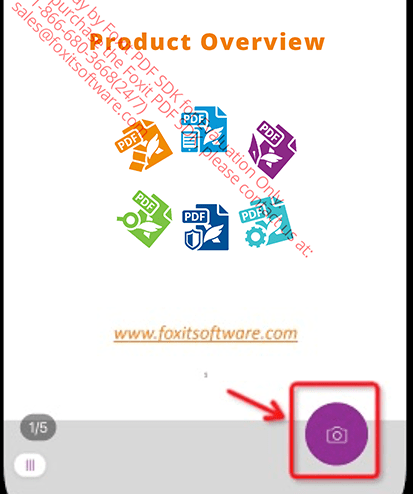
The difference between the two interfaces is if the monitoring of ScanPDFDoneCallBack is set, when you click the ‘Done’ button in the lower right corner of the figure below, it will directly save the document to the default path and exit the scanning interface, and return to the default save path through the parameter savePath.
If ScanPDFDoneCallBack is not set, when you click the ‘Done’ button in the lower right corner of the figure below, an interface for selecting the save directory will pop up. The user selects the specified directory, and the document will be saved in the directory selected by the user.
Now, you must implement the interfaces by adding them to MainActivity.java.
pdfScanManager.setDoneCallBack(new ScanPDFDoneCallBack() {

    @Override

    public void doneCallBack(int errorCode, final String savePath) {

        if (errorCode == e_ErrSuccess) {

             //The document was saved successfully

        }

    }

});


PDFScanManager.registerManagerListener(new IPDFScanManagerListener() {

    @Override

    public void onDocumentAdded(int errorCode, String path) {

        if (errorCode == e_ErrSuccess) {

             //The document was saved successfully

        }


    }

});
If you want to implement further interfaces of the pdfscan class, please refer to the API Reference documents in foxitpdfsdk_8_1_android/docs.
Done! The scan functionality has been successfully added to your application. Run the app, click the Scan button you’ve created previously and start your scanning experience.
We work with you to add complete PDF library functionality to your project and develop across all platforms and environments on one core API. Take a 30 day free trial today by clicking here.