How to Add Digital Signatures to PDFs in a Web Application

Everyone knows what a signature is—it’s how you sign your name at the end of an official document, typically to enter a contract. But what is a _digital_ signature?
It’s a digitally generated representation of a person’s identity. This can either be through an image of a person’s actual signature, or it can be a computer-generated signature. There are many reasons why you might want to add a digital signature to a piece of electronic information. Verifying someone’s authenticity is the most common.
Adding digital signatures to PDFs is a practice that’s becoming more and more common. Recently the Canadian government started using them and saw an uptick in productivity. Rather than having to move paperwork around from office to office manually, often resulting in three to four days of processing time, they can now get the same processing done within a day.
Digital Signatures with Foxit
One way to get started with digital signatures in your organization is to use Foxit and their .NET SDK. Foxit is a company that specializes in document handling. They know what a hassle PDFs can be, and they work hard to create solutions that make life easier, for many different use cases involving documents.
With Foxit, you don’t just get a tool to add digital signatures. You also get a tool that can solve close to every pain point you have involving PDFs. They focus not just on what you can do with PDFs, but also how your entire organization can optimize its use of PDFs. And with their SDK, you can integrate their solutions directly into your own applications.
Building the App
To show you how adding digital signatures works when using the Foxit SDK, let’s set up a small .NET Core application, which you can then use to add the signature. The finished application is available on GitHub or you can follow along with this article.
Prerequisites
In order to build this application, there are a few things you need:
– .NET Core SDK
– A text editor; this can be anything from Notepad to Visual Studio.
Configuring the Application
With all the prerequisites installed, it’s time to set up the application. This is relatively straightforward when you’ve got the .NET Core SDK installed. Run the following command to generate a project called AddPDFSignatures:
bash
dotnet new console --name AddPDFSignatures
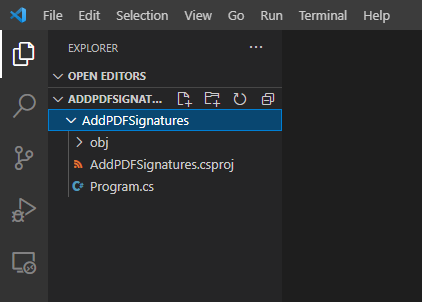
Now you should have a folder called AddPDFSignatures, in which you can find a Program.cs and a AddPDFSignatures.csproj. Once you’ve verified that these two files exist, open up the folder in your favorite editor. In this case, I’m using VSCode.

Configuring the Foxit SDK
The basic structure of the application is done, so it’s time to add the Foxit SDK. Start by going to their download page and download the SDK you need. I’m working on a Windows machine, so I’ll download the Foxit PDF SDK for Windows (.NET Core Library).
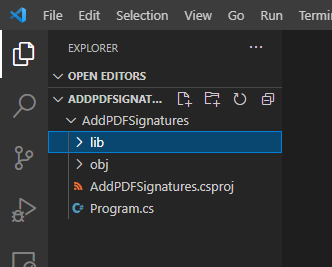
Once your SDK is downloaded, unzip the file to find the lib folder. Drag this into your project, so it sits alongside your Program.cs and AddPDFSignatures.csproj file.

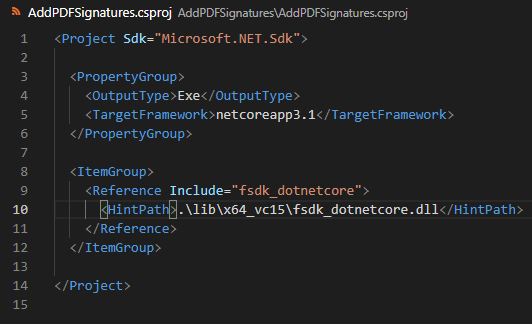
Once the lib folder is in your project, you need to tell .NET Core to include it. Open your AddPDFSignatures.csproj file and input the following:
xml
<ItemGroup>
<Reference Include="fsdk_dotnetcore">
<HintPath>..\lib\x64_vc15\fsdk_dotnetcore.dll</HintPath>
</Reference>
</ItemGroup>
This should leave you with a `.csproj` file looking like this:

Now .NET Core is aware of the .dll, and we can use it in our application.
Add a Signature to a PDF
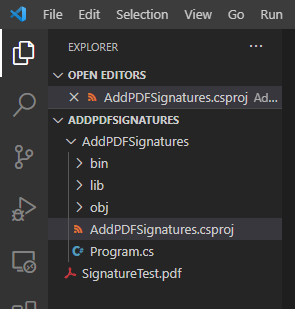
Finally you can get to the exciting part: adding a digital signature to a PDF document. Start by creating a PDF document and place it in the root folder of your application. It doesn’t matter what PDF you use. I’ve created a blank PDF using Microsoft Word.

You’ll want to define three methods:
* GetLocalDateTime
* AddSignature
* AdobePPKLiteSignature
To begin, make them return a new instance of the return type, so your editor won’t complain about syntax errors:
C#
using System;
using foxit.common;
using foxit.pdf;
using foxit.common.fxcrt;
namespace AddPDFSignatures
{
class Program{
static DateTime GetLocalDateTime()
{
return new DateTime();
} s
tatic Signature AddSignature(PDFPage pdf_page, string sub_filter) {
return new Signature();
} s
tatic void AdobePPKLiteSignature(PDFDoc pdf_doc) {
} s
tatic void Main(string[] args)
{
AdobePPKLiteSignature(pdf_doc)
}
}
}
GetLocalDateTime
C#
static DateTime GetLocalDateTime()
{
DateTimeOffset time = DateTimeOffset.Now;
DateTime datetime = new DateTime();
datetime.year = (UInt16)time.Year;
datetime.month = (UInt16)time.Month;
datetime.day = (UInt16)time.Day;
datetime.hour = (UInt16)time.Hour;
datetime.minute = (UInt16)time.Minute;
datetime.second = (UInt16)time.Second;
datetime.utc_hour_offset = (UInt16)time.Offset.Hours;
datetime.utc_minute_offset = (UInt16)time.Offset.Minutes;
return datetime;
}
This first method is more of a utility method. It initializes a new DateTime object and sets the various needed properties. Once all the properties have been set, it returns the object back to the caller.
AddSignature
C#
static Signature AddSignature(PDFPage pdf_page, string sub_filter) {
float page_height = pdf_page.GetHeight();
float page_width = pdf_page.GetWidth();
RectF new_sig_rect = new RectF(0, (float)(page_height*0.9), (float)(page_width*0.4),
page_height);
// Add a new signature to page
Signature new_sig = pdf_page.AddSignature(new_sig_rect);
if (new_sig.IsEmpty()) return null;
// Set values for the new signature
new_sig.SetKeyValue(Signature.KeyName.e_KeyNameSigner, "Foxit PDF SDK");
String new_value = String.Format("As a sample for subfilter \"{0}\"", sub_filter);
new_sig.SetKeyValue(Signature.KeyName.e_KeyNameReason, new_value);
new_sig.SetKeyValue(Signature.KeyName.e_KeyNameContactInfo,
"[email protected]");
new_sig.SetKeyValue(Signature.KeyName.e_KeyNameDN,
"CN=CN,[email protected]");
new_sig.SetKeyValue(Signature.KeyName.e_KeyNameLocation, "Fuzhou, China");
new_sig.SetKeyValue(Signature.KeyName.e_KeyNameText, new_value);
DateTime sign_time = GetLocalDateTime();
new_sig.SetSignTime(sign_time);
return new_sig;
}
This method contains much of the meat of this feature. The very first thing you do is get the page height and width. This is needed to create the rect for the PDF that’ll be generated, once the signature has been added. This rect is created in the next line.
Once this rect has been created, make sure that it checks whether the signature does exist. This ensures that your PDF isn’t created with an empty signature.
When your application has verified that the signature exists, it’s time to set some needed values. You can customize these KeyValue pairs as you want, and make sure they fit your organization. The final thing you want to do is set the time that the document is signed, and then you can return it to the caller.
AdobePPKLiteSignature
C#
static void AdobePPKLiteSignature(PDFDoc pdf_doc) {
string filter = "Adobe.PPKLite";
string sub_filter = "adbe.pkcs7.detached";
using (PDFPage pdf_page = pdf_doc.GetPage(0))
{
// Add a new signature to the first page
using (Signature new_signature = AddSignature(pdf_page, sub_filter))
{
new_signature.SetFilter(filter);
new_signature.SetSubFilter(sub_filter);
// Sign the new signature
String signed_pdf_path = "../pdf_signed.pdf";
String cert_file_path = "../foxit_all.pfx";
byte[] cert_file_password = Encoding.ASCII.GetBytes("123456");
new_signature.StartSign(cert_file_path, cert_file_password,
Signature.DigestAlgorithm.e_DigestSHA1, signed_pdf_path, IntPtr.Zero, null);
Console.WriteLine("[Sign] Finished!");
}
}
}
You’re almost at the end. First you need to make sure that you have a valid .pfx certificate placed in the folder alongside the PDF you want signed. This is the certificate that will be used by your application to verify authenticity. This last method AdobePPKLiteSignature calls the previous method and adds the signature to the PDF document that you tell it to sign. The two first lines define the filter and subfilter to use, and this is where you would change them if needed.
The using statement begins with adding the signature to the first page of the document, and then it finishes off by signing the new signature. Once the method is done, you’ll see the message [Sign] Finished in your terminal.
The very last thing to do is to call this method with the PDF document that you want signed. Then when you run the application, it should output the signed PDF to ../pdf_signed.pdf, alongside the original PDF document in this case. This is your digitally signed PDF document that you can send to someone else.
C#static void Main(string[] args)
{
string sn = "<sn>";
string key = "<key>";
ErrorCode error_code = Library.Initialize(sn, key);
if (error_code != ErrorCode.e_ErrSuccess)
{
return;
} v
ar pdf_doc = new PDFDoc("../SignatureTest.pdf");
pdf_doc.StartLoad(null, false, null);
AdobePPKLiteSignature(pdf_doc);
}
Conclusion
In the ever-growing landscape of digitalization, it’s becoming more and more important to verify the identity of not just senders but also documents. Now that you know how to add a digital signature to any PDF document, this step has become a lot easier for you. From here, it’s up to you how you want to use it—maybe you want to sign personal documents, or maybe you want to introduce the solution into your organization.
In any case, you and your applications just got a lot more secure using the Foxit SDK.
Author: Kasper Siig