How to Create and Use PDF Templates with Foxit PDF SDK for Web
PDF templates are predefined patterns that are used to generate PDF files. PDF templates can be created and added to any platform, such as web or mobile apps, and used automatically or manually with PDF software. You can have as many PDF templates as you want, each with its own purpose.
For example, if you use a financial web application that generates a PDF file (receipt) for every transaction, you’ll notice that the receipt always has a consistent design or information order. This automatically generated receipt indicates that the web app may have a preset PDF template that is automatically filled with the unique user content every time a transaction requires a receipt.
Overall, templates help simplify the task of generating documents. PDF templates provide significant advantages, including time-saving, ease of access, and simplicity. They are versatile enough to be used in a variety of contexts and work particularly well in the finance and retail industries and as application forms.
This article explores some of the uses of PDF templates before explaining how you can use Foxit PDF SDK for Web to create a simple PDF template form, as well as how to create a button that will add a new page to the PDF based on the same template.
Contents
Use Cases for PDF Templates
PDF templates are useful for online platforms, many of which cannot function properly without them. Templates are critical for consistency, branding, ease of use, and support.
PDF Templates in Finance
PDF files are essential for almost all financial and banking transactions. PDF templates have proven particularly useful in scenarios that require automated PDF files to be generated from financial platforms.
For example, suppose you want to send a specific amount of money to someone via a fintech app and need to generate a receipt. Within the app there might be a button that generates this type of file automatically.
The generated documents are usually not just simple black and white forms; they can have a specific design, well-formatted paragraphs and spaces, the organization’s logo, and other general information (apart from personal information). Such forms are examples of automated PDF templates.
PDF Templates in Retail
PDF templates can simplify retail operations such as money handling, receipts, invoices, inventory, and reports. Retail businesses need accurate and consistent documentation to ensure accountability, facilitate process coordination, and to ensure the provision of services.
Using templates is one of the best ways to encourage both accuracy and consistency.
PDF Templates in Application Forms
PDF templates are extremely useful in all types of applications, including job applications, employment applications, and student applications. PDF templates can help to make the hiring, referral, and acceptance processes much more efficient and simple.
They are critical in these scenarios because you will be processing thousands of PDF files, most of which will have the same template.
Implementing PDF Templates with the Foxit SDK for Web and JavaScript
To follow this tutorial the following are prerequisites:
– Node.js
Before proceeding to create PDF templates with Foxit PDF SDK for Web, you’ll need to set up a project on Git and a folder for your template, which you can do by following the instructions in the following sections.
Create a Project on Git and Download Foxit PDF SDK for Web
Create a GitHub project and name it whatever you want and clone it to your local PC. Open the project on your IDE, preferably VS Code.
Paste the contents of the Foxit PDF SDK into the Github project after you’ve unzipped it. Open your terminal, cd, in the project and then run npm install to install all the dependencies the project will need. The package.json will also be generated.
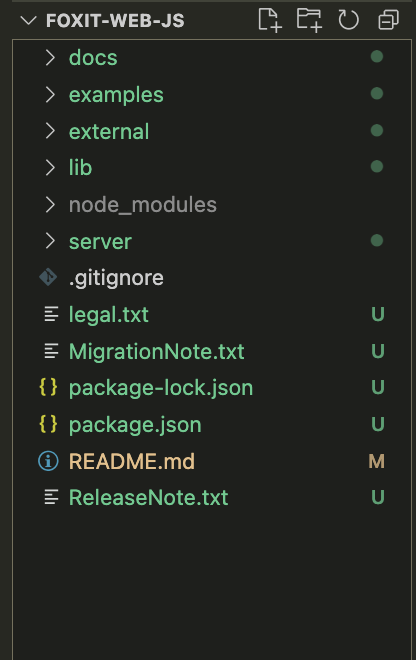
The image below shows the content that should be present in the folder.
Running Some Examples in the Foxit PDF SDK
You may want to run some examples to see how things work for yourself. Start the server with npm run start and open your browser to http://localhost:8080. There will be a folder called Examples that you can look through.
You can learn more about Foxit example projects and how to run them.
Creating a Folder for the Example and Adding Code to the Folder’s index.html File
Create a folder called pdf-templates in the main project folder. Next, create a file called index.html in the pdf-templates folder and add the following code to it:
<!DOCTYPE html>
<html lang="en">

<head>
    <meta charset="UTF-8">
    <meta http-equiv="X-UA-Compatible" content="IE=edge,chrome=1">

    <meta name="viewport" content="width=device-width,initial-scale=1,minimum-scale=1,maximum-scale=1,user-scalable=no">
    <!-- default(white), black, black-translucent -->
    <meta name="apple-mobile-web-app-status-bar-style" content="default" />
    <meta name="apple-mobile-web-app-capable" content="yes" />
    <meta name="apple-touch-fullscreen" content="yes" />
    <meta name="apple-mobile-web-app-title" content="Foxit PDF SDK for Web">
    <meta name="App-Config" content="fullscreen=yes,useHistoryState=no,transition=no">
    <meta name="format-detaction" content="telephone=no,email=no">
    <meta http-equiv="Cache-Control" content="no-siteapp" />
    <meta name="HandheldFriendly" content="true">
    <meta name="MobileOptimized" content="750">
    <meta name="screen-orientation" content="portrait">
    <meta name="x5-orientation" content="portrait">
    <meta name="full-screen" content="yes">
    <meta name="x5-fullscreen" content="true">
    <meta name="browsermode" content="application">
    <meta name="x5-page-mode" content="app">
    <meta name="msapplication-tap-highlight" content="no">
    <meta name="renderer" content="webkit">

    <title>Foxit PDF SDK for Web</title>
    <link rel="shortcut icon" href="../examples/assets/favicon.ico" type="image/x-icon" />
    <link rel="stylesheet" href="../lib/UIExtension.css">
    <style>
        html {
            overflow: hidden;
        }
        body {
            height: 100vh;
            height: calc(var(--vh, 1vh) * 100);
        }
        #pdf-ui {
            top: 40px;
            bottom: 0;
            position: absolute;
            width: 100vw;
        }

        .fv__ui-mobile #pdf-ui {
            top: 0;
        }
        .fv__ui-mobile .fv__ui-nav
        {
            display: none;
        }
    </style>
</head>

<body>
    <div class="fv__ui-nav">
        <a class="fv__ui-nav-logo" href="javascript:location.reload()">
            <i class="fv__icon-logo"></i>
        </a>
    </div>
    <div id="pdf-ui"></div>
    <script src="../examples/license-key.js"></script>
    <script src="../lib/preload-jr-worker.js"></script>
    <script>
        var readyWorker = preloadJrWorker({
            workerPath: '../lib/',
            enginePath: '../lib/jr-engine/gsdk',
            fontPath: '../external/brotli',
            licenseSN: licenseSN,
            licenseKey: licenseKey
        })
    </script>
    <script src="../lib/UIExtension.full.js"></script>
    <script>
        var PDFUI = UIExtension.PDFUI;
        var Events = UIExtension.PDFViewCtrl.Events;
        var pdfui = new PDFUI({
            viewerOptions: {
                libPath: '../../lib',
                jr: {
                    readyWorker: readyWorker
                }
            },
            renderTo: '#pdf-ui',
            appearance: UIExtension.appearances.adaptive,
            fragments: [],
            addons: UIExtension.PDFViewCtrl.DeviceInfo.isMobile ?
            '../lib/uix-addons/allInOne.mobile.js':
            '../lib/uix-addons/allInOne.js'
        });

        pdfui.addUIEventListener('fullscreenchange', function (isFullscreen) {
            if (isFullscreen) {
                document.body.classList.add('fv__pdfui-fullscreen-mode');
            } else {
                document.body.classList.remove('fv__pdfui-fullscreen-mode');
            }
        });

        function openLoadingLayer() {
            return pdfui.loading();
        }
        var loadingComponentPromise;
        var openFileError = null
        var passwordErrorCode = PDFViewCtrl.PDF.constant.Error_Code.password
        function startLoading() {
            if(openFileError&&openFileError.error===passwordErrorCode)return
            if (loadingComponentPromise) {
                loadingComponentPromise = loadingComponentPromise
                    .then(function (component) {
                        component.close();
                    })
                    .then(openLoadingLayer);
            } else {
                loadingComponentPromise = openLoadingLayer();
            }
        }
        pdfui.addViewerEventListener(Events.beforeOpenFile, startLoading);
        pdfui.addViewerEventListener(Events.openFileSuccess, function () {
            openFileError = null
            loadingComponentPromise.then(function (component) {
                component.close();
            });
        });
        pdfui.addViewerEventListener(Events.openFileFailed, function (data) {
            openFileError = data
            if(openFileError&&openFileError.error===passwordErrorCode)return
            loadingComponentPromise.then(function (component) {
                component.close();
            });
        });

        pdfui.addViewerEventListener(Events.startConvert, startLoading);
        pdfui.addViewerEventListener(Events.finishConvert, function () {
            loadingComponentPromise.then(function (component) {
                component.close();
            });
        });

        var queryParaPairs = location.search.slice(1).split('&');
        var queryParameters = queryParaPairs.reduce(function(map, pair) {
            var kv = pair.split('=');
            map[kv[0]] = decodeURIComponent(kv[1] || '');
            return map;
        }, {});

        if(queryParameters.file) {
            var reg = /^.+?\/([^\/]+?)(#[^\?#]*)?(\?.*)*$/;
            var result = reg.exec(queryParameters.file);
            var fileName = result? result[1] : document.title + '.pdf';
            pdfui.openPDFByHttpRangeRequest({
                range: {
                    url: queryParameters.file,
                }
            }, { fileName: fileName })
        } else if (!('file' in queryParameters)) {
            pdfui.openPDFByHttpRangeRequest({
                range: {
                    url: '../docs/FoxitPDFSDKforWeb_DemoGuide.pdf',
                }
            }, { fileName: 'FoxitPDFSDKforWeb_DemoGuide.pdf' })
        }


        window.addEventListener(UIExtension.PDFViewCtrl.DeviceInfo.isDesktop ? 'resize' : 'orientationchange', function(e) {
            pdfui.redraw().catch(function(err) {console.log(err)});
        });

        //signature handlers
        var requestData = function(type, url, responseType, body){
            return new Promise(function(res, rej){
                var xmlHttp = new XMLHttpRequest();
                xmlHttp.open(type, url);

                xmlHttp.responseType = responseType || 'arraybuffer';
                var formData = new FormData();
                if (body) {
                    for (var key in body) {
                        if (body[key] instanceof Blob) {
                            formData.append(key, body[key], key);
                        } else {
                            formData.append(key, body[key]);
                        }
                    }
                }
                xmlHttp.onloadend = function(e) {
                    var status = xmlHttp.status;
                    if ((status >= 200 && status < 300) || status === 304) {
                        res(xmlHttp.response);
                    }else{
                        rej(new Error('Sign server is not available.'));
                    }
                };

                xmlHttp.send(body ? formData : null);
            });
        };

        pdfui.setVerifyHandler(function (signatureField, plainBuffer, signedData){
            return requestData('post', location.origin+'/signature/verify', 'text', {
                filter: signatureField.getFilter(),
                subfilter: signatureField.getSubfilter(),
                signer: signatureField.getSigner(),
                plainContent: new Blob([plainBuffer]),
                signedData: new Blob([signedData])
            });
        });
        pdfui.registerSignHandler({
            filter: 'Adobe.PPKLite',
            subfilter: 'adbe.pkcs7.sha1',
            flag: 0x100,
            distinguishName: '[email protected]',
            location: 'FZ',
            reason: 'Test',
            signer: 'web sdk',
            showTime: true,
            sign: function(setting, buffer) {
                return requestData('post', location.origin+'/signature/digest_and_sign', 'arraybuffer', {
                    plain: new Blob([buffer])
                })
            }
        });
    </script>
</body>

</html>
The above code was obtained from the index.html file in the examples/UIExtension/complete_webViewer, which is copied into the index.html file in the pdf-templates folder.
Within the code, there are some embedded scripts with JavaScript code. The scripts specify other external script files for some tasks, such as loading the license keys for the file to enable you to use the SDK, loading the engine’s worker scripts to aid performance, loading the full use of the UIExtension library to enable you to use the tools within the SDK, and also creating a function to enable the loading of a PDF file.
The signature handlers code block is not relevant for the purposes of this tutorial and can be ignored. You can find more information about how all of the code or external script files work.
Note: The URLs of some paths within the code were changed to point to the relevant destinations.
Creating a PDF Template Using Foxit PDF SDK for Web
This section demonstrates how you can create a PDF template with the Foxit PDF SDK for Web using a blank page and the tools available on the SDK’s tab pane.
To begin creating a page template, create any single-page blank PDF through Microsoft Word or Pages, and on the Foxit tab panel, click Open Local File to open the PDF.

After the blank PDF has been opened, you’ll add text, and design some text fields and a button.
Adding Text
To add text, click the Edit tab, and then Add text on the tab pane. You can add the simple text Simple Form as the header.

Designing Text Fields
To add text fields, click the Form tab, and then the text field icon on the tab pane. Next, draw out the text fields on the blank page.

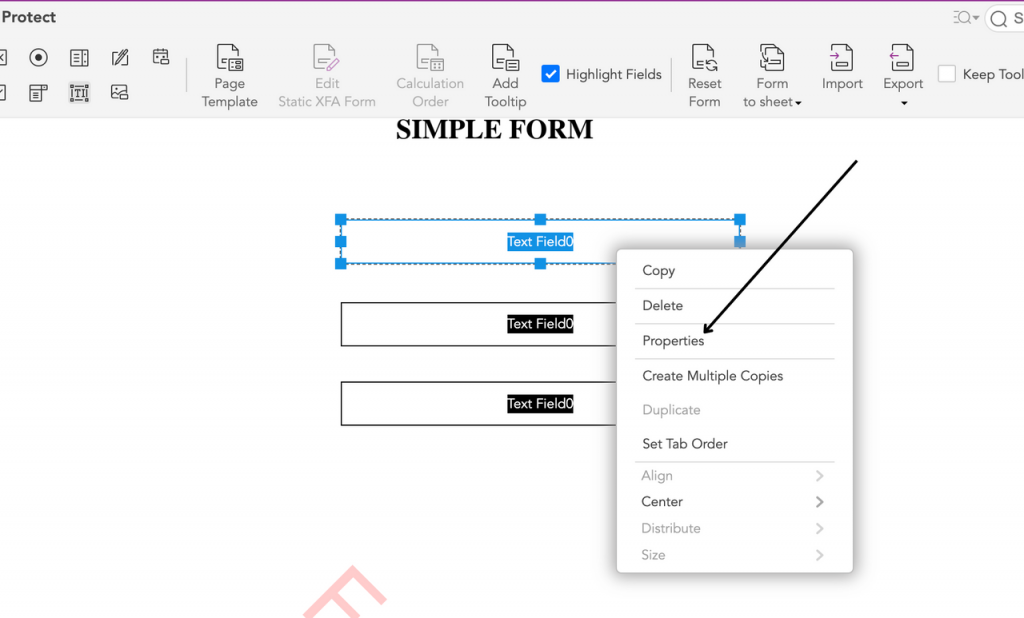
To design a text field as you want, click the text field icon again and right-click the text field drawn out on the page. After you right-click, a little modal will pop up, then click Properties.
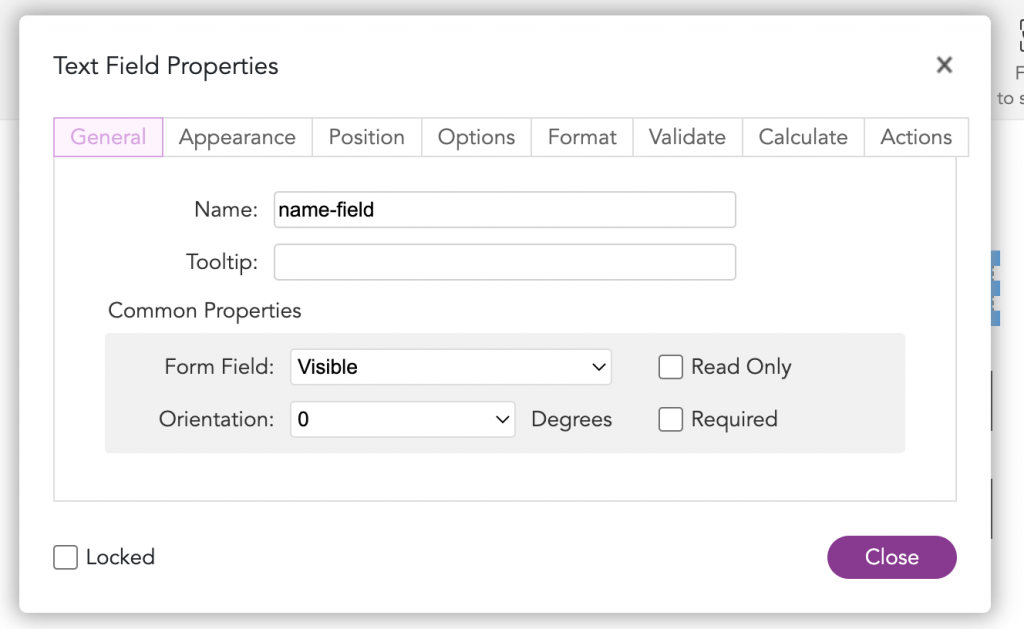
After clicking on Properties, on the General tab, you can edit some properties of the selected text field.
On the Appearance tab, you can also edit some properties of the selected text field.
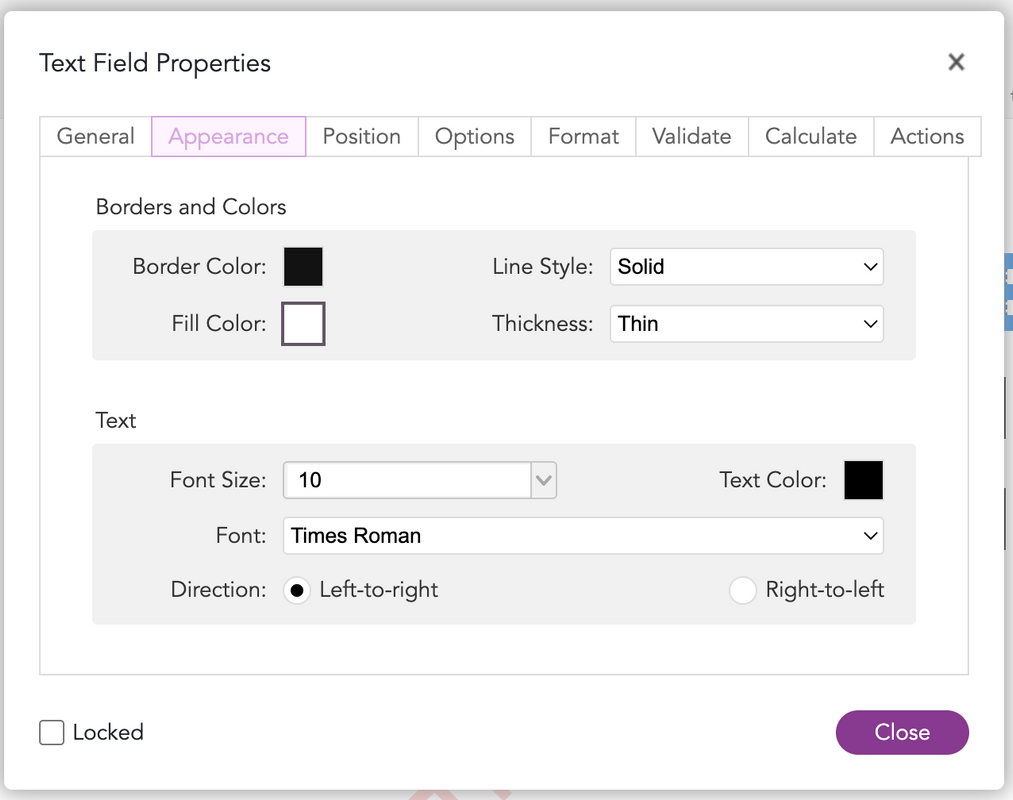
After you’ve made changes to your satisfaction, click the Close button below.
Adding a Button
To add a button, click the Form tab, and then the button icon on the tab pane. Then draw out the button on the blank PDF page. For this example, you can label your button Add Page.

You can right-click the button then click Properties on the modal to design the button as you wish.
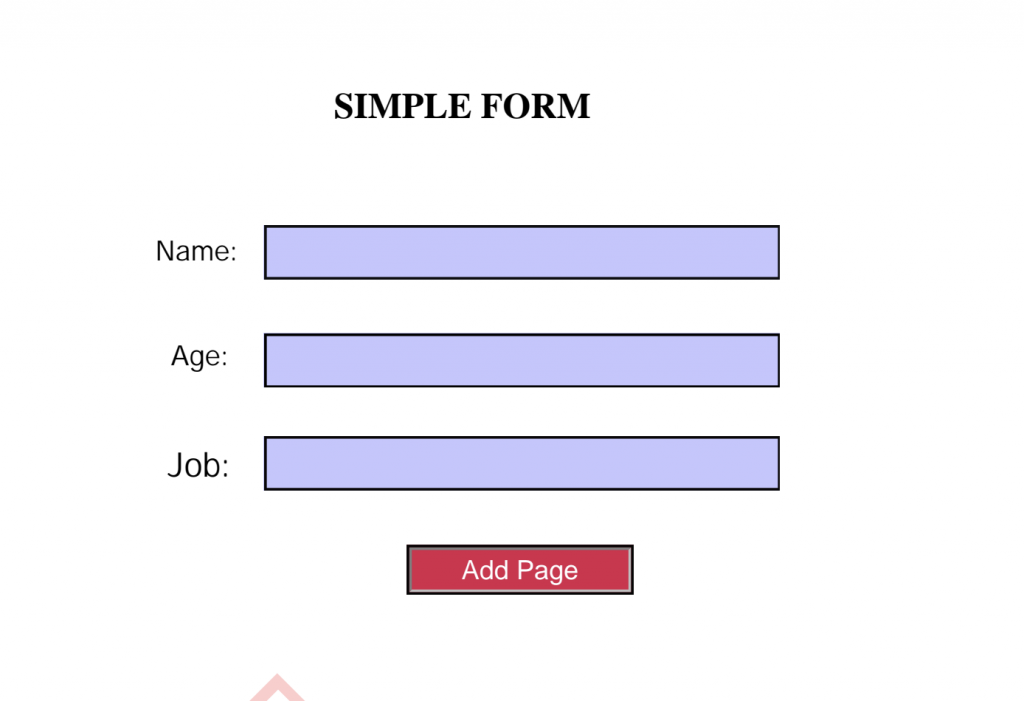
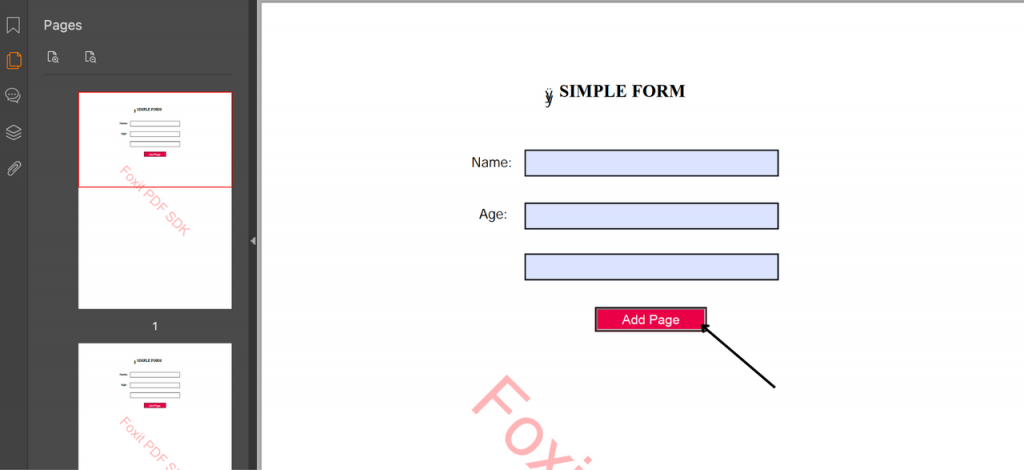
Finally, you should have something that looks similar to the following form design.
Creating a Page Template within the PDF Template
This section shows you how to link a page template via JavaScript to the button you created in the original PDF template, which will then create a new page based on the original template and add it to the PDF.
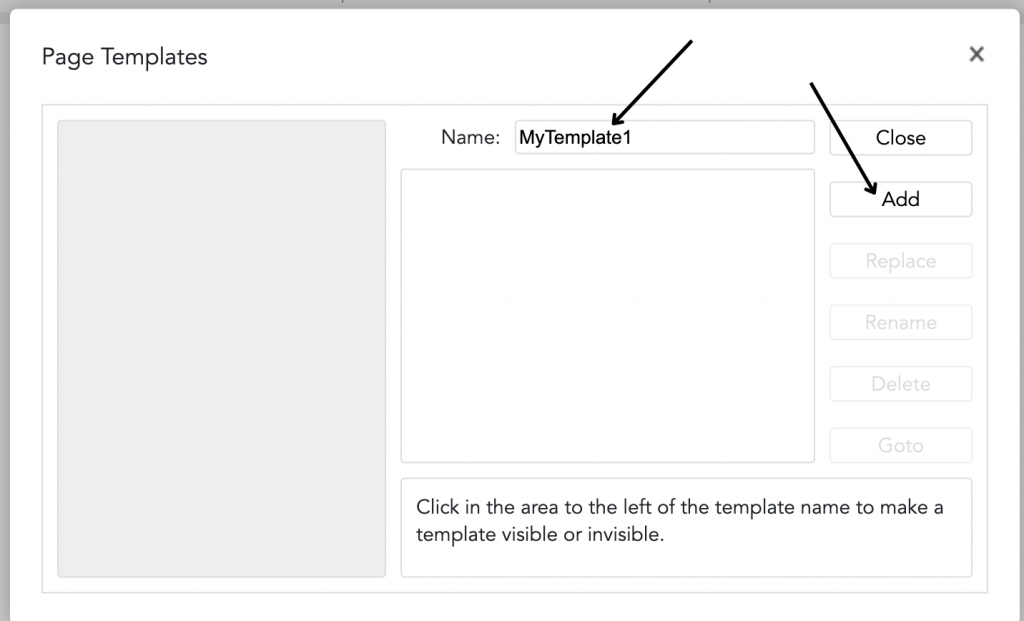
To begin creating a page template, first select the Form tab, and then Page Template from the tab pane.

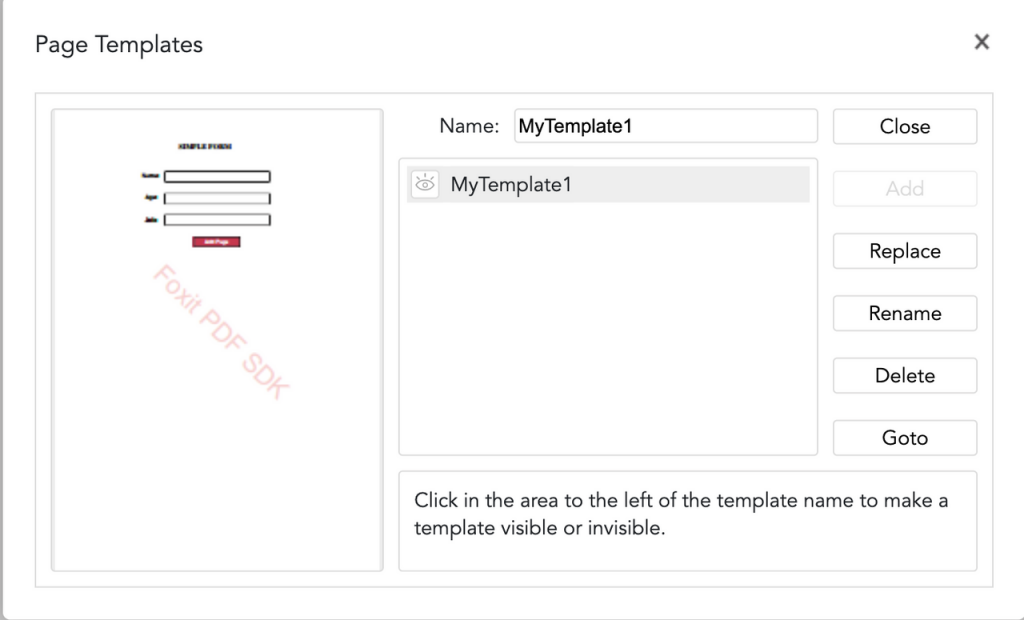
Type in the name MyTemplate1 in the name tab and click Add.
After clicking Add, you should see something like the image below.
Click the button icon under Form on the tab pane. Right-click the button on the PDF page, then select Properties from the modal that appears. Then, on the properties modal, select the Actions tab. The select trigger should be Mouse Up and select action to Run a JavaScript, then click Add.
A JavaScript console similar to the one shown below should appear. In this box, some JavaScript code will be added to allow the button to add a new page to the PDF.
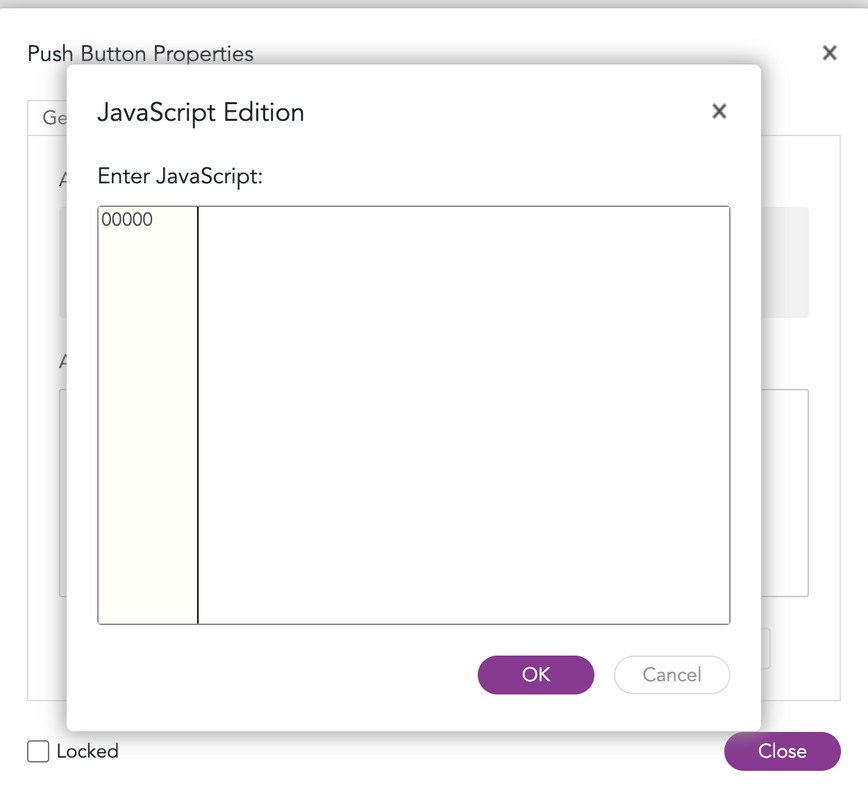
Add the following piece of code to the console and click OK:
var a = this.getTemplate("MyTemplate1");
a.spawn();
You’ll recall that the page template you created was called MyTemplate1. The variable a is then declared and assigned to the script getTemplate() to retrieve the page template.
Then, to ensure that the process runs and executes, use a.spawn();.
Click the Home tab and then Download to download the file.

View and Use the Downloaded PDF File in Foxit PDF Reader
Open the downloaded PDF file in Foxit PDF Reader and click Add Page on the PDF. A new page will be created with the exact template and added to the PDF file.
Conclusion
This article explained how to create and use PDF templates with the Foxit PDF SDK for Web.
Foxit is a quick, reliable, and multilingual PDF tool for creating, viewing, editing, digitally signing, and printing PDF files.
The code used in this article can also be found on GitHub.
Author: Funmilayo Olaiya