How to Create and Use PDF Templates with Foxit PDF SDK
PDF templates are a vital tool for many modern businesses. They serve as a standardized canvas that organizations can use to easily create, read, and update content for internal and external stakeholders.
Before PDF documents were in common use, document formatting was a struggle for individuals and organizations. Varying document software meant there was no guarantee of how a sent document would appear to the recipient. The consistency possible with the PDF format has caused its adoption to grow exponentially.
In the finance industry, for instance, PDF templates help automate the creation and updating of income statements, balance sheets, cash flow statements, and contracts. The retail industry relies on PDFs for invoices, order forms, and receipts. Companies that conduct surveys or gather other data can more easily and securely provide a copy of survey responses or other personal data to users who request it, per privacy regulations.
In this tutorial, you’ll learn more about PDF templates and how to implement them using the Foxit PDF SDK. You’ll create a PDF template form by uploading a scanned document, then duplicate the template registration page by clicking the Add Page button.
You can follow along with this GitHub repository using the included sample document named Employee Benefits Form Template.pdf.
What Is a PDF Template?
A PDF template is a predesigned document in PDF format that features editable areas to enable dynamic input. It can be used to quickly collect information while restricting the editor to what’s allowed by the layout of the document.
A PDF template can be anything from a letter to a financial statement as long as it allows users to add or update dynamic values like personal data, financial data, or other information.
Prerequisites
Here’s what you need to follow this tutorial:
* Some knowledge of C#/.NET Core
* Foxit PDF SDK for Windows (.NET Core Library)
* Some knowledge of Git
* A sample scanned PDF document
Implementing PDF Templates with Foxit
You’re going to add template-driven pages to your existing PDF template using .NET Core Windows Forms.
Scaffolding the Windows Form
To create your Windows Form using .NET Core, launch Visual Studio and select the project type Windows Forms App with the description: “A project template for creating a .NET Windows Forms (WinForms) App.” Don’t use the other option named “Windows Forms App (.NET Framework).”
You should see something like the image below:
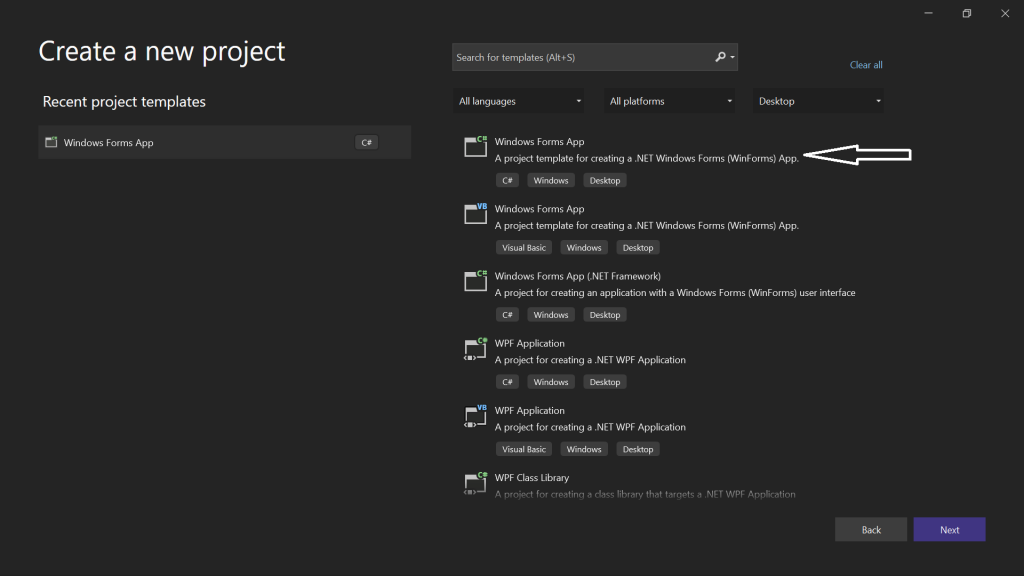
For this tutorial, the project will be named PdfFormEditor. Edit the project name and click the Next button. When prompted to select a framework, choose .NET 6.0.
Click the PdfFormEditor button to launch the application. You should see something similar to this image:
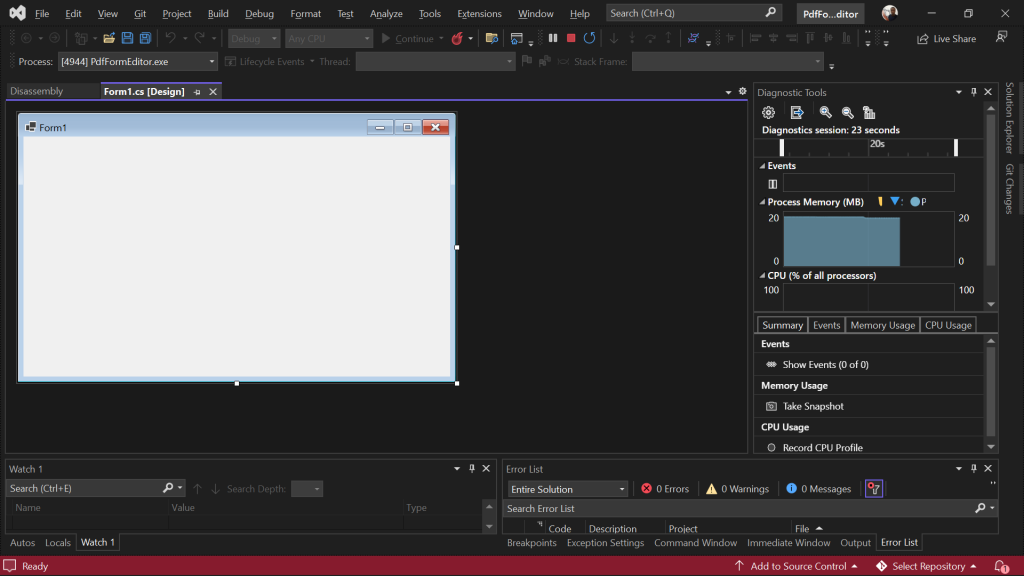
Adding the PictureBox
Adding functionality to your Windows Form can be done directly in the code or by taking advantage of the drag-and-drop functionality that the Toolbox in Visual Studio provides.
You’ll add the PictureBox directly into the code in order to get a feel for it, while the button will be added using the Toolbox functionality. Use the following instructions to do this.
Navigate to the Form1.Designer.cs file in your project.
Navigate to the InitializeComponent() method within the PdfEditor class you’re currently in and paste the code snippet below within the InitializeComponent() code block:
csharp
 private void InitializeComponent()
        {
            //DocumentImage is
            this.DocumentImage = new System.Windows.Forms.PictureBox();
            ((System.ComponentModel.ISupportInitialize)(this.DocumentImage)).BeginInit();
            this.SuspendLayout();
            //
            // DocumentImage
            //
            this.DocumentImage.Anchor = ((System.Windows.Forms.AnchorStyles)((((System.Windows.Forms.AnchorStyles.Top | System.Windows.Forms.AnchorStyles.Bottom)
            | System.Windows.Forms.AnchorStyles.Left)
            | System.Windows.Forms.AnchorStyles.Right)));
            this.DocumentImage.Location = new System.Drawing.Point(251, 45);
            this.DocumentImage.Name = "DocumentImage";
            this.DocumentImage.Size = new System.Drawing.Size(769, 619);
            this.DocumentImage.SizeMode = System.Windows.Forms.PictureBoxSizeMode.AutoSize;
            this.DocumentImage.TabIndex = 2;
            this.DocumentImage.TabStop = false;
            //
            // PdfEditor
            //
            this.AutoScroll = true;
            this.ClientSize = new System.Drawing.Size(1214, 796);
            this.Controls.Add(this.DocumentImage);
            this.Name = "PdfEditor";
            ((System.ComponentModel.ISupportInitialize)(this.DocumentImage)).EndInit();
            this.ResumeLayout(false);
            this.PerformLayout();

#endregion
        private PictureBox DocumentImage;
Adding the Button
Click the View menu toolbar, then the Toolbox option:
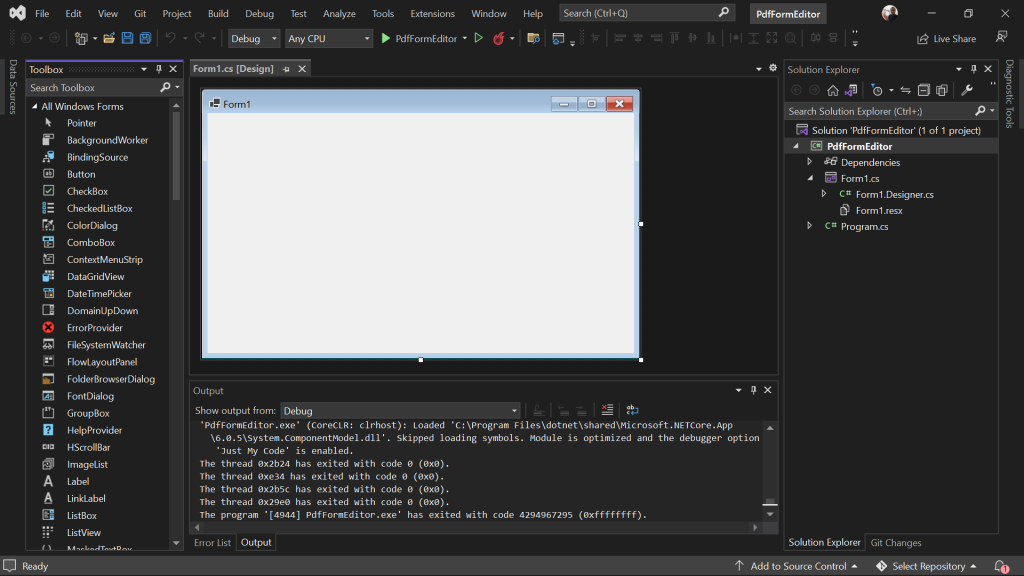
Select the Button option and drag it to the form designer layout:
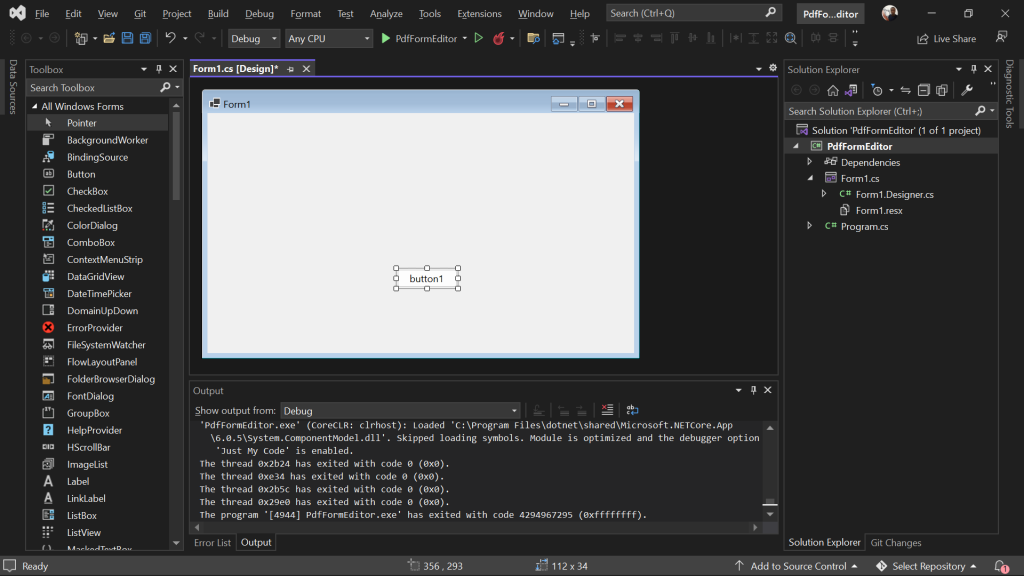
You can change the name of the button, if desired, by navigating to Form1.Designer.cs, replacing all the code in the InitializeComponent of the Form1.Designer.cs file, and updating the private Button with the code snippet below:
csharp
 private void InitializeComponent()
        {
            this.AddPage = new System.Windows.Forms.Button();
            this.DocumentImage = new System.Windows.Forms.PictureBox();
            ((System.ComponentModel.ISupportInitialize)(this.DocumentImage)).BeginInit();
            this.SuspendLayout();
            //
            // AddPage
            //
            this.AddPage.Location = new System.Drawing.Point(555, 715);
            this.AddPage.Name = "AddPage";
            this.AddPage.Size = new System.Drawing.Size(112, 34);
            this.AddPage.TabIndex = 1;
            this.AddPage.Text = "Add Page";
            this.AddPage.UseVisualStyleBackColor = true;
            this.AddPage.Click += new System.EventHandler(this.AddPage_Click);
            //
            // DocumentImage
            //
            this.DocumentImage.Anchor = ((System.Windows.Forms.AnchorStyles)((((System.Windows.Forms.AnchorStyles.Top | System.Windows.Forms.AnchorStyles.Bottom)
            | System.Windows.Forms.AnchorStyles.Left)
            | System.Windows.Forms.AnchorStyles.Right)));
            this.DocumentImage.Location = new System.Drawing.Point(251, 45);
            this.DocumentImage.Name = "DocumentImage";
            this.DocumentImage.Size = new System.Drawing.Size(769, 619);
            this.DocumentImage.SizeMode = System.Windows.Forms.PictureBoxSizeMode.AutoSize;
            this.DocumentImage.TabIndex = 2;
            this.DocumentImage.TabStop = false;
            //
            // PdfEditor
            //
            this.AutoScroll = true;
            this.ClientSize = new System.Drawing.Size(1214, 796);
            this.Controls.Add(this.AddPage);
            this.Controls.Add(this.DocumentImage);
            this.Name = "PdfEditor";
            ((System.ComponentModel.ISupportInitialize)(this.DocumentImage)).EndInit();
            this.ResumeLayout(false);
            this.PerformLayout();

        }

        #endregion
        private Button AddPage;
        private PictureBox DocumentImage;
Adding the Add Template Functionality
Right-click the Form1.cs file in your Solutions Explorer and rename the file. For this tutorial, change the name to PdfEditor.cs.
To implement the Add Template functionality, paste the code snippet below in the PdfEditor partial class block:
csharp
        internal static PDFDoc ScannedDocument;
        internal string FilePath = "";
        internal static PDFPage Page;
        private static int pageCount;
        private static int width;
        private static int height;
//The template name "Employee" is already embedded in the demo file, you can assign any name to your templates when using the SDK.
        private string savedTemplate = "Employee";


        public PdfEditor()
        {
            InitializeComponent();
            ScannedDocument = LoadDocument();
        }


        private PDFDoc LoadDocument()
        {
            try
            {
                OpenFileDialog openFileDialog = new OpenFileDialog();
                Form imagesFlowLayoutPanel = new Form();
                openFileDialog.AddExtension = true;
                openFileDialog.Multiselect = false;
                openFileDialog.Filter = "PDF files (*.pdf)|*.pdf";
                if (openFileDialog.ShowDialog() == DialogResult.OK)
                {
                    //For the purposes of this demo, the keys are used within the application.
                    //In a real world application, they should be treated as secret keys and protected accordingly
            //Also note that the key is a trial one and is temporary, you're encouraged to signup to fully leverage Foxit's SDk.
                    string sn = "SXC5wsuLUEUO4OurtXCk18JnGcxp6hrx5I1X8TbpPYqwzwQ3vWxOkg==";
                    string key = "8f0YFUGMvRkN+ddwhrBxubRv+38Gz2ILMFDAylGsl9gEt83edTI+7gO6BL3Zwz4kg8iFbUBbTA0Fo1AkxlPp2d40Z8iMd8SHfgzBN4RXdnt8UAB+qfAI8OrWhPtzxO+yOivYHoRYeiFttZWqwI4X1fwdUGO37hYJVsD/EdiOZqAjvZBeI95cx5fY0CtsvH+NaMagwb6HwBNDT0dI45XNR9ycMEboU+Ia211DtwOplnZ25dOssAtBPNk21UxQnmZMQEwfr//15ssa7/OkxfZDJY1AlID9Vq8StY3iJCSn4q+t0dSoJkYM/lhZNkkn7OGPTjjx/WJ0yXN1SISFvrHgVbnLhwtVUnJ7wCz91NLIISUTmWRJRcEXu7CQmS4+QjDhBbtKAyG4urX9uNzkkn2Xbk/QN1D5Id6fYOrLxVwmjllIW7JASUgxpBRbt3qxYUuIZGxtu009yTB/NATboZS2FMngZD556sCMsT7Xb1JQwqyQ2WBRSm31qWi8g87e3MewMGaNW5T0P/NEqU619EX0RUiedSCm6ISqCeGXKqw1jJ4K56293J31qvn1DfwePzHg3O+Ga2eqHqERaNbCqtwGHpGo/DAa/r9qhipsO/W8BGfjDzRs9zvKvnjwIkoOoI/4HiQapyFG6F6rDW/C78gubmNjASjK9C9NtJ12F/qohlErie4gd8gik+L12bfrZPXs8j9pMNHFbzT50zYuRv0qt/f38goLxjKZkVS2V5do9n1ehlVf0Sq/EXzz+XX9xIjh6fL/0DykoTOXm8i/J40BOZ1e+0sDkI0vrYw6AvnFz1AKB6p4ROQyFUdmt5pRNlWRTMYxgrFf+jZ6g6LkmTd+d0+MT2MX45R2xKWF3JIiyrtZXxXplMur7dKe9B8B7rrJ8klvOnJzP8Buj4fHjxp8EFbBvscng1H5wdYrxB/PlWmH4ZY0iPn5zSP8Uauvy2osIRk/LadTjSSi3+z1XY7MkGai86eiu2EjQtlnnnEz0XWaguOJueVPErt7xGDgihqOeptG5nMwNi/S98/UX63lW/r9UNR40tN/1gGEropGpfHvDuviLWn8ANieWcxxlyL1U8D02lPoND/kfNBEsQY02ZWB+pZ2Qk3pLBuYL+YvkFabCyBXYVCp6Mjj7DYgg8jRPdtuxK5X9i4LveA9ViQI2tQcMfCsxS0YUf8bLxa4Yp7xJKfosFBACGSUU12XNaOEp9IrTkaXaqi+KTKUy5SI2JN5zD6Wjid43oDpi16eV39dLVlrRWI5MITj8rBrxg0CWyTLOwJ/um2vIqH1K9br27x0L5paRTxc9N7WIZci1gnxC8Jzjs5qwg==
                    ErrorCode error_code = Library.Initialize(sn, key);
                    if (error_code != ErrorCode.e_ErrSuccess)
                    {
        string message = "Unable to verify your SDK activation key";
                        string title = "Load Document Status";
                        MessageBox.Show(message, title);
                        return ScannedDocument;
                    }

                    this.FilePath = openFileDialog.FileName.ToString();
                    ScannedDocument = new PDFDoc(this.FilePath);
                    var loadDocument = ScannedDocument.LoadW("");
                    if (error_code != ErrorCode.e_ErrSuccess)
                    {
        string message = "Unable to verify your SDK activation key";
                        string title = "Load Document Status";
                        MessageBox.Show(message, title);
                        Library.Release();
                        return ScannedDocument;
                    }
                    //The purpose of the lines of code between line 59 and 81 is to render the first page of the selected PDF document in the Windows Form
                    Page = ScannedDocument.GetPage(0);
                    Page.StartParse((int)PDFPage.ParseFlags.e_ParsePageNormal, null, false);
                    width = (int)(Page.GetWidth());
                    height = (int)(Page.GetHeight());

                    Matrix2D matrix = Page.GetDisplayMatrix(0, 0, width, height, Page.GetRotation());

                    // Prepare a bitmap for rendering.
                    foxit.common.Bitmap bitmap = new foxit.common.Bitmap(width, height, foxit.common.Bitmap.DIBFormat.e_DIBRgb32);
                    System.Drawing.Bitmap sbitmap = bitmap.GetSystemBitmap();
                    Graphics draw = Graphics.FromImage(sbitmap);
                    draw.Clear(System.Drawing.Color.White);

                    // Render page
                    Renderer render = new Renderer(bitmap, false);
                    render.StartRender(Page, matrix, null);

                    // Add the bitmap to image and save the image.
                    foxit.common.Image image = new foxit.common.Image();
                    string imgPath = $"{FilePath.Split('.').First()}IndexPage.jpg";
                    image.AddFrame(bitmap);
                    image.SaveAs(imgPath);
                    DocumentImage.Image = System.Drawing.Image.FromFile(imgPath);
                }
                return ScannedDocument;
            }
            catch (Exception ex)
            {
        string message = "An error occured, please contact your tech support";
                string title = "Load Document Status";
                MessageBox.Show(message, title);
                throw;
            }
        }


         private void AddPage_Click(object sender, EventArgs e)
         {
            try
            {
                //Adding a counter helps to track how many times the "Add Page" button was clicked in order to handle the creation of multiple pages
                pageCount++;

                //"AddPageFromTemplate" is used to add a hidden page template to the document.
 	    //Note that the "AddPageFromTemplate" method is used once per template name, upon calling the method, the hidden template is used and the name is released.
                Page = ScannedDocument.AddPageFromTemplate(savedTemplate);
                //"TemplatePage" is hardcoded to the file path to save the new template document to a new file rather than updating the original file
                //As a personal convention, this can help in reconciling the original document with the template document
                ScannedDocument.SaveAs($"{FilePath.Split('.').First()}TemplatePage.pdf", (int)PDFDoc.SaveFlags.e_SaveFlagNoOriginal);
                int pageNumbers = ScannedDocument.GetPageCount();
        string message = $"PDF template page created! ";
                string title = "PDF Template Status";
                MessageBox.Show(message, title);

            }
            catch (Exception ex)
            {
    string message = "The page template was already added";
                string title = "PDF Template Status";
                MessageBox.Show(message, title);
                throw;
            }
        }
Add the using statements below to your PdfEditor.cs file:
csharp
using foxit.common;
using foxit.pdf;
using foxit.pdf.objects;
using System.Windows.Forms;
using System.Drawing;
using foxit.common.fxcrt;
Adding the Foxit PDF SDK
Unzip the foxitpdfsdk_8_3_2_win_dotnetcore.zip file you downloaded from Foxit and copy the lib folder to the file path of your project.
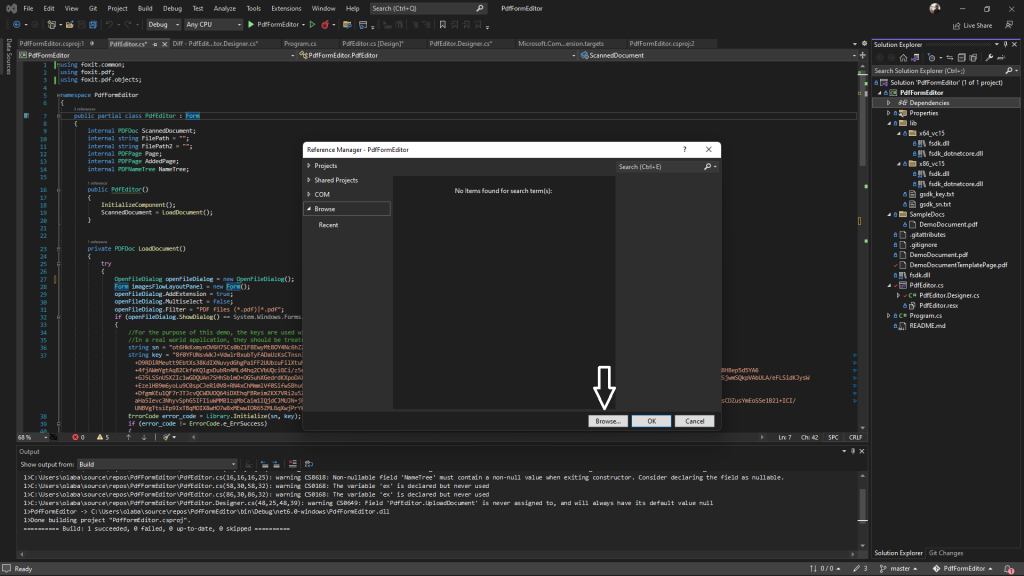
Right-click the Dependencies node in your Solutions Explorer tab and click Add Project Reference.
Click the Browse button:
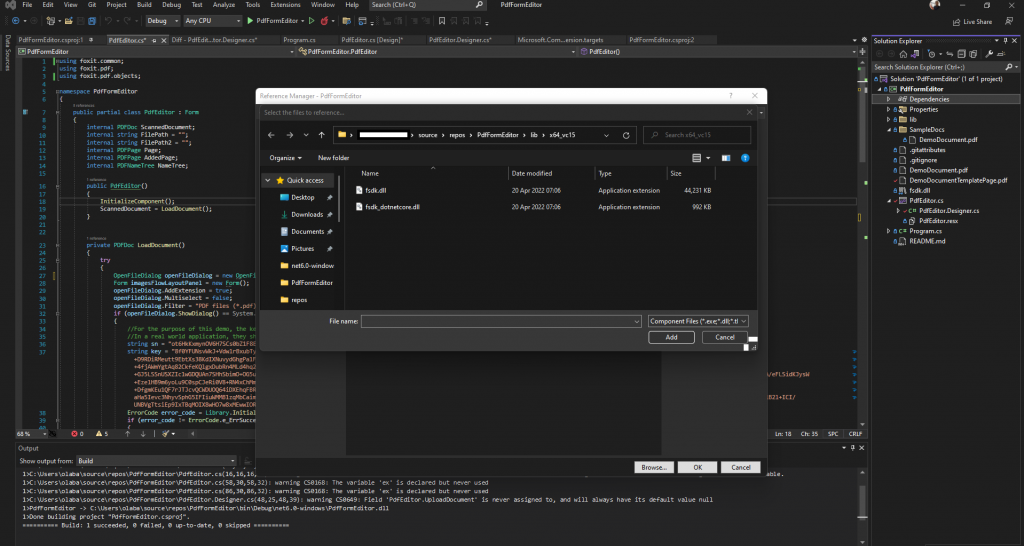
Navigate to x64_vc15 if you use a 64-bit PC or x86_vc15 if you use a 32-bit PC. Select fsdk_dotnetcore.dll, then click the Add button to add the library to your project:
Click the OK button to add the project reference.
Next, install the System.Drawing.Common NuGet package into your project.
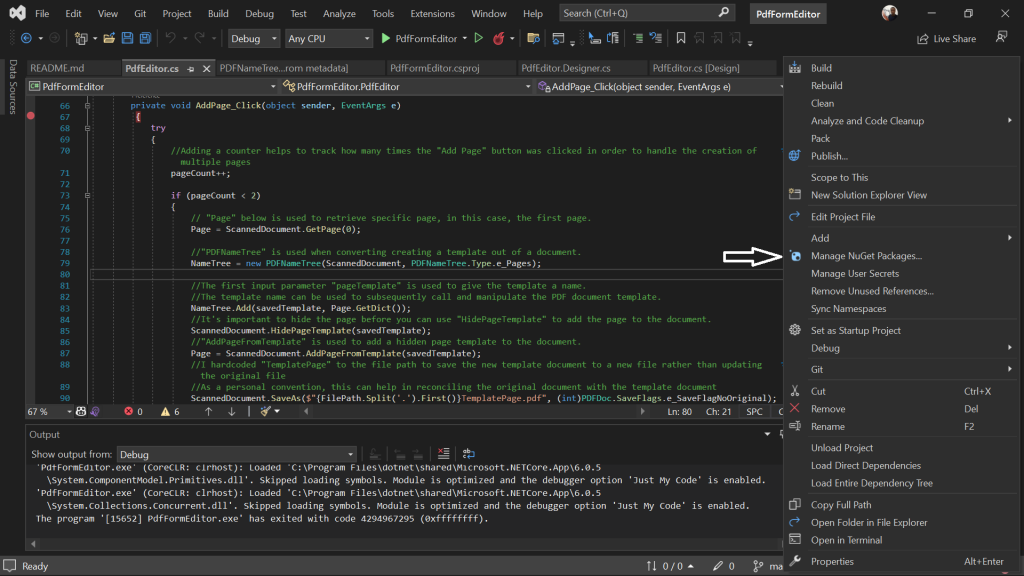
Right-click your project file:
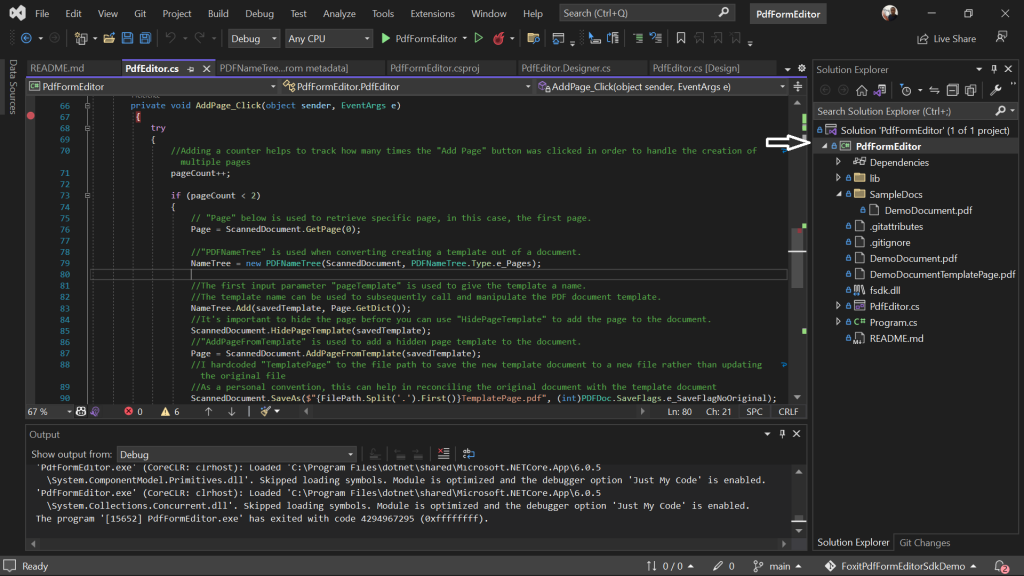
Select Manage NuGet Packages:
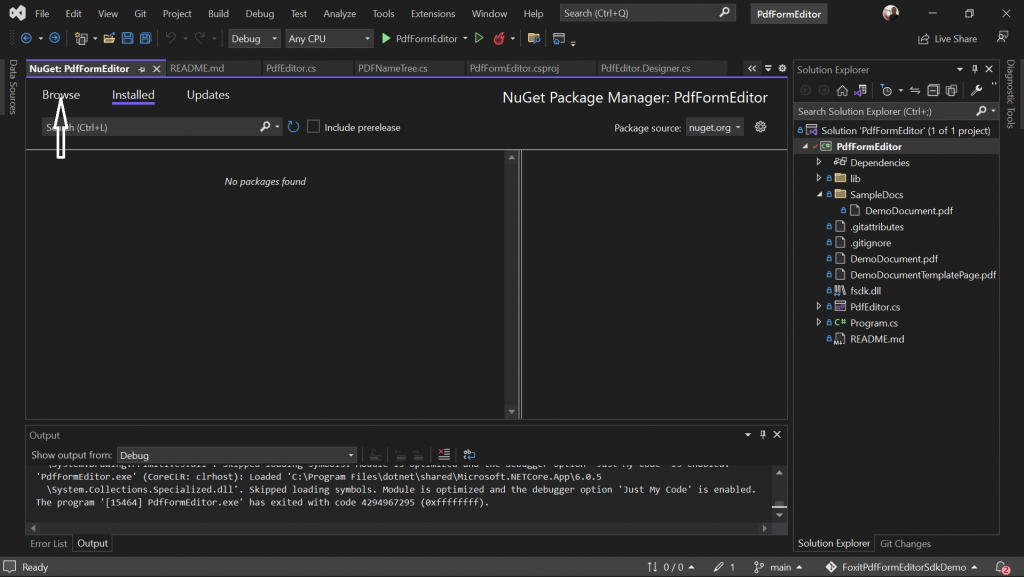
Click the Browse tab:
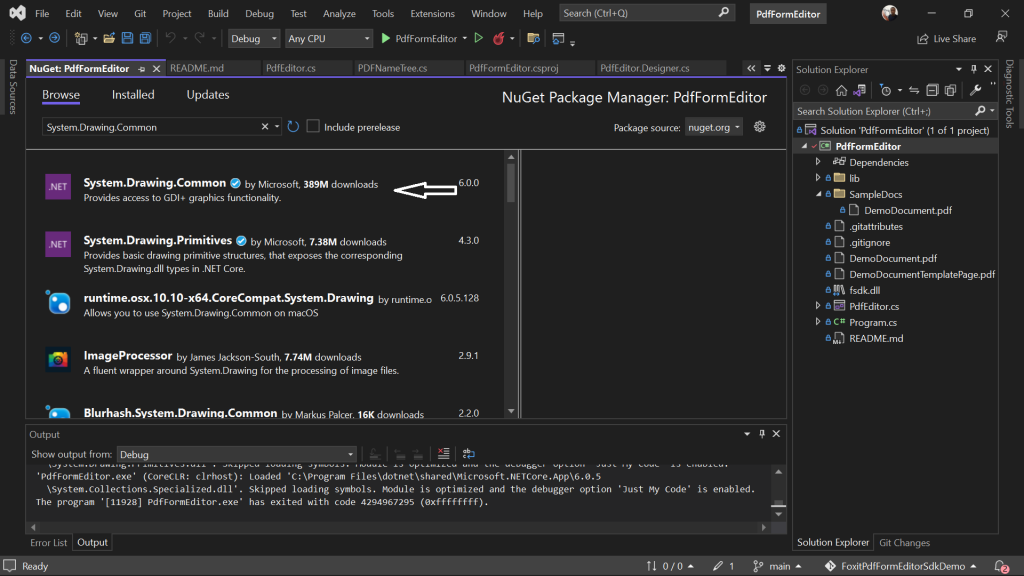
Search for and select System.Drawing.Common:
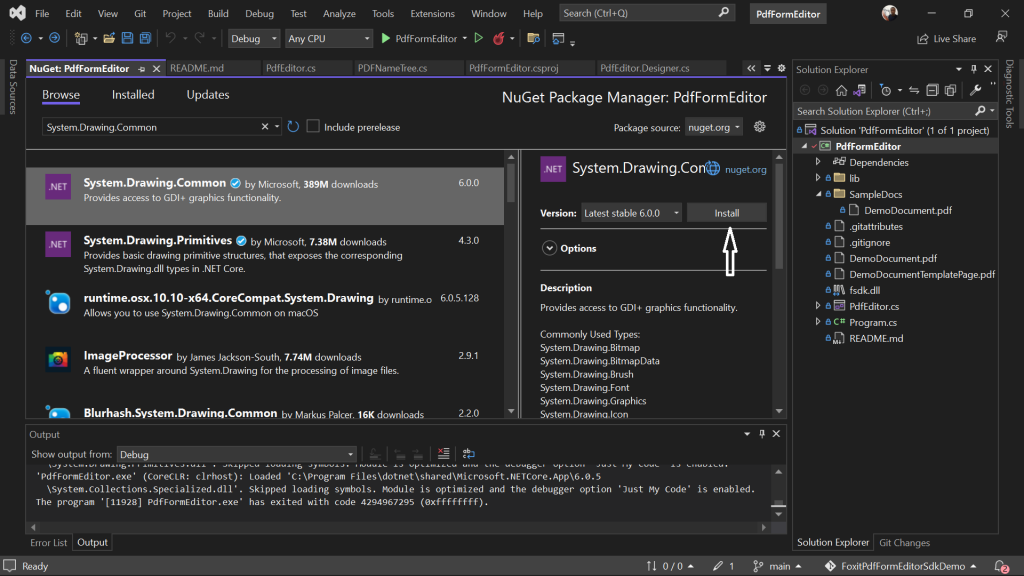
Click the Install button:
Now, add the fsdk.dll library from your lib\x64_vc15 or lib\x86_vc15 path to your project.
Right-click your project file:
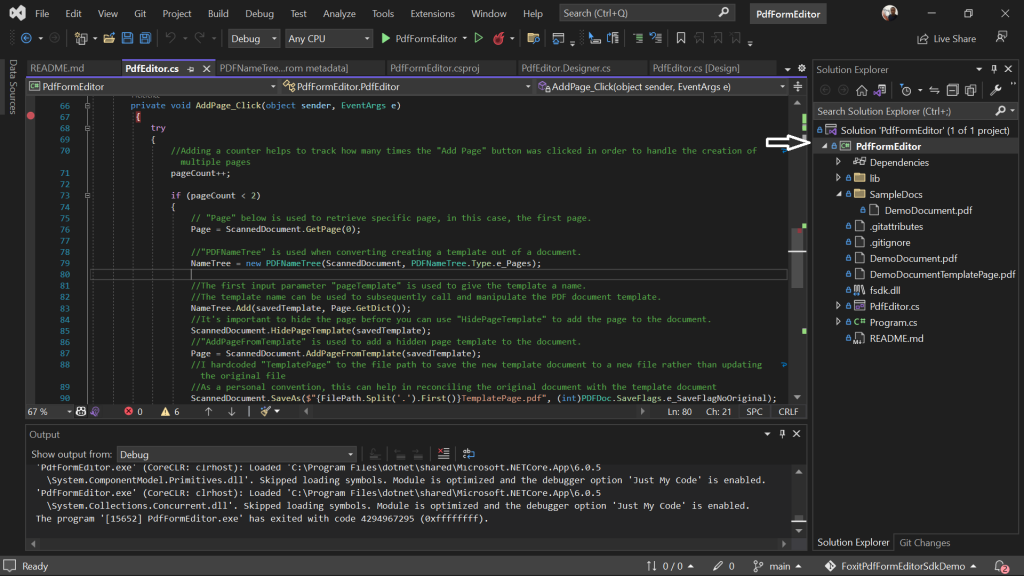
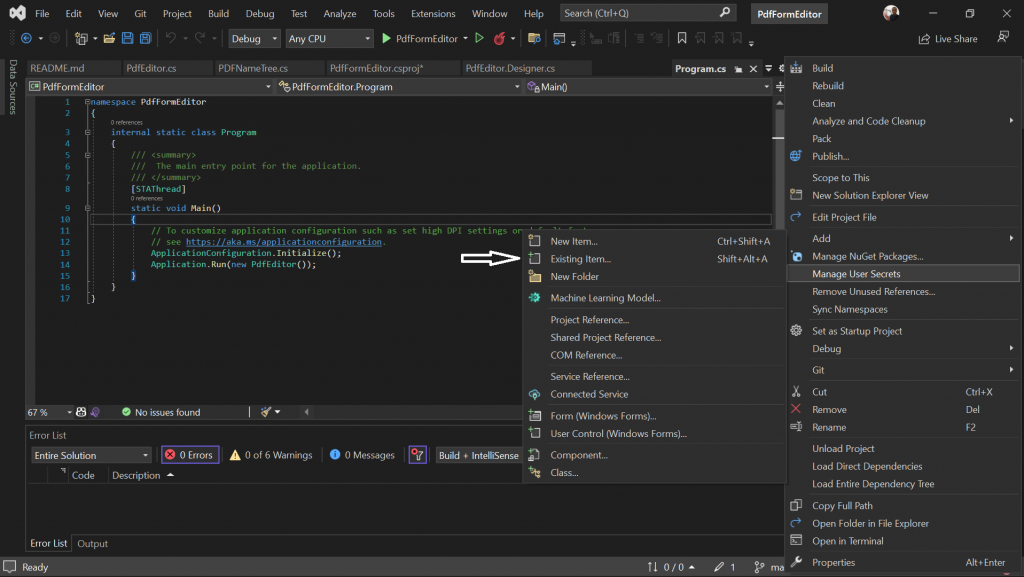
Hover on the Add dropdown and click Existing Item:
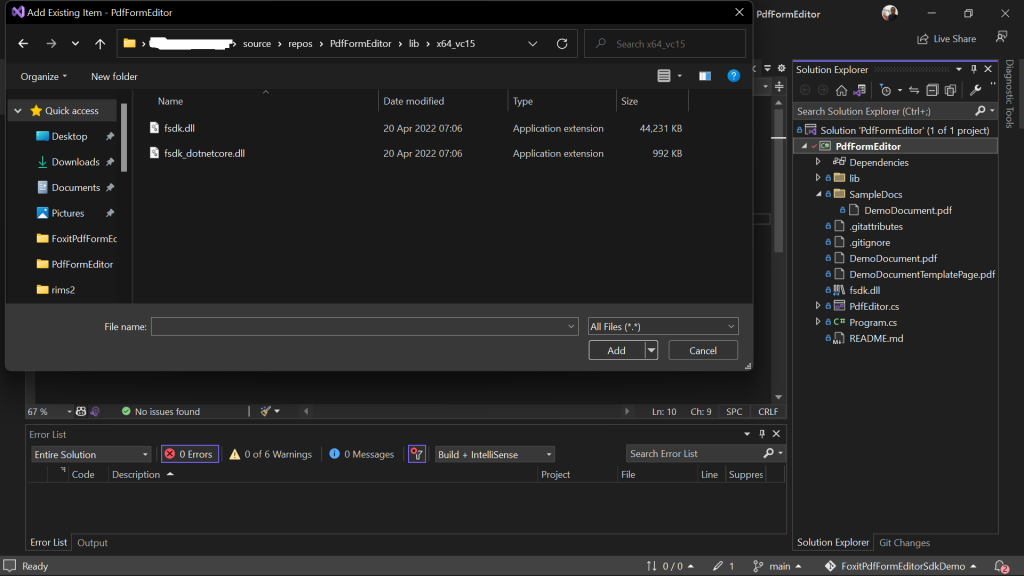
Navigate to the lib\x64_vc15 or lib\x86_vc15 path to your project (depending on whether your PC is 64-bit or 32-bit, respectively):
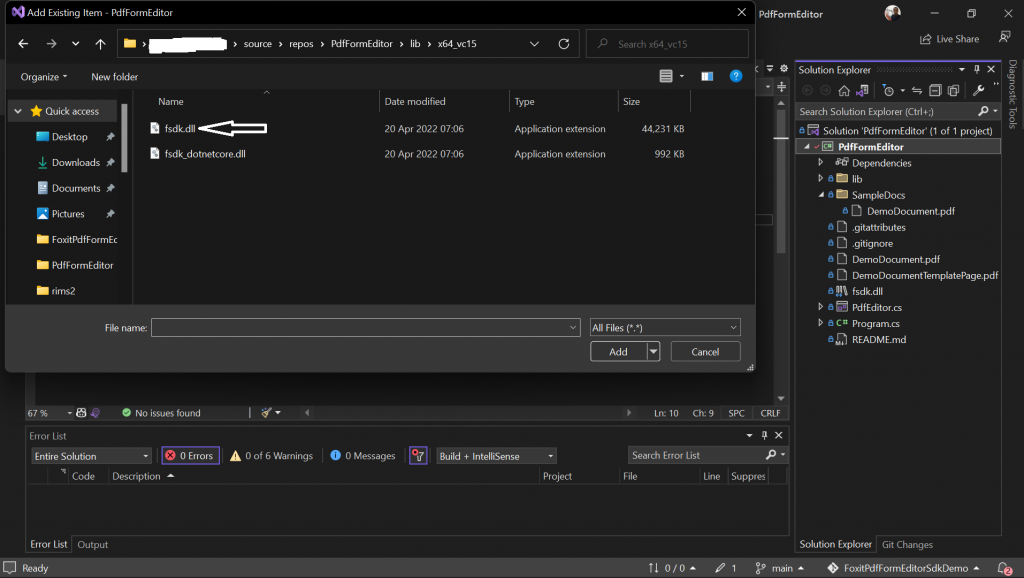
Double-click fsdk.dll to add the library to your project:
Check your .csproj file (PdfFormEditor.csproj) and confirm the presence of the code snippet below:
csharp
  <ItemGroup>
    <None Update="fsdk.dll">
      <CopyToOutputDirectory>PreserveNewest</CopyToOutputDirectory>
    </None>
    <None Update="Employee Benefits Form Template.pdf">
      <CopyToOutputDirectory>PreserveNewest</CopyToOutputDirectory>
    </None>
  </ItemGroup>
Employee Benefits Form Template.pdf represents the name of the PDF file you’re using to test the application. This item group helps ensure that the application can update the specified files.
Launch the application to test the AddPageFromTemplate functionality.
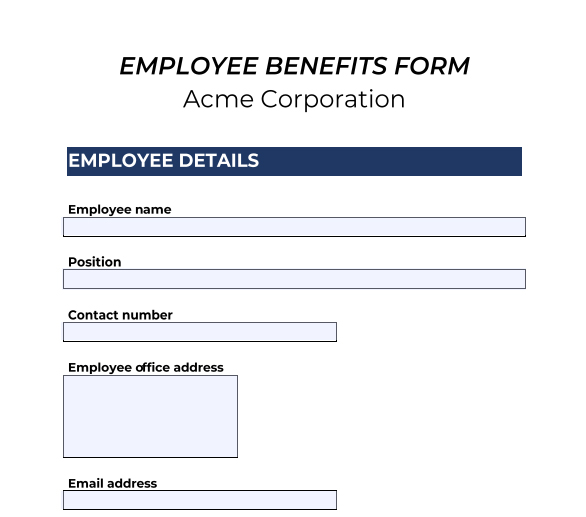
If you used the Employee Benefits Form Template.pdf document in the sample project repository, you should get a result like the one illustrated in the image below. If you’re using the trial version of the Foxit PDF SDK, you’ll see a watermark.
Conclusion
Working with PDF templates helps to simplify business processes for both your clients and your company. It can also aid compliance with data protection and privacy regulations, and it can help you maintain proper encryption and security for sensitive documents.
This tutorial demonstrated how to use the Foxit PDF SDK with PDF templates. Foxit can help you create, edit, and digitally sign PDF files in multiple languages. Among Foxit’s clients are JPMorgan Chase & Co., Google, Amazon, and Nasdaq.
In addition to the PDF SDK, Foxit offers a PDF editor, eSignature capabilities, and AI-based redaction, among other features. To see how Foxit can help your business, try it for free.
To check your work on this tutorial, consult the GitHub repository.
Author: Olabayo Balogun