Let Your Clients Fill Insurance Claim Forms Online with the Foxit SDK

Software has revolutionized the signing, storage, and manipulation of paper forms by converting a paper process into a digital one. PDFs are perhaps the most widely used format for digital versions of paper forms. Modern PDF technologies like the Foxit SDK even allow users to fill out forms online that are embedded inside PDFs, then print or upload those forms for their records.
The Foxit JavaScript SDK also allows users to digitally sign a PDF. This is a game-changer for the insurance industry, since it saves insurance agents and underwriters the trouble of signing and scanning paper forms.
In this tutorial, you will learn how to build a React project for a mock insurance company. You’ll build a web application that uses the Foxit SDK to fill out insurance claims online.
Contents
Prerequisites
– Latest LTS NodeJS version and latest version of npm. Installing Node will also install npm
– Foxit PDF SDK for Web a free trial download is available here
– Your Foxit license key and serial number
– Copy of sample insurance claim form pdf
You can also view a full sample application if you want to skip ahead.
Creating a React App
You’ll be creating a new React application that will leverage the Foxit SDK to interact with the insurance claim PDF form.
Open a terminal and run the following:
npx create-react-app pdf-form
This will generate a new React application with boilerplate defaults configured.
Download a copy of the template insurance claim PDF and place it in the public folder of your new project as public/InsuranceClaim.pdf.
To work with the Foxit SDK, you’ll have several npm packages and tweaks to make to the package.json file. You can make things easy by copying the following into your package.json file:
json
{
"name": "pdf-form",
"version": "0.1.0",
"private": true,
"dependencies": {
"@testing-library/jest-dom": "^5.11.4",
"@testing-library/react": "^11.1.0",
"@testing-library/user-event": "^12.1.10",
"react": "^17.0.2",
"react-dom": "^17.0.2","react-scripts": "4.0.3",
"web-vitals": "^1.1.1",
"@foxitsoftware/foxit-pdf-sdk-for-web-library": "^8.1.1"
},
"scripts": {
"start": "react-app-rewired --max_old_space_size=8192 start",
"build": "react-app-rewired --max_old_space_size=8192 build",
"test": "react-app-rewired test --env=jsdom",
"eject": "react-scripts eject"
},
"eslintConfig": {
"extends": [
"react-app",
"react-app/jest"
]
},
"browserslist": {
"production": [
">0.2%",
"not dead",
"not op_mini all"
],
"development": [
"last 1 chrome version",
"last 1 firefox version",
"last 1 safari version"
]
},
"devDependencies": {
"copy-webpack-plugin": "^6.1.1",
"customize-cra": "^1.0.0",
"react-app-rewired": "^2.1.8"
}
}
You’ll notice there are a few changes from the default file.
First, you’ll see an entry for the Foxit SDK npm package in the dependencies section.
In the scripts property, the start, build, and test values have been changed to use react-app-rewired. This allows more flexibility in adding tweaks to webpack. Also, by using –max_old_space_size you won’t deal with the memory issues that can occur when building webpack and the Foxit SDK.
There is a devDependencies section at the bottom of the file that adds a few more npm packages, which you’ll need to use the Foxit SDK.
To install all the dependencies, execute npm install in your terminal.
Foxit SDK Configuration
Create a file under the root of the project named config-overrides.js and replace the contents with the following:
js
const CopyWebpackPlugin = require("copy-webpack-plugin");
const {
override,
addWebpackPlugin,
addWebpackExternals
} = require('customize-cra');
const path = require("path");
const libraryModulePath =
path.resolve('node_modules/@foxitsoftware/foxit-pdf-sdk-for-web-library');
const libPath = path.resolve(libraryModulePath, 'lib');
module.exports = override(
addWebpackPlugin(
new CopyWebpackPlugin({
patterns: [{
from: libPath,
to: 'foxit-lib',
force: true
}]
})
),
addWebpackExternals(
'UIExtension',
'PDFViewCtrl'
)
);
This will add extra configuration for the Foxit SDK to load properly with webpack.
Next, add your license key. Create a file /src/licenseKey.js and replace it with the following:
js
const licenseKey = “YOUR_KEY”;
const licenseSN = ”YOUR_ SN”;
export { licenseKey, licenseSN }
You can find your real license key and serial number in the SDK folder you downloaded from the file /lib/websdk_key.txt and /lib/websdk_sn.txt.
Next, make a file src/preload.js that will help to load the web workers that the Foxit SDK uses; web workers run scripts in the background to free up the user interface. Replace the contents of src/preload.js with the following:
js
import preloadJrWorker from '@foxitsoftware/foxit-pdf-sdk-for-web-library/lib/preload-jr-worker';
import {
licenseKey,
licenseSN
} from './licenseKey';
const libPath = "/foxit-lib/";
window.readyWorker = preloadJrWorker({
workerPath: libPath,
enginePath: libPath + '/jr-engine/gsdk',
fontPath: 'https://webpdf.foxit.com/webfonts/',
licenseSN,
licenseKey,
});
Import this file inside src/index.js by adding the following to the top of that file:
js
import './preload.js'
Creating React Components
Now you’ll build the core of your React application that renders your PDF.
First, add some basic styling for the PDF viewer. Create a new file src/PDFForm.css and replace it with the following:
css
.foxit-PDF {
width: 90vw;
height: 90vh;
}
Next is the most important file in your application. This will render a PDF and programmatically add form elements to your insurance claim form PDF. Create a file src/PDFForm.js and replace it with the following:
js
import React from "react";
import * as UIExtension from "@foxitsoftware/foxit-pdf-sdk-for-web-library/lib/UIExtension.full.js";
import "@foxitsoftware/foxit-pdf-sdk-for-web-library/lib/UIExtension.css";
import "./PDFForm.css";
export default class PDFForm extends React.Component {
constructor() {
super();
this.elementRef = React.createRef();
} r
ender() {
return <div className="foxit-PDF" ref={this.elementRef} />;
} a
sync componentDidMount() {
const element = this.elementRef.current;
const libPath = "/foxit-lib/";
this.pdfui = new UIExtension.PDFUI({
viewerOptions: {
libPath,
jr: {
readyWorker: window.readyWorker,},
},
renderTo: element,
appearance: UIExtension.appearances.adaptive,
addOns: libPath + "uix-addons/allInOne.js",
});
window.pdfui = this.pdfui;
const pdfViewer = this.pdfui.pdfViewer;
const PDFViewCtrl = UIExtension.PDFViewCtrl;
const FieldTypes = PDFViewCtrl.PDF.form.constant.Field_Type;
const formFieldsJson = [
{
pageIndex: 0,
fieldName: "policyNumber",
fieldType: FieldTypes.Text,
rect: {
left: 50,
right: 300,
top: 650,
bottom: 600,
},
},
{
pageIndex: 0,
fieldName: "claimType",
fieldType: FieldTypes.ComboBox,
rect: {
left: 50,
right: 300,
top: 550,
bottom: 500,
},
},
];
pdfViewer
.getEventEmitter()
.on(PDFViewCtrl.Events.openFileSuccess, function (PDFDoc) {
PDFDoc.loadPDFForm().then(function (PDFForm) {
PDFDoc.getPDFForm();const taskList = formFieldsJson.map((json) =>
PDFForm.addControl(
json.pageIndex,
json.fieldName,
json.fieldType,
json.rect
)
);
Promise.all(taskList).then(function (results) {
results.map(function (result, index) {
if (!result) {
console.error("Cannot add control");
return;
}c
onst fieldName = formFieldsJson[index].fieldName;
const field = PDFForm.getField(fieldName);
if (fieldName === "claimType") {
field.setOptions([
{
label: "Car Accident",
value: "0",
selected: true,
defaultSelected: true,
},
{
label: "House Fire",
value: "1",
selected: false,
defaultSelected: false,
},
]);
}f
ield.setValue("", null);
});
});
});
});
const response = await fetch("InsuranceClaim.pdf");
const file = await response.blob();
await this.pdfui.openPDFByFile(file);} c
omponentWillUnmount() {
this.pdfui.destroy();
}
}
You’re sending an HTTP Ajax request to fetch your template PDF and then programmatically appending some form elements for your users to fill out in the PDF.
Open up src/App.js and replace it with the following to use the PDFForm component you just created:
js
import './App.css';
import PDFForm from './PDFForm.js';
import React from "react";
function App() {
return (
<div className="App">
<PDFForm />
</div>
);
}

export default App
Run npm start in your terminal to see the application in action.
Filling Out the PDF
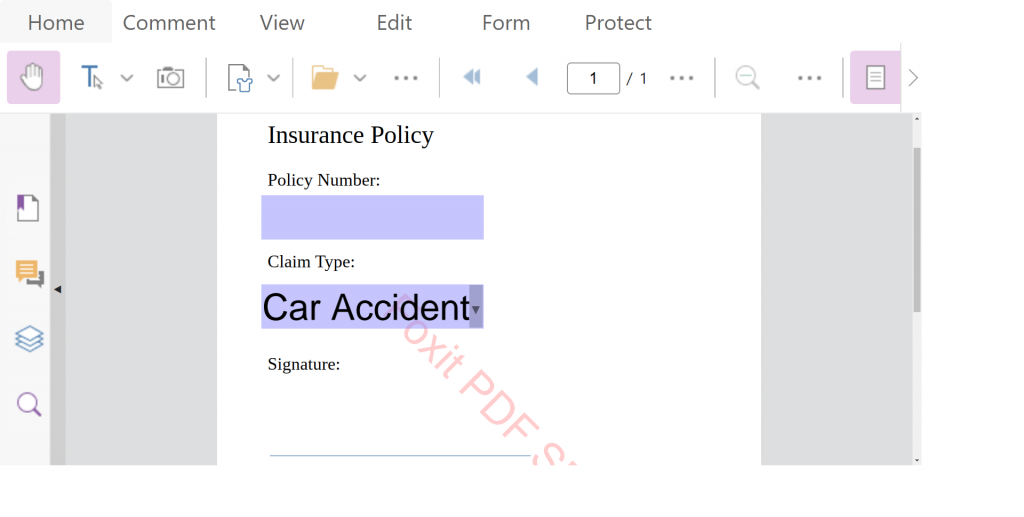
Once you have the application running, you’ll see the PDF template rendered with the form
elements you added.

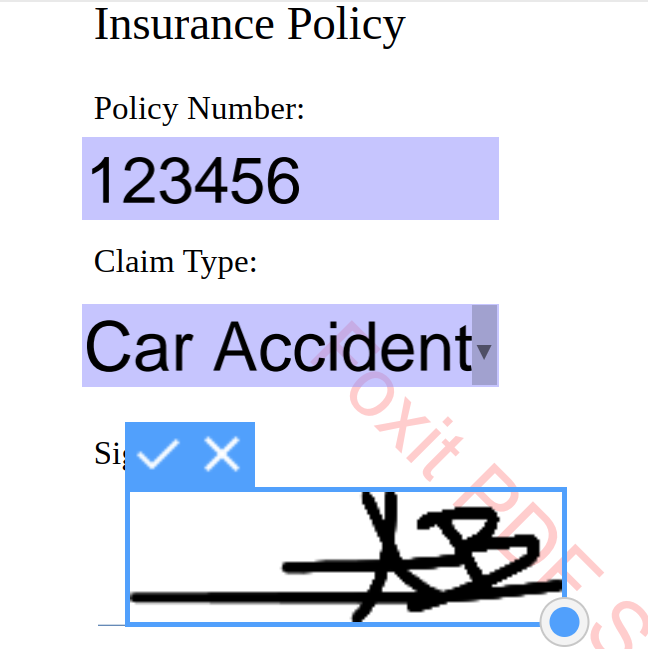
Fill out the insurance policy number and pick a claim type from the dropdown.
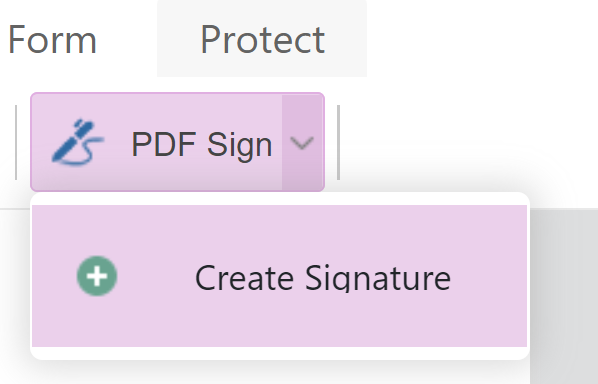
On the top toolbar, click Protect > PDF Sign > Create Signature. Draw a signature and press the button Create and Use.

Paste your signature under the label Signature on the PDF.

On the top toolbar, click Home, then click Download.
If you were a client filling out this insurance claim, you might want to email the form or upload it from an upload tool on the insurance company’s website.
Conclusion
In this article, you learned about the Foxit web SDK and how you can easily add powerful functionality to your web applications like rendering PDFs, adding form elements inside a PDF, allowing users to interact with your PDF in real time, and allowing users to download a filled-out and signed copy of the PDF.
You also saw how easy it is to use the Foxit SDK with React. By adding React components, you can reuse and extend the Foxit SDK’s functionalities within a larger suite of features that you often find in real-world applications.
If you found this tutorial helpful, you may want to take the next step and add functionality to programmatically export PDF form data as JSON.
Author: James Hickey