Using the Foxit SDK to Edit Text in a PDF
PDF files are handy when a document needs to be shared but protected from further edits. However, there are some circumstances where you might need to add or change information in a PDF anyway, for example, adding a signature to a contract. Because the very nature of PDFs is to protect the document from edits, this can be difficult.
Fortunately, the Foxit SDK is here to help. In this tutorial, we’ll show you how to create a JavaScript web application that can enable you to edit a PDF file with Foxit to your heart’s content.
Contents
Creating a JavaScript Web Application
The first step to editing a PDF is to create a web app that will allow you to edit the file. But before you get started, there are a few things you’ll need to do:
Prerequisites
– Download Apache Tomcat 9. Tomcat is used to host Java web applications.
– Download the Foxit SDK and extract it in your local folder.
– Create one folder in your local system for the JavaScript web application and copy the `external`, `lib`, `server` folders and the `package.json` file to this folder from the downloaded Foxit libraries folder.
Building the Web App
Now that we’re all set up, let’s get to work building the app.
JavaScript can be used to develop both client- and server-side applications. JavaScript applications use HTML and CSS for structure and style, which allows for great user interactivity. You’ll add the following HTML, CSS, and JavaScript into a single `.html` file. You can use any of your favorite editors to create the web app, but we suggest using Notepad++ as it has a lot of useful functions and is free and open source.
Note: This HTML file must be in the folder you’ve created for the web application.
Creating the HTML Index File
Open Notepad++ and create a new file. The following HTML code is boilerplate that contains the basic tags (`<html>`, `<head>`, `<title>`, `<body>`) necessary for creating an HTML file. The `<meta>` tag specifies the character set you use in the file. `utf-8` is the commonly used charset.
<!doctype html>
<html lang="en">
<head>
    <meta charset="UTF-8">
    <title>Document</title>
</head>
<body>

</body>
</html>
Save the file as `index.html`. Typically, the index file will be the homepage of any web application. But it’s not mandatory to name it as `index.html`. You can use the name of your choice.
Linking the UI Extension Stylesheet
The stylesheet consists of the CSS styles used for the UI of the PDF Editor. It’s available as the file `UIExtension.css` in the `lib` folder of the libraries you’ve copied to the web application directory.
To link your stylesheet, add this line between the `<head>` `</head>` tags:
<link rel="stylesheet" type="text/css" href="./lib/UIExtension.css">
Adding Styles for Tab Navigation
Tab navigation styles allow you to set the colors and display types of tabs in the PDF editor. Add this `<style>` between the `<head>` `</head>` tags. You can add this after the stylesheet linking line.
<style>
        .fv__ui-tab-nav li span {
            color: #636363;
        }
        .flex-row {
            display: flex;
            flex-direction: row;
        }
</style>
Adding a Div in the Body
Normally, the `<body>` tag contains the code for the UI elements that need to be present in the HTML page. The `<div>` tag defines a division or a section to the body of the HTML file.
Add the following line to create a div with the id `pdf-ui` in the body of the HTML file:
<div id="pdf-ui"></div>
You will define the elements for this div using JavaScript later on.
Adding Necessary JavaScripts
Now you can start adding the JavaScript that will load the Foxit SDK PDF viewer and editor to your web app. The `<script>` tag is used to embed client-side scripts to your application.
Add the following script to embed the `UIExtension.full` script available in the `lib` folder of the Foxit SDK.
<script src="./lib/UIExtension.full.js"></script>
Next, add the JavaScript that defines the necessary license variables of the Foxit SDK. You’ll need to change two variables:
* License serial number, available in the `websdk_sn` file in the `lib` folder
* Key, available in the `websdk_key` file in the lib folder
 <script>
        var licenseSN = "Your License Serial number";
        var licenseKey = "Your License Key";
</script>
The Foxit SDK is now configured.
Now, you’ll add the following code to render the `pdfui` from the div you set up earlier. It’ll render the complete PDF editor in your homepage when you load the application.
<script>
        var pdfui = new UIExtension.PDFUI({
            viewerOptions: {
                libPath: './lib', // the library path of web sdk.
                jr: {
                    licenseSN: licenseSN,
                    licenseKey: licenseKey
                }
            },
            renderTo: '#pdf-ui' // the div (id="pdf-ui").
        });
</script>
Configuring the Default PDF File to Be Loaded (Optional)
In this section, you’ll configure the default PDF file to be loaded when you initially open the web application. This step is optional—if it’s not configured, you’ll be able to select a PDF file from the Open PDF file option available in the web application.
To configure the default PDF file, it must be available in your web application directory. Add the following script to load the default PDF file:
<script>
        // modify the file path as you need.
        fetch('./pdf_file/finalTest.pdf').then(function (response) {
            response.arrayBuffer().then(function (buffer) {
                pdfui.openPDFByFile(buffer);
            })
        })

    </script>
Now, the specified PDF file available in the location `/pdf_file/finalTest.pdf` will be loaded to the editor by default.
That’s it, you’re done! Make sure you save your .html file.
Normally, running `.html` files is as simple as opening them up in your browser of choice, but Foxit SDK scripts will not load and execute properly if you directly open them. You’ll face a `Uncaught DOMException: Blocked a frame with origin “null” from accessing a cross-origin frame.` exception due to security protocol in the browser.
So, you’ll need to host the web application using a web server such as Tomcat.
Hosting the Application Using Tomcat
To host your JavaScript web application, you’ll use the Apache Tomcat web server you’ve already downloaded in the Prerequisite section.
Registering Apache as a Windows Service
You first need to register the Tomcat web server as a Windows service. Running Tomcat as a Windows service will keep it running in the background, so the web applications hosted on the server will always be accessible.
To register Tomcat as windows service, open the command prompt and navigate to the `bin` directory in the Apache Tomcat folder you’ve downloaded. For example, `E:\softwares\apache-tomcat-9.0.44\bin`. As another option, in Windows Explorer, you can open the `Apache bin` directory, hold *Shift key* and right click. Select Open Command Window Here. The command window will be open in the bin directory as the current working directory.
Now, enter the following command to register `Tomcat` as Windows service:
service.bat install
Hosting your Application in Tomcat
Now that you’ve created a folder, copied the relevant Foxit SDK files, and created a web application using the HTML file, you’ll need to copy the entire application folder into the `webapps` folder of your Apache Tomcat installation. For example: `E:\softwares\apache-tomcat-9.0.44\webapps`.
Starting the Tomcat Server
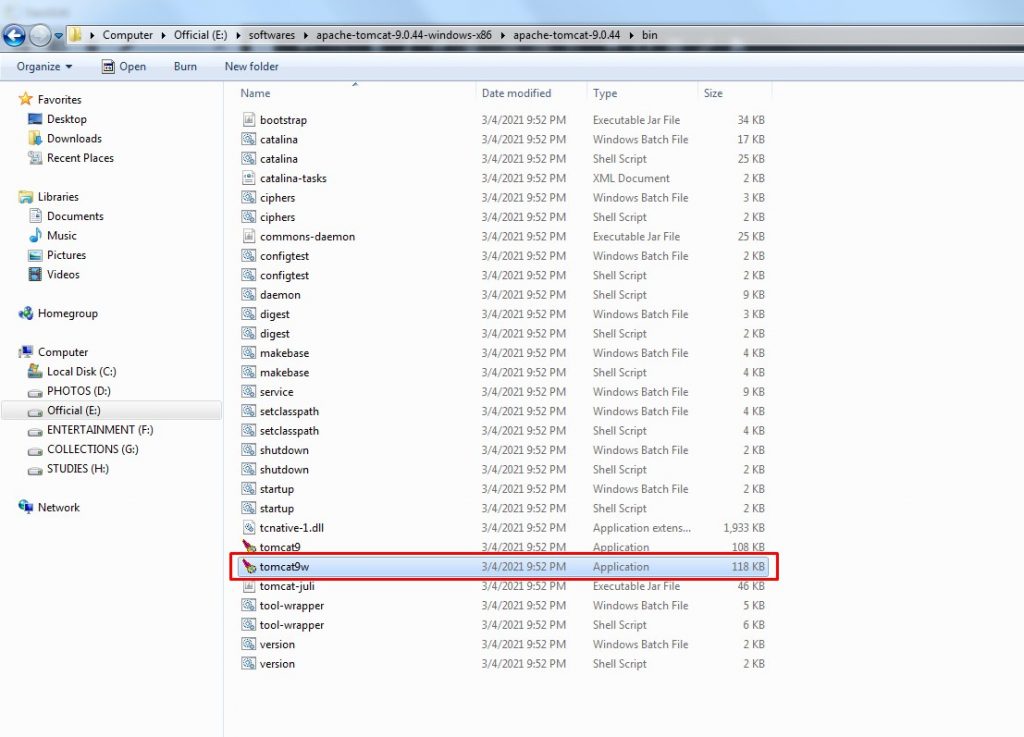
To start, navigate to the `bin` directory of the Apache installation, for example, `E:\softwares\apache-tomcat-9.0.44\bin`. Double-click the file called `tomcat9w`.
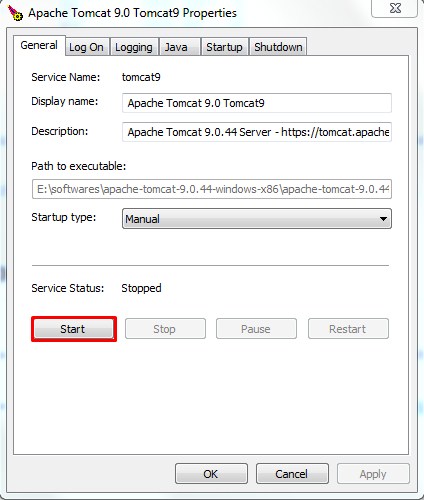
The Tomcat server properties dialog will open. Click Start to start the server.
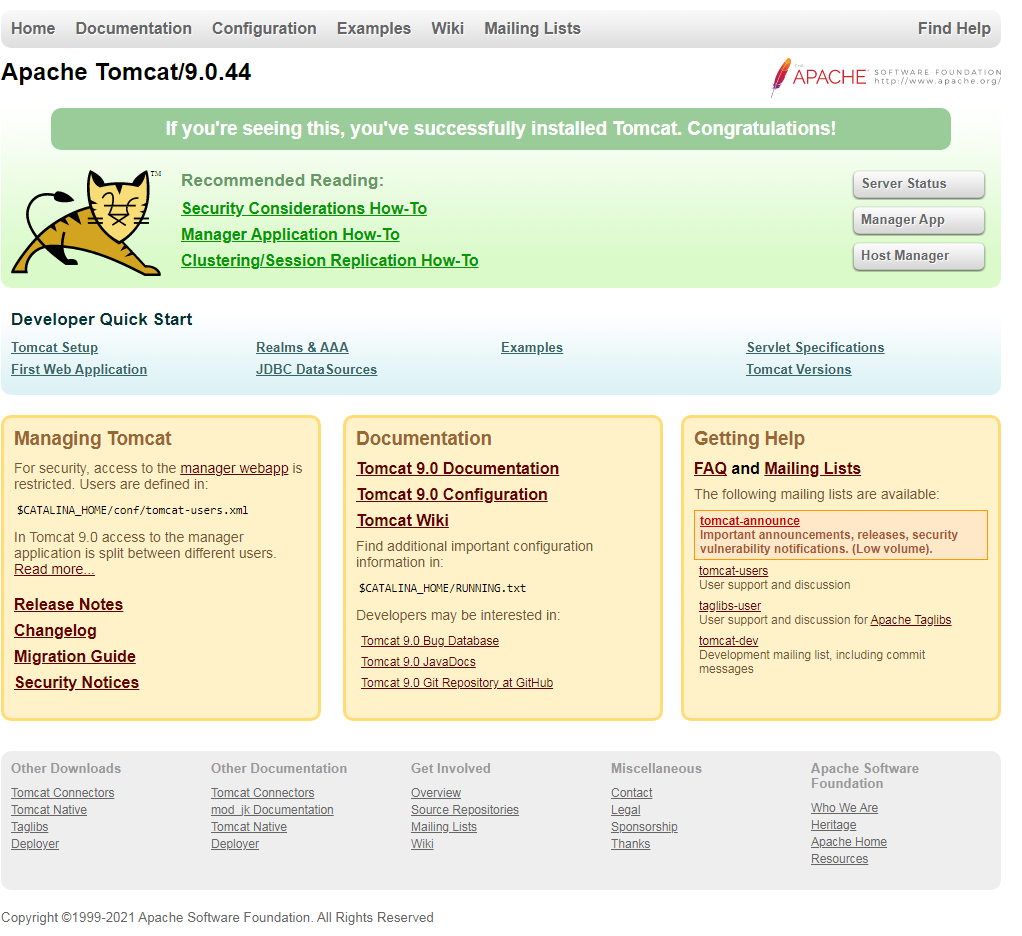
Now, you can access the applications hosted in this server using your browser. You can access the server by using the IP address of the server and port number `8080`. If you would like to access it directly from your local machine, you can use `localhost` in place of the IP address, like so:
http://localhost:8080/
If you see the Apache Tomcat homepage, the server has been started successfully.
Accessing the Foxit PDF Edit Application
You can access the application with the following URL:
http://localhost:8080/JavaScript_Web_app/index.html
Note that:
– `localhost:8080` is the local server with port `8080`.
– `JavaScript_web_app` is your web application name (the folder name you created for your application).
– `index.html` is the HTML file you’ve created.
Now, your application will open in your browser.
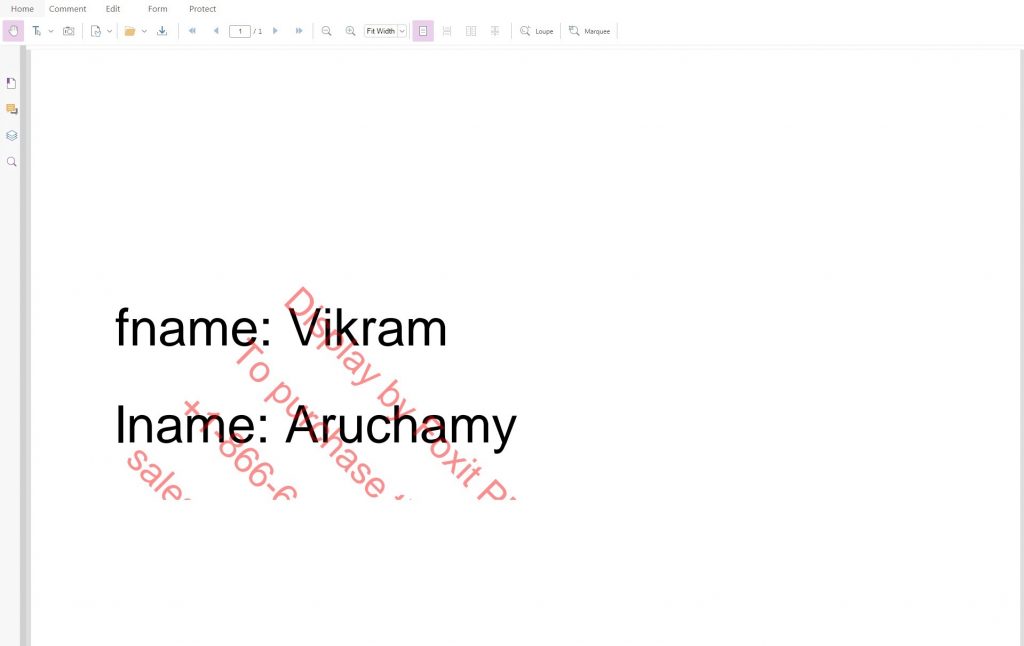
If you configured a default PDF file to be opened in your earlier setup, then that file will now open. If not, then you can open a PDF file using the Open option.
Editing the PDF File
To demonstrate the user-friendly functionality of Foxit SDK, let’s interact with some of the editing features of Foxit.
Underlining a Text in PDF
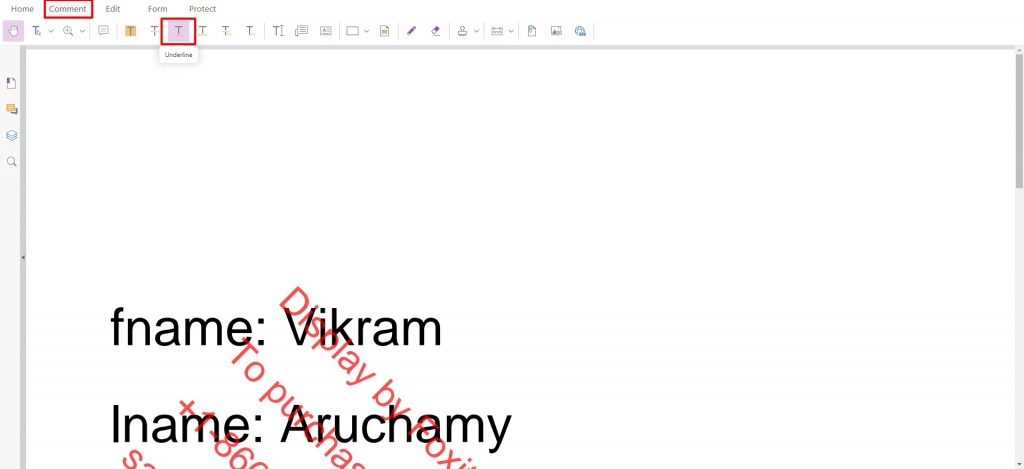
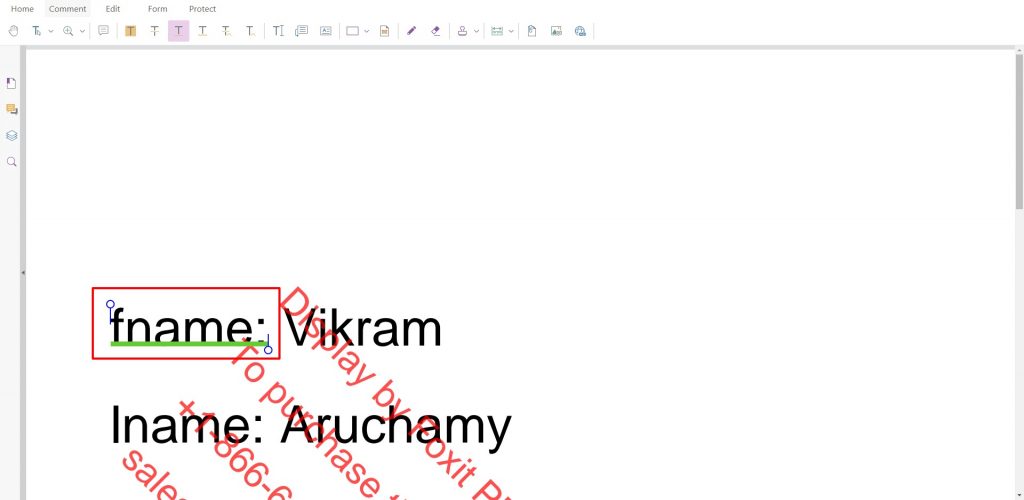
Select Text underline under the Comment section, select the text you want to underline, and voilà, the text is underlined.
Signing the PDF File
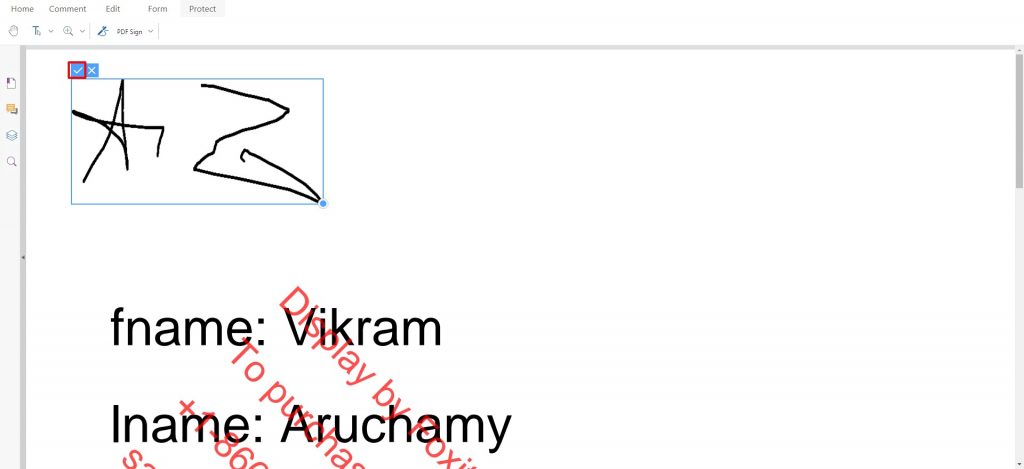
In this section, you’ll add a signature to the PDF, a common way to electronically authorize a document. First, create the signature. Select the Protect menu and then select PDF Sign. Click Create Signature to open a new window. Draw your signature and click Create and Use.
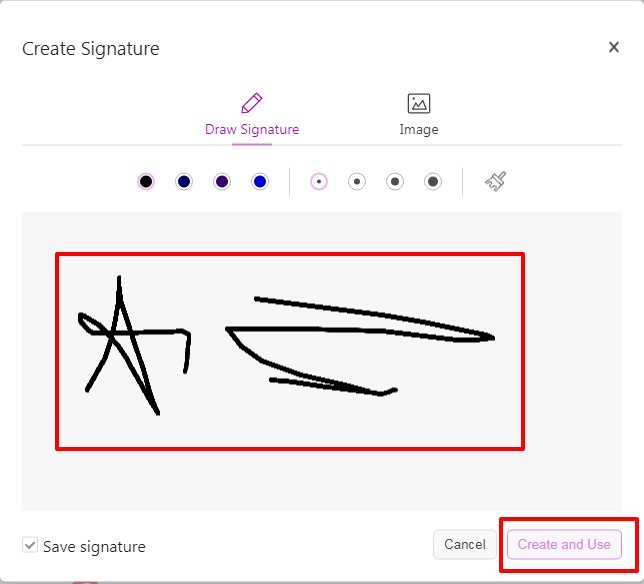
Once you’ve created your signature, click your mouse where you want to place it in the PDF. If the placement is satisfactory, select the checkbox above the signature to add it to the document.
Adding a Link
Let’s try adding some links in your PDF. First, select the text where you want to insert the link. Under the Comment tab, select Link, enter the URL in the popup, and click OK.

Adding an Image
To add an image to your PDF, select Image under the Comment tab. Highlight the area where you want to add the image. Choose an image from your local file system. That’s it.

Downloading the Edited File
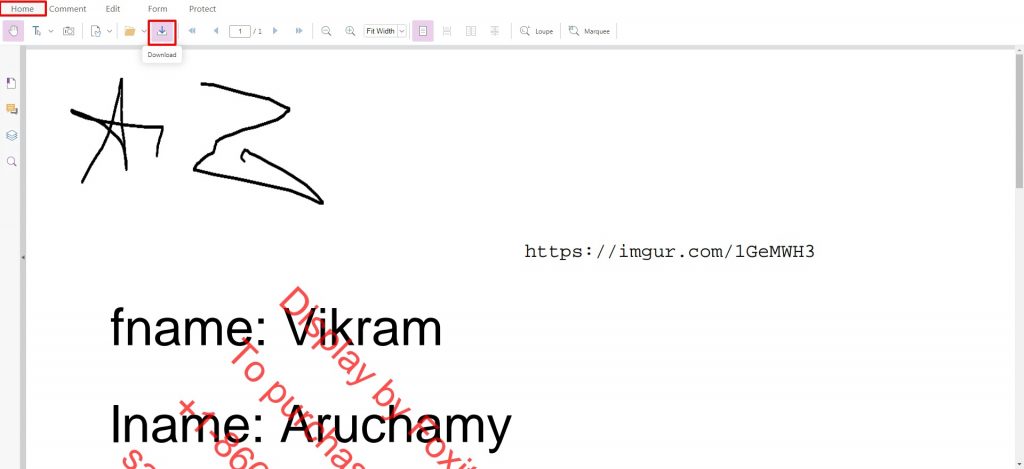
When you edit a PDF file, the edits are not saved in the source PDF file itself, so you’ll need to download an updated PDF file that contains the edits.
To download the updated PDF, select Download from the Home menu to download it to your default location.
Conclusion
The sole purpose of a PDF is to protect information from unwanted edits when sharing a document, which means it’s naturally difficult to edit. Foxit SDK is one of the easiest options for allowing developers to make simple edits to PDFs, such as adding an authorizing electronic signature.
You’ve just scratched the surface of what Foxit offers—it also supports other languages for creating applications to work with PDFs, and many more features that we haven’t covered here. For more details, please refer to the Foxit Developer Guide.
Author: Vikram Aruchamy