How to Programmatically Add Form Fields to Scanned PDFs Using Foxit PDF SDK for Web

Many businesses need to create PDFs with fillable form fields for internal or customer use. Creating PDF forms that end users can fill out—without having to print them out—helps you run your business with seamless efficiency and is also beneficial to the environment as it avoids contributing to deforestation.
Imagine running an organization or business without having to worry about the frustrations of an expensive copier that constantly needs maintenance, new ink, or more paper. Imagine a workplace that’s free and open, without bulky filing cabinets or administrators needing to spend hours sifting through paperwork.
PDF documents that can be filled out digitally will help you bring this future to life. Users can download, fill out, save, and send these documents back to you, all on their chosen device and without the hassle of printing, physically filling out, and scanning forms before sending them back to you.
Such digitally fillable forms are very practical for industries that are typically dependent on physical paperwork, for example, the healthcare and the education sectors.
This article introduces the concept of programmatically adding form fields to scanned PDFs, including some use cases; it then explains how to create fillable PDF forms through the use of the Foxit Quick PDF Library.
Contents
What Do We Mean by Programmatically Adding Form Fields to Scanned PDFs?
Programmatically adding form fields to PDFs involves adding code to generate fillable form fields in your PDF documents that can then be filled out using any PDF reader. You can use GUIs like Foxit, and other PDF readers to add fillable form fields.
As mentioned, digitally fillable PDFs enable seamless filling out of PDF files without having to print; they also save costs (no need for an expensive copier), reduce paper consumption, and support data or information gathering through forms. Fillable PDFs are useful in various situations, including applications, contracts, and other legal documents.
Filling out forms electronically as opposed to manually positively affects business growth and streamlines business processes with better data collection and significant time and cost saving. These improvements not only help your business operate more efficiently but also more professionally and effectively.
Use Cases for Programmatically Adding Form Fields to Scanned PDFs
Digitally fillable PDFs can provide strong advantages for organizations that traditionally use a large amount of physical paperwork. For example, hospitals and healthcare providers produce many static, scanned, or malformed PDFs.
All too often, these forms force users to resort to old-fashioned printing, filling out, and signing by hand, which is a significant waste of time and can lead to significant inaccuracies in records.
Digitally fillable forms can be completed and filed much faster than traditional ones and can be configured with a variety of properties to ensure important fields are completed before a form is submitted, thus ensuring more accurate records. Digital records are also less vulnerable to hazards such as fires, and can be more easily backed up.
Like healthcare providers, educational institutions, eg, schools and universities, can benefit greatly from the improved time efficiency, lower costs, and more accurate records that digitally fillable PDF forms provide. However, reducing paper consumption is a particularly attractive prospect for educational institutions, as the environmental cost of paper usage is a significant concern in this field.
Programmatically Implementing Form Fields to Scanned PDFs Using Foxit PDF SDK for Web
The following tutorial demonstrates how to add form fields to scanned PDFs programmatically using Foxit PDF SDK for Web, a leading software provider of solutions for reading, editing, creating, organizing, and securing PDF documents. Foxit PDF SDK for Web is also a cross-platform solution for PDF online viewing.
Note: In order to proceed with this tutorial, you must have a good understanding of HTML,
CSS, and JavaScript.
Getting Started
To follow the tutorial you first need to download Foxit PDF SDK for Web.
Note: Foxit PDF SDK for Web allows users to download a trial version to evaluate the SDK. The trial version is the same as the standard, except it expires after fifteen days and generated pages bear watermarks. After the evaluation period expires, customers can contact the Foxit sales team and purchase a license to continue using the software.
After downloading Foxit PDF SDK for Web, you start by setting up your folder structure:
1. Create a new directory as a project folder, such as C:\DEVELOPMENT\Eunit\Test code\Foxit.
2. Unzip the contents and copy the folders and files lib and external (if you need to use the
font resources) from Foxit PDF SDK for Web package to C:\DEVELOPMENT\Eunit\Test code\Foxit.
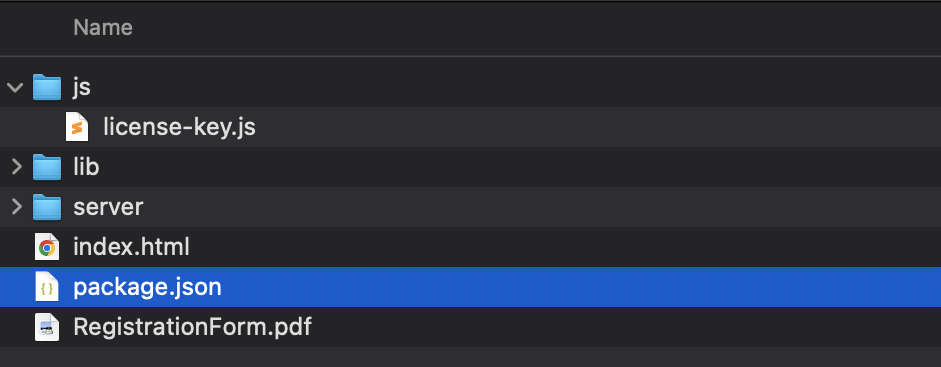
This below is how your folder structure should be:
txt
C:\DEVELOPMENT\Eunit\Test code\Foxit
+-- lib (copy from the Foxit PDF SDK for Web package)
+-- server (copy from the Foxit PDF SDK for Web package)
+-- index.html (create this file)
+-- RegistrationForm.pdf (this will be your sample PDF document)
+-- js
|__ license-key.js (contains your free trial license key and SN, copied from the Foxit PDF
SDK for Web package. You can find it inside the examples folder)
+-- package.json (copy from the Foxit PDF SDK for Web package)

Note: You can have a look at the sample PDF document used in this example.
First, make sure you have node js with npm installed on your machine. You can find instructions for installing nodejs and npm here.
Next, open the terminal and go to the root folder of your project and install the dependencies by running the following command:
npm install

Now, go to the server folder and open the index.js file with your preferred IDE and update the if(localAddress){ …} with the following code:
if(localAddress) {
console.log(boxen(`${chalk.bold('Basic Form')}: ${chalk.cyan(localAddress)}index.html
`, {
borderColor: 'green',
borderStyle: 'bold',
padding: 1,
margin: 1
}));
}
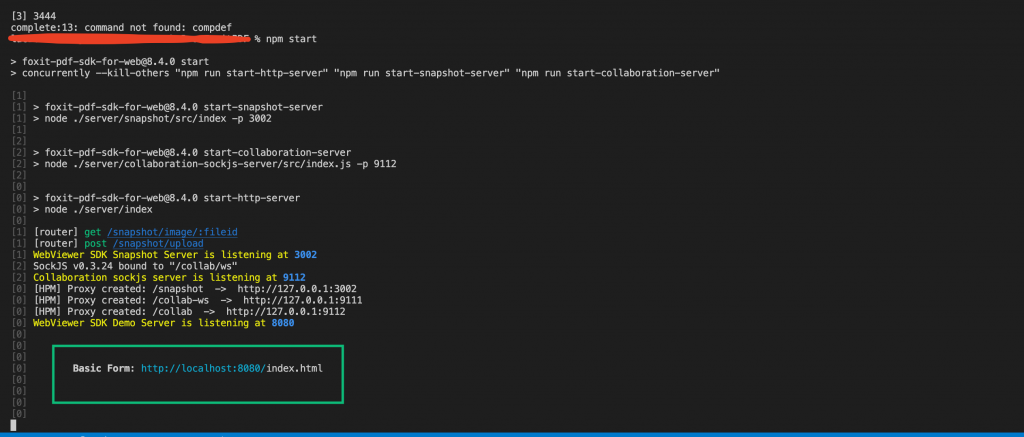
In the above code, you are updating the nodejs server output log to show the correct path since you copied it from the Web SDK.
Now we have everything set to start using Foxit SDK and programatically fill the sample registration form.
In the index.html file that you just created, paste the following code:
html
<!DOCTYPE html>
<html lang="en">
<head>
<meta charset="UTF-8">
<meta name="viewport" content="width=device-width,initial-scale=1">
<title>Foxit - Registration Form PDF Sample</title>
<link rel="stylesheet" href="./lib/PDFViewCtrl.css">
</head>
<body>
<div id="pdf-viewer"></div>
<script src="./js/license-key.js"></script>
<script src="./lib/PDFViewCtrl.full.js"></script>
<script>
window.$ = PDFViewCtrl.jQuery;
let IStateHandler = PDFViewCtrl.IStateHandler;
var PDFViewer = PDFViewCtrl.PDFViewer;
var pdfViewer = new PDFViewer({
libPath: './lib',
jr: {
licenseSN: licenseSN,
licenseKey: licenseKey,
}
});pdfViewer.init('#pdf-viewer');
var xhr = new XMLHttpRequest();
xhr.open('GET', './RegistrationForm.pdf', true);
xhr.responseType = 'blob';
xhr.onreadystatechange = function () {
if (xhr.readyState !== 4) {
return;
}v
ar status = xhr.status;
if ((status >= 200 && status < 300) || status === 304) {
pdfViewer.openPDFByFile(xhr.response);
}
};
xhr.send();
var FieldTypes = PDFViewCtrl.PDF.form.constant.Field_Type;
var formfiledsJson = [{
pageIndex: 0, fieldName: 'FirstName', fieldType: FieldTypes.Text, rect: {
left: 72,
right: 541,
top: 657,
bottom: 640,
}
},
{
pageIndex: 0, fieldName: 'LastName', fieldType: FieldTypes.Text, rect: {
left: 72,
right: 541,
top: 612,
bottom: 595,
}
},
{
pageIndex: 0, fieldName: 'age', fieldType: FieldTypes.Text, rect: {
left: 72,
right: 541,
top: 567,
bottom: 550,
}
},
{pageIndex: 0, fieldName: 'email', fieldType: FieldTypes.Text, rect: {
left: 72,
right: 541,
top: 522,
bottom: 505,
}
},
{
pageIndex: 0, fieldName: 'phone', fieldType: FieldTypes.Text, rect: {
left: 72,
right: 541,
top: 477,
bottom: 460,
}
},
{
pageIndex: 0, fieldName: 'dob', fieldType: FieldTypes.Text, rect: {
left: 72,
right: 541,
top: 432,
bottom: 415,
}
}];
pdfViewer.getEventEmitter().on(PDFViewCtrl.Events.renderFileSuccess, function
(PDFDoc) {
PDFDoc.loadPDFForm().then(function (PDFForm) {
PDFDoc.getPDFForm();
var taskList = []
formfiledsJson.map(function (json) {
taskList.push(PDFForm.addControl(json.pageIndex, json.fieldName, json.fieldType,
json.rect));
});
Promise.all(taskList).then(function (results) {
results.map(function (result,index) {
if(!result){
console.error("can't add control");
return;
}//
prefill the form
var field = PDFForm.getField(formfiledsJson[index].fieldName)
field.form.fields[0].setValue("John");field.form.fields[1].setValue("Doe");
field.form.fields[2].setValue("21");
field.form.fields[3].setValue("[email protected]");
field.form.fields[4].setValue("0143367789");
field.form.fields[5].setValue("11-11-1996");
})
});
})
})
</script>
</body>
</html>
A Partial part of the code has been taken from Foxit documentation.
In the above code, you imported the license.js for the Foxit SDK credentials, and PDFViewCtrl.full.js that you will use to load the PDF form then programatically fill it. Then you created a new PDFViewer instance and initialized it on your DOM inside the <div> with the pdf-viewer id. With your viewer ready, you then performed an XML Http request to load the sample PDF of your Registration Form.
Your PDF registration form is now loaded on the DOM, and you need to create the input fields programmatically to be able to fill them with text. To do so, first, you locate the fields on the PDF sample so you can generate the inputs at the same location. The formfiledsJson array will specify the input fields on your PDF form for the FirstName, LastName, age, email, Phone and dob. For this example, you only used form fields of text type. The rect property specifies the location of where these fields should be placed on the PDF form.
These dimensions will depend on the form you upload, you need to adjust these dimensions accordingly if you are using a different PDF form. Matching the dimensions of your created field rectangles to those in the PDF may require some trial and error. You could also use a PDF editor to get the exact coordinates for each field, but this would require additional software and expenses.
Next, the code renders the PDF form by loading the form fields based on the formfiledsJson array. You use PDFForm.addControl(..) to prepare the list of fields to be added where you want to have control and then render these on the PDF form by calling the Promise.all(..).
Finally, now that you have added fields to the PDF form, you can go ahead and fill them programmatically using the setValue(..) function.
To run the demo, open your terminal and go to the project root folder and run the nodejs server
with the following command:
npm start

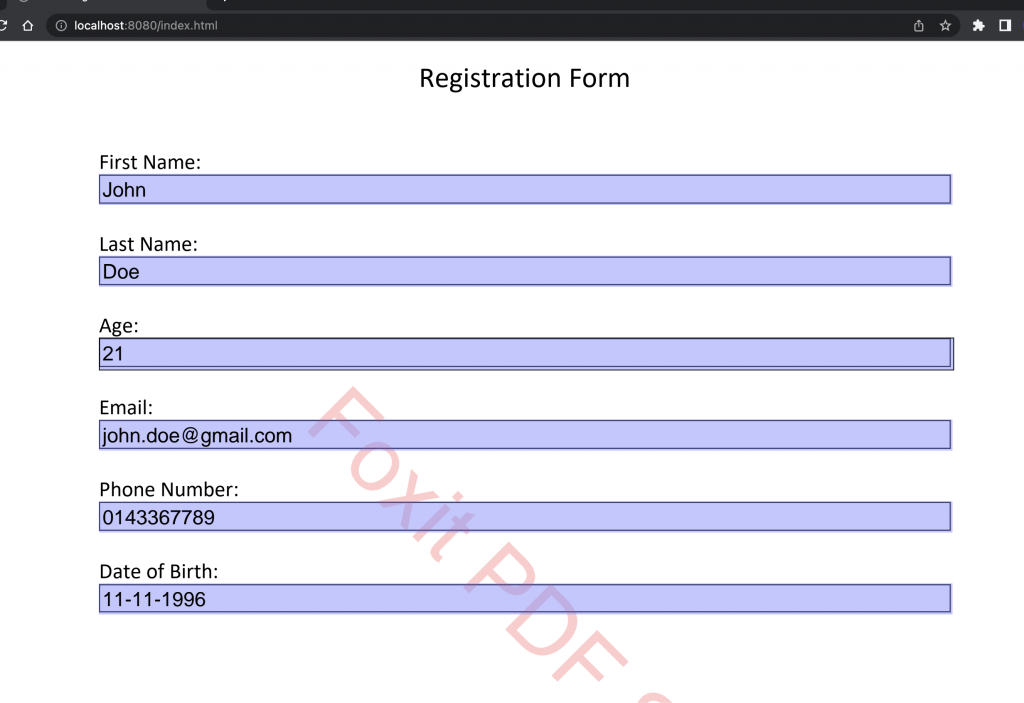
Now go to the http://localhost:8080/index.html and you should see your PDF form prefilled in your browser.

You can find the complete code of this tutorial on the following GitHub repository.
Conclusion
In this tutorial, you learned how to programmatically add form fields to scanned PDFs using Foxit PDF SDK for Web, a multilingual PDF tool that can create, view, edit, digitally sign, and print PDF files.
With this knowledge, you should be able to set up your own Foxit PDF SDK for Web, enabling
you to create your own digitally fillable forms; this will give you more accurate data and save you
both time and money.
Author: Emmanuel Uchenna