Developer Guide for Foxit PDF SDK for iOS (7.6)
Contents
- Introduction to Foxit PDF SDK
- Getting Started
- Rapidly building a full-featured PDF Reader
- Rapidly building a full-featured PDF Reader using Mac Catalyst
- Customizing User Interface
- Working with SDK API
- Creating a Custom Tool
- Implement Foxit PDF SDK for iOS using Cordova
- Implement Foxit PDF SDK for iOS using React Native
- Implement Foxit PDF SDK for iOS using Xamarin
- FAQ
- Bitcode Support
- Open a PDF document from a specified PDF file path
- Display a specified page when opening a PDF document
- License key and serial number cannot work
- Add a link annotation to a PDF file
- Insert an image into a PDF file
- Highlight the links in PDF documents and set the highlight color
- Highlight the form fields in PDF form files and set the highlight color
- Indexed Full Text Search support
- Print PDF document
- Night mode color settings
- Upload Foxit SDK Framework to Apple App Store
- Output exception/crash log information
- Localization settings
- Technical Support
Introduction to Foxit PDF SDK
Foxit PDF SDK
Foxit PDF SDK provides high-performance libraries to help any software developer add robust PDF functionality to their enterprise, mobile and cloud applications across all platforms (includes Windows, Mac, Linux, Web, Android, iOS, and UWP), using the most popular development languages and environments.
Application developers who use Foxit PDF SDK can leverage Foxit’s powerful, standard-compliant PDF technology to securely display, create, edit, annotate, format, organize, print, share, secure, search documents as well as to fill PDF forms. Additionally, Foxit PDF SDK includes a built-in, embeddable PDF Viewer, making the development process easier and faster. For more detailed information, please visit the website https://developers.foxit.com/pdf-sdk/.
In this guide, we focus on the introduction of Foxit PDF SDK for iOS platform.
Foxit PDF SDK for iOS
Have you ever worried about the complexity of the PDF specification? Or have you ever felt lost when asked to build a full-featured PDF app within a limited time-frame? If your answer is “Yes”, then congratulations! You have just found the best solution in the industry for rapidly integrating PDF functionality into your apps.
Foxit PDF SDK for iOS focuses on helping developers easily integrate powerful Foxit PDF technology into their own mobile apps. With this SDK, even developers with a limited knowledge of PDF can quickly build a professional PDF viewer with just a few lines of code on iOS or macOS platform.
Why Foxit PDF SDK for iOS is your choice
Foxit is a leading software provider of solutions for reading, editing, creating, organizing, and securing PDF documents. Foxit PDF SDK libraries have been used in many of today’s leading apps, and they are proven, robust, and battle-tested to provide the quality, performance, and features that the industry’s largest apps demand.
Foxit PDF SDK for iOS provides quick PDF viewing and manipulation support for iOS or macOS Devices. Customers choose it for the following reasons:
- Easy to integrate
Developers can seamlessly integrate the SDK into their own apps with just a few lines of code.
- Perfectly designed
Foxit PDF SDK for iOS is designed with a simple, clean, and friendly style, which provides the best user experience.
- Flexible customization
Foxit PDF SDK for iOS provides the source code for the user interface which lets the developers have full control of the functionality and appearance of their apps.
- Robust performance on mobile platforms
Foxit PDF SDK for iOS provides an OOM (out-of-memory) recovery mechanism to ensure the app has high robust performance when running the app on a mobile device which offers limited memory.
- Powered by Foxit’s high fidelity rendering PDF engine
The core technology of the SDK is based on Foxit’s PDF engine, which is trusted by a large number of the world’s largest and well-known companies. Foxit’s powerful engine makes the app fast on parsing, rendering, and makes document viewing consistent on a variety of devices.
- Premium World-side Support
Foxit offers premium support for its developer products because when you are developing mission critical products you need the best support. Foxit has one of the PDF industry’s largest team of support engineers. Updates are released on a regular basis to improve user experience by adding new features and enhancements.
Main Frame of Foxit PDF SDK for iOS
Foxit PDF SDK for iOS consists of three elements as shown in the following picture. This structure is shared between all mobile platform versions of Foxit PDF SDK, which makes it easier to integrate and support multiple mobile operating systems and frameworks in your apps.
Note:From version 7.4, Foxit PDF SDK for iOS provides a new package which supports to build a Mac version app built with Mac Catalyst.

The three elements of Foxit PDF SDK for Android, iOS and UWP
- PDF Core API
The PDF Core API is the heart of this SDK and is built on Foxit’s powerful underlying technology. It provides the functionality for basic PDF operation features, and is utilized by the PDF View Control and UI Extensions Component, which ensures the apps can achieve high performance and efficiency. The Core API can be used independently for document rendering, analysis, text extraction, text search, form filling, digital signatures, Pressure Sensitive Ink, certificate and password security, annotation creation and manipulation and much more.
- PDF View Control
The PDF View Control is a utility class that provides the functionality for developers to interact with rendering PDF documents per their requirements. With Foxit’s renowned and widely used PDF rendering technology at its core, the View Control provides fast and high quality rendering, zooming, scrolling and page navigation features. The View Control derives from platform related viewer classes such as UIView on iOS and allows for extension to accommodate specific user needs.
- UI Extensions Component
The UI Extensions Component is an open source library that provides a customizable user interface with built-in support for text selection, markup annotation, outline navigation, reading bookmarks, full-text searching, form filling, text reflow, attachment, digital/handwritten signature, reflow, document editing and password encryption. These features in the UI Extensions Component are implemented using the PDF Core API and PDF View Control. Developers can utilize these ready-to-use UI implementations to build a PDF viewer quickly with the added benefit of complete flexibility and control to customize the UI design as desired.
From version 4.0, Foxit PDF SDK for iOS made a big change and optimization for the UI Extensions Component. Now, it wraps the basic UI implementations to FSPDFReader class, such as panel controller, toolbar settings, and alert view, etc. Building a full-featured PDF Reader is getting simpler and easier. Furthermore, users can flexibly customize the features they want through a configuration file.
From version 5.0, Foxit PDF SDK for iOS removed the FSPDFReader class, and moved the wrapped APIs in FSPDFReader class to UI Extensions Component. In version 5.0, every element in the built-in UI can be configurable. More advanced APIs and more powerful configuration file are provided for developers to further customize the UI elements, such as showing or hiding a specific panel, top/bottom toolbar, the items in the top toolbar, and the items in the View setting bar and More Menu view.
UI Extensions Component Overview
The UI Extensions Component uses “module” mechanism which refines each feature into a module. All of the modules except LocalModule (used for file management) will be loaded by default if UI Extensions is added. Users can customize module through implementing Module interface class, and then call UIExtensionsManager#registerModule to register the custom module to current UIExtensions manager. When not in use, you can call UIExtensionsManager#unregisterModule to unregister it from current UIExtensions manager.
UIExtensionsManager contains the main-frame UI, such as top/bottom toolbar, and other UI components which are shared between each module. Meanwhile, through UIExtensionsManager, each feature module can also be loaded separately. And when loaded, the feature module will adapt and adjust the main-frame UI, as well as establish the connection of message event response. Each feature module may contain its module-specific UI components, and have its self-contained message event handling logic. UIExtensionsManager will also be responsible for distributing messages and events received from View Control component to each feature module. The following figure shows the detailed relationship between UIExtensionsManager and modules.

The relationship between UIExtensionsManager and modules
Tool handler and annotation handler will process the events from touch screen or gestures of PDFViewCtrl. When the touch screen and gestures occur, PDFViewCtrl will send the corresponding events to UIExtensionsManager:
a) If a tool handler exists currently, UIExtensionsManager will send the corresponding events to the current tool handler, and then event-handing process ends.
b) If an annotation is selected currently, UIExtensionsManager will send the corresponding events to the annotation handler corresponding to the currently selected annotation, and then event-handing process ends.
c) If currently no tool handler exists and no annotation is selected, UIExtensionsManager will send the corresponding events to selection tool handler. Text Selection tool is used for processing the related events for text selection. For example, select a piece of text, and add Highlight annotation. Blank Selection tool is used for processing the related events for blank space. For example, add a Note annotation on the blank space.
Note: Tool Handler and Annotation Handler will not respond the events at the same time. Tool Handler is primarily used for annotation creation (currently, the creation of link annotation is not supported), signature creation and text selection. Annotation Handler is mainly used for annotation editing and form filling. The following figure shows the event response flow chart between Tool Handler and Annotation Handler.

The event response flow chart between Tool Handler and Annotation Handler
Key Features of Foxit PDF SDK for iOS
Foxit PDF SDK for iOS has several main features which help app developers quickly implement the functions that they really need and reduce the development cost.
Note: From version 7.1, Foxit PDF SDK for iOS supports the new appearance of iOS 13 Dark Mode. All the built-in controls in the tools framework can adapt their appearance to match the current system appearance for a seamless experience.
| Features | Description |
| PDF Document | Open and close files, set and get metadata. |
| PDF Page | Parse, render, read, and edit PDF pages. |
| Render | Graphics engine created on a bitmap for platform graphics device. |
| Reflow | Rearrange page content. |
| Crop | Crop PDF pages for betting reading. |
| Text Select | Select text in a PDF document. |
| Text Search | Search text in a PDF document, and provide indexed Full-Text Search |
| Outline | Directly locate and link to point of interest within a document. |
| Reading Bookmark | Mark progress and interesting passages as users read. |
| Annotation | Create, edit and remove annotations. |
| Layers | Add, edit, and remove optional content groups. |
| Attachments | Add, edit, and remove document level attachments. |
| Form | Fill form with JavaScript support, export and import form data by XFDF/FDF/XML file. Support to create TextField, CheckBox, RadioButton, ComboBox, ListBox, and Signature Field. |
| XFA | Support static and dynamic XFA. |
| Signature | Sign a PDF document, verify a signature, add or delete a signature field. Add and verify third-party digital signature. Support Long term validation of signatures (LTV). |
| Fill | Fill flat forms (i.e. non-interactive forms) with text and symbols. |
| Security | Protect PDFs with password or certificate. |
| Pan and Zoom | Adjust the magnification and position of the view area to match the area in an adjustable rectangle in the Pan & Zoom window’s thumbnail view of the page. |
| Print PDF document. | |
| RMS | Support Microsoft RMS decryption with the standard IRMv1 and IRMv2. |
| Comparison | Compare two PDF documents, and mark the differences between them. |
| Scanning | Scan and convert paper documents to PDFs. |
| Speak | Support to read out the text of PDF file. |
| Out of Memory | Recover from an OOM condition |
Note Outline is the technical term used in the PDF specification for what is commonly known as bookmarks in traditional desktop PDF viewers. Reading bookmarks are commonly used on mobile and tablet PDF viewers to mark progress and interesting passages as users read but are not technically outline and are stored at app level rather than within the PDF itself.
Support robust PDF applications with Foxit PDF SDK for iOS
Development of robust PDF applications is challenging on mobile platforms which has limited memory. When memory allocation fails, applications may crash or exit unexpectedly. To deal with this issue, Foxit PDF SDK for iOS provides an out-of-memory (OOM) mechanism to support applications.
OOM is an evolved feature in Foxit PDF SDK for iOS because of its complexity. The key of OOM mechanism is that Foxit PDF SDK for iOS will monitor the usage of memory and take recovery operations automatically once OOM is detected. During the recovery process, Foxit PDF SDK for iOS reloads the document and page automatically and restores the status to the original before OOM. It means the current reading page and location, as well as page view mode (single or continuous page) can be recovered. However, the data generated from editing will be lost.
Foxit PDF SDK for iOS provides a property “shouldRecover” in FSPDFViewCtrl class. By default, the value of “shouldRecover” is “YES”. If you do not want to enable the auto-recovery when OOM is detected, you can set “shouldRecover” to “No” as follows:
self.pdfViewControl = [[FSPDFViewCtrl alloc] initWithFrame:[[UIScreen mainScreen] bounds]];
self.pdfViewControl.shouldRecover = NO;
At that time, the application will throw an exception, and may crash or exit unexpectedly.
Evaluation
Foxit PDF SDK allows users to download trial version to evaluate SDK. The trial version has no difference from the standard licensed version except for the free 10-day trial limitation and the trial watermarks in the generated pages. After the evaluation period expires, customers should contact the Foxit sales team and purchase licenses to continue using Foxit PDF SDK.
License
Developers should purchase licenses to use Foxit PDF SDK in their solutions. Licenses grant developers permission to release their apps which utilize Foxit PDF SDK. However, users are prohibited to distribute any documents, sample code, or source code in the released package of Foxit PDF SDK to any third party without written permission from Foxit Software Incorporated.
About this Guide
This guide is intended for the developers who need to integrate Foxit PDF SDK for iOS into their own apps. It aims at introducing the following sections:
- Section 1: gives an introduction of Foxit PDF SDK, especially for iOS platform SDK.
- Section 2: illustrates the package structure and running demos.
- Section 3: describes how to quickly create a full-featured PDF Reader.
- Section 4: describes how to quickly create a full-featured PDF Reader using Mac Catalyst.
- Section 5: introduces how to customize the user interface.
- Section 6: shows how to use Foxit PDF SDK Core API.
- Section 7: shows how to create a custom tool.
- Section 8: shows how to implement Foxit PDF SDK using Cordova
- Section 9: shows how to implement Foxit PDF SDK using React Native
- Section 10: shows how to implement Foxit PDF SDK using Xamarin
- Section 11: lists some frequently asked questions.
- Section 12: provides support information.
Getting Started
It is very easy to setup Foxit PDF SDK for iOS and see it in action! It takes just a few minutes and we will show you how to use it on the iOS or macOS platforms. The following sections introduce the structure of the installation package and how to run a demo.
Requirements
Note: From version 7.5.1, Foxit PDF SDK for iOS only supports 64-bit devices. It is because that in iOS 11 and later, all apps use the 64-bit architecture, please see the Apple developer guide.
The package without Mac Catalyst:
- iOS 11.0 or higher
- Xcode 9.0 or newer
Note: iOS 13 or higher requires Xcode version 11 or higher.
The package with Mac Catalyst:
- macOS 10.15 or higher
- Xcode 11 or higher
What is in the Package
Foxit PDF SDK for iOS provides two packages as follows:
- foxitpdfsdk_7_6_ios.zip: only support building apps on an iPhone or iPad.
- foxitpdfsdk_7_6_ios_catalyst.zip: support building apps on an iPhone, iPad or a Mac.
Note: If you want to build apps on macOS, you can choose the foxitpdfsdk_7_6_ios_catalyst.zip package.
The package without Mac Catalyst
Download the “foxitpdfsdk_7_6_ios.zip” package, and extract it to a new directory like “foxitpdfsdk_7_6_ios” as shown in Figure 2-1. The package contains:
| docs: | A folder containing API references, developer guide, and upgrade warnings. |
| icc_profile | The default icc profile files used for output preview feature |
| libs: | A folder containing license files, SDK framework, UI Extensions Component and source code. |
| samples: | A folder containing iOS sample projects. |
| getting_started_ios.pdf: | A quick guide for Foxit PDF SDK for iOS. |
| legal.txt: | Legal and copyright information. |
| release_notes.txt: | Release information. |

Figure 2-1
In the “libs” folder as shown in Figure 2-2, there are items that make up the core components of Foxit PDF SDK for iOS, and a configuration file for cocoaPods tool and a script file for stripping the arm architectures.

Figure 2-2
- FoxitRDK.framework – The framework that includes the Foxit PDF SDK dynamic library and associated header files.
- uiextensionsDynamic.framework – The framework that includes UIExtensions dynamic library, associated header files, and the resource files that are needed for the default built-in UI implementations.
- FoxitPDFScanUI.framework – The framework that includes Foxit PDF SDK for scanning dynamic library, associated header files, and the resource files that are needed for the default built-in UI implementations of scanning feature.
- FoxitPDF.podspec – A configuration file for cocoaPods tool which is used to manage the third-party libraries. It has been used in section “Implement Foxit PDF SDK for iOS using React Native”.
- prepare-framework-to-publish-to-appstore.sh – A script file used to strip the arm architectures from Foxit SDK Framwork. This is because Foxit SDK Framwork includes arm64, armv7, i386, and x86_64 architectures, but the i386, and x86_64 architectures are not allowed to be uploaded to Apple App Store.
- pdfscan project – It is an open source library that contains the UI implementations for scanning feature, which can help developers rapidly integrate scanning feature into their iOS app, or customize the UI for scanning as desired.
- uiextensions project – found in the “libs/uiextensions_src” folder. It is an open source library that contains some ready-to-use UI module implementations and the basic UI design for app, which can help developers rapidly embed a fully functional PDF reader into their iOS app. Of course, developers are not forced to use the default UI, they can freely customize and design the UI for their specific apps through the “uiextensions” project.
Note: For iOS 13 or higher, you should use Xcode 11 or higher to build the “uiextensions” project.
The package with Mac Catalyst
Download the “foxitpdfsdk_7_6_ios_catalyst.zip” package, and extract it to a new directory. The contents in this package are similar to the “foxitpdfsdk_7_6_ios.zip” package. You can refer to the previous section “The package without Mac Catalyst” for more information.
In the “libs” folder as shown in Figure 2-3, the difference is that the FoxitRDK.xcframework and uiextensionsDynamic.xcframework can support to build a Mac version of your iPad app using Mac Catalyst.
Note: Currently, the RMS and Scanning features are not supported by the Mac version app.

Figure 2-3
How to run a demo
Download and install Xcode IDE (https://developer.apple.com/download/).
Note: In this guide, we do not cover the installation of Xcode. You can refer to Apple’s developer site if you haven’t installed it already.
Foxit PDF SDK for iOS provides three useful demos (Function demo, Viewer Control demo, and Complete PDF viewer demo) in both Objective-C and Swift programming languages for developers to learn how to call the SDK. The Swift demos are located in the “swift” folder. (See Figure 2-4)
Note: The complete PDF viewer demo in Swift provides tabs reading mode to support viewing multiple PDF documents.

Figure 2-4
Foxit PDF SDK for iOS (Mac Catalyst) provides a Complete PDF viewer demo in Objective-C for developers to learn how to call the SDK. The demo is located in the “samples” folder. To run this demo, please make sure that your macOS version is 10.15 or higher and Xcode version is 11 or higher.
Function demo
The function demo is provided with Objective-C and Swift programming languages, which is used to show how to use Foxit PDF SDK for iOS to realize some specific features related to PDF with PDF core API. This demo includes the following features:
- pdf2txt: extract text from a PDF document to a TXT file.
- outline: edit outline (aka bookmark) appearances and titles.
- annotation: add annotations to a PDF page.
- docinfo: export document information of a PDF to a TXT file.
- render: render a specified page to Bitmap.
- signature: add a signature to PDF, sign PDF and verify the signature.
- image2pdf: convert images to PDF files.
- watermark: add text, image and PDF-page watermarks to PDF files.
- search: search PDF files.
- graphics_objects: create a PDF document with graphics objects.
To run it in Xcode, follow the steps below:
a) Double-click function_demo.xcodeproj found in the “samples/function_demo” folder to open the demo in Xcode. (For Swift, double-click function_demo_swift.xcodeproj found in the “samples/swift/function_demo_swift” folder)
Note: There is another way to open the demo in Xocde: double-click samples_xcworkspace found in the “samples” folder. It is a workspace including the three demos.
b) Click on “Product -> Run” to run the demo on an iOS device or simulator. In this guide, an iPhone 8 Simulator will be used as an example. After building the demo successfully, the features are listed like the Figure 2-5.

Figure 2-5
c) Click the feature buttons in the above picture to perform the corresponding actions. For example, click “pdf2txt”, and then a message box will be popped up as shown in Figure 2-6. It shows where the text file was saved to. Just run the demo and try the features.

Figure 2-6
Viewer control demo
The viewer control demo is provided with Objective-C and Swift programming languages, which is used to demonstrate how to implement the features related to the View Control feature level, such as performing annotations (note, typewriter, highlight, underline, strikeout, squiggly, etc.), outline, reading bookmarks and text search. The logical structure of the code is quite clear and simple so that developers can quickly find the detailed implementation of features which are used widely in PDF apps, such as a PDF viewer. With this demo, developers can take a closer look at the APIs provided in Foxit PDF SDK.
To run the demo in Xcode, please refer to the setup steps outlined in the Function demo.
Figure 2-7 shows what the demo looks like after it was built successfully. Here, an iPhone 8 Simulator will be used as an example to run the demo.

Figure 2-7
This demo provides the features like text search and listing reading bookmarks, outline, annotations and digital signatures. For example, click ![]() , select the second tab (outline), then the outline of this document will be displayed as shown in Figure 2-8.
, select the second tab (outline), then the outline of this document will be displayed as shown in Figure 2-8.
Note Outline is the technical term used in the PDF specification for what is commonly known as bookmarks in traditional desktop PDF viewers. Reading bookmarks are commonly used on mobile and tablet PDF viewers to mark progress and interesting passages as users read but are not technically outlines and are stored at app level rather than within the PDF itself.

Figure 2-8
Complete PDF viewer demo
Complete PDF Viewer demo without Mac Catalyst
The complete PDF viewer demo demonstrates how to use Foxit PDF SDK for iOS to realize a completely full-featured PDF viewer which is almost ready-to-use as a real world mobile PDF reader. This demo utilizes all of the features and built-in UI implementations which are provided in Foxit PDF SDK for iOS.
Note: The complete PDF viewer demo in Swift provides tabs reading mode to support viewing multiple PDF documents.
To run the demo in Xcode, please refer to the setup steps outlined in the Function demo.
Here, we will build and run the Swift demo in an iPhone 8 Simulator. After building the demo successfully, on the start screen, it lists the “Sample.pdf” and “complete_pdf_viewer_guide_ios.pdf” documents. If you want to view multiple PDF documents, click  to switch to the tabs reading mode (see Figure 2-9.).
Note If you want to use some other PDF files to test this demo, you need to put them onto the “Document” folder of the device.

Figure 2-9
Click YES to switch to the tabs reading mode. Select the “complete_pdf_viewer_guide_ios.pdf” document, and then click the Back button![]() , and select the “Sample.pdf”, then it will be displayed as shown in Figure 2-10. Now, you can browse the two PDF documents by switching the tabs.
, and select the “Sample.pdf”, then it will be displayed as shown in Figure 2-10. Now, you can browse the two PDF documents by switching the tabs.

Figure 2-10
This demo realizes a completely full-featured PDF viewer, please feel free to run it and try it.
For example, it provides the page thumbnail feature. You can click the View menu, choose the Thumbnail as shown in Figure 2-11, and then the thumbnail of the document will be displayed as shown in Figure 2-12.

Figure 2-11

Figure 2-12
Complete PDF Viewer demo with Mac Catalyst
To run the “complete_pdf_viewer” demo in Xcode, please follow the steps below:
a) Double-click complete_pdf_viewer.xcodeproj found in the “samples/complete_pdf_viewer” folder to open the demo in Xcode.
b) Click on “Product -> Run” to run the demo on an iOS device/simulator or on your Mac. Here, select “My Mac” as the run destination for example. After building the demo successfully, on the start screen, it lists the “Sample.pdf” and “complete_pdf_viewer_guide_ios.pdf” documents as shown in Figure 2-13.
The features provided in this demo is similar to “Complete PDF Viewer demo without Mac Catalyst”.
Note: You may need to register your Mac using a development provisioning profile which allows your app to launch on devices and use certain app services during development.

Figure 2-13
Rapidly building a full-featured PDF Reader
Foxit PDF SDK for iOS wrapped all of the UI implementations including the basic UI for app and ready-to-use UI feature modules to UI Extensions Component, so that developers can easily and rapidly build a full-featured PDF Reader with just a few lines of code. This section will help you to quickly get started with using Foxit PDF SDK for iOS to make a full-featured PDF Reader app (only can be deployed to iPhone or iPad devices) in Objective-C and Swift with step-by-step instructions provided.
Make an iOS app in Objective-C with Foxit PDF SDK for iOS
This section will help you to quickly make an iOS app in Objective-C using Foxit PDF SDK for iOS. It includes the following steps:
- Create a new iOS project in Objective-C
- Integrate Foxit PDF SDK for iOS into your apps
- Initialize Foxit PDF SDK for iOS
- Display a PDF document using FSPDFViewCtrl
- Build a full-featured PDF Reader with UI Extensions Component
- Add the scanning feature based on the full-featured PDF Reader
Create a new iOS project in Objective-C
In this guide, we use Xcode 11.3.1 to create a new iOS project.
Fire up Xcode, choose File -> New -> Project…, and then select iOS -> Single View App as shown in Figure 3-1. Click Next.

Figure 3-1
Choose the options for your new project as shown in Figure 3-2. Please make sure to choose Objective-C as the programming language. For simplicity, we don’t check the Unit Tests and UI Tests which are used for automated testing. Then, Click Next.

Figure 3-2
Place the project to the location as desired. The option “version control” is not actually important for building your first PDF app, so let’s not check the Git repository. Here, we place the project to desktop as shown in Figure 3-3. Then, click Create.

Figure 3-3
Integrate Foxit PDF SDK for iOS into your apps
Note: In this section, we will use the default built-in UI implementations to develop the app, for simplicity and convenience (use the UI Extensions Component directly, and don’t need to build the source code project), we only need to add the following files to the pdfreader project.
- FoxitRDK.framework – The framework that includes the Foxit PDF SDK for iOS dynamic library and associated header files.
- uiextensionsDynamic.framework – The framework that includes UI Extensions dynamic library, associated header files, and the resource files that are needed for the default built-in UI implementations.
- (optional) FoxitPDFScanUI.framework – The framework that includes Foxit PDF SDK for scanning dynamic library, associated header files, and the resource files that are needed for the default built-in UI implementations of scanning feature.
Tip:
- The UI Extensions Component (uiextensionsDynamic.framework) is not required for the following two sections “Initialize Foxit PDF SDK for iOS” and “Display a PDF document using PDFViewCtrl“, so you can just add FoxitRDK.framework to the project at first. Then, add uiextensionsDynamic.framework when you need to use the UI Extensions Component, such like the project described in the section “Build a full-featured PDF Reader with UI Extensions Component“.
- The FoxitPDFScanUI.framework is required by the scan module, which will be needed for the section “Add the scanning feature based on the full-featured PDF Reader“.
To add the above three dynamic framework files into the pdfreader project, please follows the steps below:
a) Right-click the “pdfreader” project, select Add Files to “pdfreader“… as shown in Figure 3-4.

Figure 3-4
b) Find and choose “FoxitRDK.framework“ in the “libs” folder of the download package, and then click Add as shown in Figure 3-5.
Note: Make sure to check the “Copy items if needed” option.

Figure 3-5
c) Repeat the steps like a) and b) to add “uiextensionsDynamic.framework“ and “FoxitPDFScanUI.framework“. Then, the pdfreader project will look like the Figure 3-6.

Figure 3-6
d) Embed the dynamic frameworks. Left-click the project, find Frameworks, Libraries, and Embedded Content in the General tab, and then choose “Embed & Sign” as shown in Figure 3-7.

Figure 3-7
Now, we have added “FoxitRDK.framework“, “uiextensionsDynamic.framework” and “FoxitPDFScanUI.framework” to the pdfreader project successfully.
Initialize Foxit PDF SDK for iOS
It is necessary for apps to initialize and unlock Foxit PDF SDK for iOS using a license before calling any APIs. The function [FSLibrary initialize:sn key:key] is provided to initialize Foxit PDF SDK. The trial license files can be found in the “libs” folder of the download package. After the evaluation period expires, you should purchase an official license to continue using it. Finish the initialization in the didFinishLaunchingWithOptions method within the AppDelegate.m file.
#import "AppDelegate.h"
#import <FoxitRDK/FSPDFObjC.h>

@interface AppDelegate ()

@end

@implementation AppDelegate

- (BOOL)application:(UIApplication *)application didFinishLaunchingWithOptions:(NSDictionary *)launchOptions {

    // The value of "sn" can be found in the "rdk_sn.txt".
    // The value of "key" can be found in the "rdk_key.txt".
    NSString* sn = @" ";
    NSString* key = @" ";

    FSErrorCode eRet = [FSLibrary initialize:sn key:key];
    if (FSErrSuccess != eRet) {
        return NO;
    }
    return YES;
}

@end
Note The parameter “sn” can be found in the “rdk_sn.txt” (the string after “SN=”) and the “key” can be found in the “rdk_key.txt” (the string after “Sign=”).
Display a PDF document using FSPDFViewCtrl
So far, we have added Foxit PDF SDK for iOS frameworks to the pdfreader project, and finished the initialization of the Foxit PDF SDK. Now, let’s start displaying a PDF document using FSPDFViewCtrl with just a few lines of code.
Note: The UI Extensions Component is not required if you only need to display a PDF document.
First of all, add a PDF file to the project which will be used as the test file. For example, we use “Sample.pdf” found in the “samples\test_files” folder of the download package. Right-click the pdfreader project, and select Add Files to “pdfreader“… to add this file. After adding, you can see the PDF in the Xcode’s Copy Bundle Resources as shown in Figure 3-8.
Note: You can add the PDF to Copy Bundle Resources directly. Just left-click the pdfreader project, find Copy Bundle Resources in the Build Phases tab, press on the + button, and choose the file to add. You can refer to any PDF file, just add it to the Xcode’s Copy Bundle Resources.

Figure 3-8
Then, add the following code to ViewController.m to display a PDF document. It’s really easy to present a PDF on screen. All you need is to get a PDF file, instantiate a FSPDFViewCtrl object and call [FSPDFViewCtrl openDoc: filePath passwork:password completion:completion] function to open and display the PDF.
Update ViewController.m as follows:
#import "ViewController.h"
#import <FoxitRDK/FSPDFViewControl.h>

@interface ViewController ()

@end

@implementation ViewController

- (void)viewDidLoad {
    [super viewDidLoad];

    // Get the path of a PDF.
    NSString* pdfPath = [[NSBundle mainBundle] pathForResource:@"Sample" ofType:@"pdf"];

    // Initialize a FSPDFViewCtrl object with the size of the entire screen.
    FSPDFViewCtrl* pdfViewCtrl;
    pdfViewCtrl = [[FSPDFViewCtrl alloc] initWithFrame: [self.view bounds]];

    // Open an unencrypted PDF document.
    [pdfViewCtrl openDoc:pdfPath password:nil completion:nil];

    // Add the pdfViewCtrl to the root view.
    [self.view addSubview:pdfViewCtrl];
}

- (void)didReceiveMemoryWarning {
    [super didReceiveMemoryWarning];
    // Dispose of any resources that can be recreated.
}

@end
Fantastic! We have now finished building a simple iOS app which uses Foxit PDF SDK to display a PDF document with just a few lines of code. The next step is to run the project on a device or simulator.
In this guide, we build and run the project on an iPhone 8 Simulator, and you will see that the “Sample.pdf” document is displayed as shown in Figure 3-9. Now, this sample app has some basic PDF features, such as zooming in/out and page turning. Just have a try!

Figure 3-9
Build a full-featured PDF Reader with UI Extensions Component
Foxit PDF SDK for iOS comes with built-in UI design including the basic UI for app and the feature modules UI, which are implemented using Foxit PDF SDK and are shipped in the UI Extensions Component. Hence, building a full-featured PDF Reader is getting simpler and easier. All you need to do is to instantiate a UIExtensionsManager object, and then set it to FSPDFViewCtrl.
Instantiate a UIExtensionsManager object and set it to FSPDFViewCtrl
In the “ViewController.m” file, you only need to add the following code:
#import <uiextensionsDynamic/uiextensionsDynamic.h>
UIExtensionsManager* extensionsManager;
...
extensionsManager = [[UIExtensionsManager alloc] initWithPDFViewControl:pdfViewCtrl];
pdfViewCtrl.extensionsManager = extensionsManager;
Add permissions to access camera, microphone and photo library
In order to access the camera, microphone and photo library in iOS 9.0 or higher, you need to do the following configuration in the “Info.plist“.
<key>NSCameraUsageDescription</key>
<string>The App needs to access your Camera, please allow</string>
<key>NSMicrophoneUsageDescription</key>
<string>The App needs to access your Microphone, please allow</string>
<key>NSPhotoLibraryAddUsageDescription</key>
<string>The App needs to add pictures into your Photo Library, please allow</string>
<key>NSPhotoLibraryUsageDescription</key>
<string>The App needs to access your Photo Library, please allow</string>
The whole update of ViewController.m is as follows:
#import "ViewController.h"
#import <FoxitRDK/FSPDFViewControl.h>
#import <uiextensionsDynamic/uiextensionsDynamic.h>

@interface ViewController ()

@end

@implementation ViewController
{
    UIExtensionsManager* extensionsManager;
}

- (void)viewDidLoad {
    [super viewDidLoad];

    // Get the path of a PDF.
    NSString* pdfPath = [[NSBundle mainBundle] pathForResource:@"Sample" ofType:@"pdf"];

    // Initialize a FSPDFViewCtrl object with the size of the entire screen.
    FSPDFViewCtrl* pdfViewCtrl;
    pdfViewCtrl = [[FSPDFViewCtrl alloc] initWithFrame: [self.view bounds]];

    // Open an unencrypted PDF document.
    [pdfViewCtrl openDoc:pdfPath password:nil completion:nil];

    // Add the pdfViewCtrl to the root view.
    [self.view addSubview:pdfViewCtrl];

    // Instantiate a UIExtensionsManager object and set it to pdfViewCtrl
    extensionsManager = [[UIExtensionsManager alloc] initWithPDFViewControl:pdfViewCtrl];
    pdfViewCtrl.extensionsManager = extensionsManager;
}

- (void)didReceiveMemoryWarning {
    [super didReceiveMemoryWarning];
    // Dispose of any resources that can be recreated.
}

@end
Let’s run it on an iPhone 8 Simulator. Now, it is a full-featured PDF Reader as shown in Figure 3-10, which includes all of the features in Complete PDF Viewer demo. Feel free to try it.

Figure 3-10
Add the scanning feature based on the full-featured PDF Reader
The scanning feature is a stand-alone module which is not shipped in the UI Extensions Component, so if you want to use this feature in your project, you should add the core code below to call the scan module:
#import <FoxitPDFScanUI/PDFScanManager.h>

// Initialize the scan module.
[PDFScanManager initializeScanner:0 serial2:0];
[PDFScanManager initializeCompression:0 serial2:0];

// Get the PDFScan controller.
UIViewController *VC = [PDFScanManager getPDFScanView];
if (VC) [self presentViewController:VC animated:YES completion:nil];

[PDFScanManager setSaveAsCallBack:^(NSError * _Nonnull error, NSString * _Nonnull savePath) {
    // <add your code>
}];
For PDFScanManager::initializeScanner and PDFScanManager::initializeCompression interfaces, if you set the parameters to 0, then the scanned image will be with watermark. If you do not want to have watermark, you should contact Foxit sales or support team to get the license key.
Based on the previous section, we add a new button to call the scan module.
Update ViewController.m as follows:
(Assuming that you have added the image file “scan.png” to the project. The image file can be found in the “samples/complete_pdf_viewer/Source/Assets.xcassets/scan.imageset” folder.)
#import "ViewController.h"
#import <FoxitRDK/FSPDFViewControl.h>
#import <uiextensionsDynamic/uiextensionsDynamic.h>
#import <FoxitPDFScanUI/PDFScanManager.h>

@interface ViewController ()

@end

@implementation ViewController
{
    UIExtensionsManager* extensionsManager;
    UIButton *openScanBtn;
}

- (void)viewDidLoad {
    [super viewDidLoad];

    // Get the path of a PDF.
    NSString* pdfPath = [[NSBundle mainBundle] pathForResource:@"Sample" ofType:@"pdf"];

    // Initialize a FSPDFViewCtrl object with the size of the entire screen.
    FSPDFViewCtrl* pdfViewCtrl;
    pdfViewCtrl = [[FSPDFViewCtrl alloc] initWithFrame: [self.view bounds]];

    // Open an unencrypted PDF document.
    [pdfViewCtrl openDoc:pdfPath password:nil completion:nil];

    // Add the pdfViewCtrl to the root view.
    [self.view addSubview:pdfViewCtrl];

    // Instantiate a UIExtensionsManager object and set it to pdfViewCtrl
    extensionsManager = [[UIExtensionsManager alloc] initWithPDFViewControl:pdfViewCtrl];
    pdfViewCtrl.extensionsManager = extensionsManager;

    // Create a scan button.
    openScanBtn = [[UIButton alloc] initWithFrame:CGRectMake(self.view.frame.size.width - 80, self.view.frame.size.height - 120, 60, 60)];
    [openScanBtn setImage:[UIImage imageNamed:@"scan"] forState:UIControlStateNormal];
    [openScanBtn addTarget:self action:@selector(openScan:) forControlEvents:UIControlEventTouchUpInside];

    // Add the scan button to the root view.
    [self.view addSubview:openScanBtn];

    // Initialize the scan module.
    [PDFScanManager initializeScanner:0 serial2:0];
    [PDFScanManager initializeCompression:0 serial2:0];

}

- (IBAction)openScan🙁UIButton *)sender{
    // Get the PDFScan controller.
    UIViewController *VC = [PDFScanManager getPDFScanView];
    if (VC) [self presentViewController:VC animated:YES completion:nil];

    [PDFScanManager setSaveAsCallBack:^(NSError * _Nonnull error, NSString * _Nonnull savePath) {
          if (savePath) {
              if (VC.presentingViewController) {
                  [VC.presentingViewController dismissViewControllerAnimated:NO completion:nil];
              }
              [VC dismissViewControllerAnimated:NO completion:nil];
        }
    }];
}

- (void)didReceiveMemoryWarning {
    [super didReceiveMemoryWarning];
    // Dispose of any resources that can be recreated.
}

@end
Run the project on an iPhone 8 Simulator, then you will see the following window (Figure 3-11), tap the scan button to start scanning documents.

Figure 3-11
Make an iOS app in Swift with Foxit PDF SDK for iOS
Nowadays, Swift is more and more popular for iOS developers because its syntax is much cleaner and easier to read. To better support Swift developers, this section will help you to quickly make an iOS app in Swift using Foxit PDF SDK for iOS. It includes the following steps:
- Create a new iOS project in Swift
- Integrate Foxit PDF SDK for iOS into your apps
- Initialize Foxit PDF SDK for iOS
- Display a PDF document using FSPDFViewCtrl
- Build a full-featured PDF Reader with UI Extensions Component
- Add the scanning feature based on the full-featured PDF Reader
Create a new iOS project in Swift
In this guide, we use Xcode 11.3.1 to create a new iOS project.
To create a new iOS project in Swift, you can refer to section “Create a new iOS project in Objective-C”. The only difference is that you should choose Swift as the programming language (See Figure 3-12).

Figure 3-12
Integrate Foxit PDF SDK for iOS into your apps
To integrate Foxit PDF SDK for iOS into your apps, please refer to section “Integrate Foxit PDF SDK for iOS into your apps” to add the dynamic frameworks “FoxitRDK.framework“, “uiextensionsDynamic.framework” and “FoxitPDFScanUI.framework” into the pdfreader project.
Initialize Foxit PDF SDK for iOS
It is necessary for apps to initialize and unlock Foxit PDF SDK for iOS using a license before calling any APIs. The function FSLibrary::initialize is provided to initialize Foxit PDF SDK. The trial license files can be found in the “libs” folder of the download package. After the evaluation period expires, you should purchase an official license to continue using it. Finish the initialization in the application method within the AppDelegate.swift file.
import FoxitRDK
...

func application(_ application: UIApplication, didFinishLaunchingWithOptions launchOptions: [UIApplicationLaunchOptionsKey: Any]?) -> Bool {

        let sn = ""
        let key = ""
        let eRet = FSLibrary.initialize(sn, key:key)
        if .errSuccess != eRet {
            return false
        }
        return true
}
Note The parameter “sn” can be found in the “rdk_sn.txt” (the string after “SN=”) and the “key” can be found in the “rdk_key.txt” (the string after “Sign=”).
Display a PDF document using FSPDFViewCtrl
So far, we have added Foxit PDF SDK for iOS frameworks to the pdfreader project, and finished the initialization of the Foxit PDF SDK. Now, let’s start displaying a PDF document using FSPDFViewCtrl with just a few lines of code.
Note: The UI Extensions Component is not required if you only need to display a PDF document.
First of all, add a PDF file to the project which will be used as the test file. For example, we use “Sample.pdf” found in the “samples\test_files” folder of the download package. Right-click the pdfreader project, and select Add Files to “pdfreader“… to add this file. After adding, you can see the PDF in the Xcode’s Copy Bundle Resources as shown in Figure 3-13.
Note You can add the PDF to Copy Bundle Resources directly. Just left-click the pdfreader project, find Copy Bundle Resources in the Build Phases tab, press on the + button, and choose the file to add. You can refer to any PDF file, just add it to the Xcode’s Copy Bundle Resources.

Figure 3-13
Then, add the following code to ViewController.swift to display a PDF document. It’s really easy to present a PDF on screen. All you need is to get a PDF file, instantiate a FSPDFViewCtrl object and call FSPDFViewCtrl::openDoc function to open and display the PDF.
Update ViewController.swift as follows:
import UIKit
import FoxitRDK

class ViewController: UIViewController {

    override func viewDidLoad() {
        super.viewDidLoad()

        // Get the path of a PDF.
        let pdfPath = Bundle.main.path(forResource: "Sample", ofType: "pdf")!

        // Initialize a FSPDFViewCtrl object with the size of the entire screen.
        var pdfViewCtrl: FSPDFViewCtrl!
        pdfViewCtrl = FSPDFViewCtrl.init(frame:self.view.bounds)

        // Set the document to display.
        pdfViewCtrl.openDoc(pdfPath, password: nil, completion: nil)

        // Add the pdfViewCtrl to the root view.
        self.view.insertSubview(pdfViewCtrl, at: 0)
    }

    override func didReceiveMemoryWarning() {
        super.didReceiveMemoryWarning()
        // Dispose of any resources that can be recreated.
    }
}
Fantastic! We have now finished building a simple iOS app in Swift which uses Foxit PDF SDK to display a PDF document with just a few lines of code. The next step is to run the project on a device or simulator.
In this guide, we build and run the project on an iPhone 8 Simulator, and you will see that the “Sample.pdf” document is displayed as shown in Figure 3-14. Now, this sample app has some basic PDF features, such as zooming in/out and page turning. Just have a try!

Figure 3-14
Build a full-featured PDF Reader with UI Extensions Component
Foxit PDF SDK for iOS comes with built-in UI design including the basic UI for app and the feature modules UI, which are implemented using Foxit PDF SDK and are shipped in the UI Extensions Component. Hence, building a full-featured PDF Reader is getting simpler and easier. All you need to do is to instantiate a UIExtensionsManager object and set it to FSPDFViewCtrl.
Instantiate a UIExtensionsManager object and set it to FSPDFViewCtrl
In the “ViewController.swift” file, you only need to add the following code:
import uiextensionsDynamic
...

var extensionsManager: UIExtensionsManager!
...
extensionsManager = UIExtensionsManager(pdfViewControl: pdfViewCtrl)
pdfViewCtrl.extensionsManager = extensionsManager;
Add permissions to access camera, microphone and photo library
In order to access the camera, microphone and photo library in iOS 9.0 or higher, you need to do the following configuration in the “Info.plist“.
<key>NSCameraUsageDescription</key>
<string>For adding photographs to your PDF files.</string>
<key>NSMicrophoneUsageDescription</key>
<string>RDK need to add record permissions,please allow</string>
<key>NSPhotoLibraryAddUsageDescription</key>
<string>RDK need to add picture permissions,please allow</string>
<key>NSPhotoLibraryUsageDescription</key>
<string>For adding pictures to your PDF files.</string>
The whole update of ViewController.swift is as follows:
import UIKit
import FoxitRDK
import uiextensionsDynamic

class ViewController: UIViewController {

    var extensionsManager: UIExtensionsManager!

    override func viewDidLoad() {
        super.viewDidLoad()

        // Get the path of a PDF.
        let pdfPath = Bundle.main.path(forResource: "Sample", ofType: "pdf")!

        // Initialize a FSPDFViewCtrl object with the size of the entire screen.
        var pdfViewCtrl: FSPDFViewCtrl!
        pdfViewCtrl = FSPDFViewCtrl.init(frame:self.view.bounds)

        // Set the document to display.
        pdfViewCtrl.openDoc(pdfPath, password: nil, completion: nil)

        // Add the pdfViewCtrl to the root view.
        self.view.insertSubview(pdfViewCtrl, at: 0)

        // Initialize a UIExtensionsManager object and set it to pdfViewCtrl.
        extensionsManager = UIExtensionsManager(pdfViewControl: pdfViewCtrl)
        pdfViewCtrl.extensionsManager = extensionsManager;
    }

    override func didReceiveMemoryWarning() {
        super.didReceiveMemoryWarning()
        // Dispose of any resources that can be recreated.
    }
}
Let’s run it on an iPhone 8 Simulator. Now, it is a full-featured PDF Reader as shown in Figure 3-15, which includes all of the features in Complete PDF Viewer demo. Feel free to try it.

Figure 3-15
Add the scanning feature based on the full-featured PDF Reader
The scanning feature is a stand-alone module which is not shipped in the UI Extensions Component, so if you want to use this feature in your project, you should add the core code below to call the scanning module:
import FoxitPDFScanUI

// Initialize the scan module.
PDFScanManager.initializeScanner(0, serial2: 0);
PDFScanManager.initializeCompression(0, serial2: 0);

// Get the PDFScan controller.
let VC = PDFScanManager.getPDFScanView();
self.present(VC, animated: true, completion: nil);
PDFScanManager.saveAsCallBack = { (error, savePath) -> () in
     // <add your code>
}
For PDFScanManager.initializeScanner and PDFScanManager.initializeCompression interfaces, if you set the parameters to 0, then the scanned image will be with watermark. If you do not want to have watermark, you should contact Foxit sales or support team to get the license key.
Based on the previous section, we add a new button to call the scan module.
Update ViewController.swift as follows:
(Assuming that you have added the image file “scan.png” to the project. The image file can be found in the “samples/swift/complete_pdf_viewer_swift/Sources/Assets.xcassets/scan.imageset” folder.)
import UIKit
import FoxitRDK
import uiextensionsDynamic
import FoxitPDFScanUI

class ViewController: UIViewController {

    var extensionsManager: UIExtensionsManager!
    var openScanBtn: UIButton!

    override func viewDidLoad() {
        super.viewDidLoad()

        // Get the path of a PDF.
        let pdfPath = Bundle.main.path(forResource: "Sample", ofType: "pdf")!

        // Initialize a FSPDFViewCtrl object with the size of the entire screen.
        var pdfViewCtrl: FSPDFViewCtrl!
        pdfViewCtrl = FSPDFViewCtrl.init(frame:self.view.bounds)

        // Set the document to display.
        pdfViewCtrl.openDoc(pdfPath, password: nil, completion: nil)

        // Add the pdfViewCtrl to the root view.
        self.view.insertSubview(pdfViewCtrl, at: 0)

        // Initialize a UIExtensionsManager object and set it to pdfViewCtrl.
        extensionsManager = UIExtensionsManager(pdfViewControl: pdfViewCtrl)
        pdfViewCtrl.extensionsManager = extensionsManager;

        // Create a scan button.
        openScanBtn = UIButton(frame: CGRect(x: view.frame.size.width - 80, y: view.frame.size.height - 120, width: 60, height: 60))
        openScanBtn.setImage(UIImage(named: "scan"), for: .normal);
        openScanBtn.addTarget(self, action: #selector(openScan(_🙂), for: .touchUpInside)

        // Add the scan button to the root view.
        self.view.addSubview(openScanBtn);

        // Initialize the scan module.
        PDFScanManager.initializeScanner(0, serial2: 0);
        PDFScanManager.initializeCompression(0, serial2: 0);

    }

    @IBAction func openScan(_ sender: UIButton) {
        let VC = PDFScanManager.getPDFScanView();
        self.present(VC, animated: true, completion: nil);
        PDFScanManager.saveAsCallBack = { (error, savePath) -> () in
            if ((savePath) != nil) {
                if ((VC.presentingViewController) != nil) {
                    VC.presentingViewController?.dismiss(animated: false, completion: nil)
                }
                VC.dismiss(animated: false, completion: nil)
                }
        }
    }

    override func didReceiveMemoryWarning() {
        super.didReceiveMemoryWarning()
        // Dispose of any resources that can be recreated.
    }
}
Run the project on an iPhone 8 Simulator, then you will see the following window (Figure 3-16), tap the scan button to start scanning documents.

Figure 3-16
Rapidly building a full-featured PDF Reader using Mac Catalyst
The previous section introduces how to build a full-featured PDF Reader app with Foxit PDF SDK for iOS, which can be only deployed to iPhone and iPad devices. In this section, we will use Foxit PDF SDK for iOS (Mac Catalyst) to build a full-featured PDF Reader app in Objective-C, which users can run on an iPhone/iPad or a Mac device. It includes the following steps:
- Create a Mac app built with Mac Catalyst
- Integrate Foxit PDF SDK for iOS (Catalyst) into your apps
- Initialize Foxit PDF SDK for iOS (Catalyst)
- Display a PDF document using FSPDFViewCtrl
- Build a full-featured PDF Reader with UI Extensions Component
Create a Mac app built with Mac Catalyst
In this section, we use Mac Catalyst to create a Mac app with Xcode 11.5. Please refer to section “Create a new iOS project in Objective-C” to create a Mac project named “pdfreader_catalyst“.
Integrate Foxit PDF SDK for iOS (Catalyst) into your apps
Note: In this section, we will use the default built-in UI implementations to develop the app, for simplicity and convenience (use the UI Extensions Component directly, and don’t need to build the source code project), we only need to add the following files to the pdfreader_catalyst project.
- FoxitRDK.xcframework – The framework that includes the Foxit PDF SDK for iOS dynamic library and associated header files.
- uiextensionsDynamic.xcframework – The framework that includes UI Extensions dynamic library, associated header files, and the resource files that are needed for the default built-in UI implementations.
- (optional) FoxitPDFScanUI.framework – The framework that includes Foxit PDF SDK for scanning dynamic library, associated header files, and the resource files that are needed for the default built-in UI implementations of scanning feature.
Note: The FoxitPDFScanUI.framework only support iOS platform, and does not support macOS platform.
To add the above three dynamic framework files into the pdfreader_catalyst project, please follows the steps below:
a) Add support for Mac. Left-click the project, find Deployment Info in the General tab, select the Mac checkbox as shown in Figure 4-1. (If your app supports iPhone/iPad only, the checkbox is unavailable.)

Figure 4-1
b) Drag the FoxitRDK.xcframework, uiextensionsDynamic.xcframework and FoxitPDFScanUI.framework in the “libs” folder of the download package to the pdfreader_catalyst project.
Note: Make sure to check the “Copy items if needed” option when dragging the framework (See Figure 4-2).

Figure 4-2
c) Embed the dynamic frameworks. Left-click the project, find Frameworks, Libraries, and Embedded Content in the General tab, and then choose “Embed & Sign” and the supported platforms as shown in Figure 4-3.
Note: The FoxitPDFScanUI.framework only support iOS platform.

Figure 4-3
d) Check for Framework search paths. Left-click the project, find Search Paths in the Build Settings tab, check if the Framework search paths is set, if not, please set it correctly. (See Figure 4-4)

Figure 4-4
Now, we have added “FoxitRDK.xcframework“, “uiextensionsDynamic.xcframework” and “FoxitPDFScanUI.framework” to the pdfreader_catalyst project successfully.
Initialize Foxit PDF SDK for iOS (Catalyst)
To initialize Foxit PDF SDK for iOS (Catalyst), it is exactly the same as the section “Initialize Foxit PDF SDK for iOS”.
Display a PDF document using FSPDFViewCtrl
To display a PDF document, it is exactly the same as the section “Display a PDF document using FSPDFViewCtrl”. Add a PDF file to the project, and add the following code to ViewController.m referring to “Display a PDF document using FSPDFViewCtrl”.
Update ViewController.m as follows:
#import "ViewController.h"
#import <FoxitRDK/FSPDFViewControl.h>

@interface ViewController ()

@end

@implementation ViewController

- (void)viewDidLoad {
    [super viewDidLoad];

    // Get the path of a PDF.
    NSString* pdfPath = [[NSBundle mainBundle] pathForResource:@"Sample" ofType:@"pdf"];

    // Initialize a FSPDFViewCtrl object with the size of the entire screen.
    FSPDFViewCtrl* pdfViewCtrl;
    pdfViewCtrl = [[FSPDFViewCtrl alloc] initWithFrame: [self.view bounds]];

    // Open an unencrypted PDF document.
    [pdfViewCtrl openDoc:pdfPath password:nil completion:nil];

    // Add the pdfViewCtrl to the root view.
    [self.view addSubview:pdfViewCtrl];
}

- (void)didReceiveMemoryWarning {
    [super didReceiveMemoryWarning];
    // Dispose of any resources that can be recreated.
}

@end
Then, build and run the project. This project can be run on an iPhone/iPad, or a Mac. In this section, select “My Mac” as the destination and run the project. After building the project successfully, you will see that the “Sample.pdf” document is displayed as shown in Figure 4-5.
Note: You may need to register your Mac using a development provisioning profile which allows your app to launch on devices and use certain app services during development.

Figure 4-5
Build a full-featured PDF Reader with UI Extensions Component
To build a full-featured PDF Reader, it is similar to the section “Build a full-featured PDF Reader with UI Extensions Component”. Update the ViewController.m as follows:
#import "ViewController.h"
#import <FoxitRDK/FSPDFViewControl.h>
#import <uiextensionsDynamic/uiextensionsDynamic.h>

@interface ViewController ()

@end

@implementation ViewController
{
    UIExtensionsManager* extensionsManager;
}

- (void)viewDidLoad {
    [super viewDidLoad];

    // Get the path of a PDF.
    NSString* pdfPath = [[NSBundle mainBundle] pathForResource:@"Sample" ofType:@"pdf"];

    // Initialize a FSPDFViewCtrl object with the size of the entire screen.
    FSPDFViewCtrl* pdfViewCtrl;
    pdfViewCtrl = [[FSPDFViewCtrl alloc] initWithFrame: [self.view bounds]];

    // Open an unencrypted PDF document.
    [pdfViewCtrl openDoc:pdfPath password:nil completion:nil];

    // Add the pdfViewCtrl to the root view.
    [self.view addSubview:pdfViewCtrl];

    // Instantiate a UIExtensionsManager object and set it to pdfViewCtrl
    extensionsManager = [[UIExtensionsManager alloc] initWithPDFViewControl:pdfViewCtrl];
    pdfViewCtrl.extensionsManager = extensionsManager;
}

- (void)didReceiveMemoryWarning {
    [super didReceiveMemoryWarning];
    // Dispose of any resources that can be recreated.
}

@end
Then, build and run the project on your Mac. After building the project successfully, you will see that the “Sample.pdf” document is displayed as shown in Figure 4-6.
Figure 4-6
Customizing User Interface
Foxit PDF SDK for iOS provides a simple, clean and friendly user interface for developers to quickly build a full-featured PDF app without needing to take much time on the design. Furthermore, customizing the user interface is straightforward. Foxit PDF SDK for iOS provides the source code of the UI Extensions Component that contains ready-to-use UI module implementations, which lets the developers have full control of styling the appearance as desired.
From version 4.0, developers can flexibly customize the features they want through a configuration file.
From version 5.0, every element in the built-in UI can be configurable. More advanced APIs and more powerful configuration file are provided for developers to further customize the UI elements, such as showing or hiding a specific panel, top/bottom toolbar, the items in the top toolbar, and the items in the View setting bar and More Menu view.
From version 6.3, the configuration file has been enhanced which provides more optional settings to customize the UI including the rights management and the properties of UI elements.
The following section will introduce how to customize the feature modules, rights management and UI elements through a configuration file, or APIs, or the source code.
Customize the UI through a configuration file
Through a configuration file, developers can easily choose the features module, set the rights management and the properties of UI elements without needing to write any additional code or redesign the app’s UI.
Introduction to JSON file
The configuration file can be provided as a JSON file or implemented directly in code. We recommend you to use the JSON format which is more intuitive and clearer to view and configure the items.
You can refer to the JSON file found in “samples\complete_pdf_viewer\Source\Resource\” folder of Foxit PDF SDK for iOS package. It looks like as follows:
{
    "modules": {
        "readingbookmark": true,
        "outline": true,
        "annotations": {
            "highlight": true,
            "underline": true,
            "squiggly": true,
            "strikeout": true,
            "insert": true,
            "replace": true,
            "line": true,
            "rectangle": true,
            "oval": true,
            "arrow": true,
            "pencil": true,
            "eraser": true,
            "typewriter": true,
            "textbox": true,
            "callout": true,
            "note": true,
            "stamp": true,
            "polygon": true,
            "cloud": true,
            "polyline": true,
            "distance": true,
            "image": true,
            "audio": true,
            "video": true,
            "redaction": true
        },
        "thumbnail": true,
        "attachment": true,
        "signature": true,
        "fillSign": true,
        "search": true,
        "navigation": true,
        "form": true,
        "selection": true,
        "encryption": true,
        "multipleSelection": true
    },
    "permissions": {
        "runJavaScript" : true,
        "copyText" : true,
        "disableLink" : false
    },
    "uiSettings": {
        "pageMode":"Single",
        "continuous":false,
        "colorMode" : "Normal",
        "zoomMode" : "FitWidth",
        "mapForegroundColor" : "#5d5b71",
        "mapBackgroundColor" : "#00001b",
        "reflowBackgroundColor":"#ffffff",
        "disableFormNavigationBar" : false,
        "highlightForm" : true,
        "highlightLink" : true,
        "highlightLinkColor" : "#16007fff",
        "highlightFormColor":"#200066cc",
        "fullscreen" : true,
        "annotations": {
            "continuouslyAdd" : false,
            "highlight": {
                "color" : "#ffff00",
                "opacity" : 1.0
            },
            "underline": {
                "color" : "#66cc33",
                "opacity" : 1.0
            },
            "squiggly": {
                "color" : "#ff6633",
                "opacity" : 1.0
            },
            "strikeout": {
                "color" : "#ff0000",
                "opacity" : 1.0
            },
            "insert": {
                "color" : "#993399",
                "opacity" : 1.0
            },
            "replace": {
                "color" : "#0000ff",
                "opacity" : 1.0
            },
            "line": {
                "color" : "#ff0000",
                "opacity" : 1.0,
                "thickness" : 2
            },
            "rectangle": {
                "color" : "#ff0000",
                "opacity" : 1.0,
                "thickness" : 2
            },
            "oval": {
                "color" : "#ff0000",
                "opacity" : 1.0,
                "thickness" : 2
            },
            "arrow": {
                "color" : "#ff0000",
                "opacity" : 1.0,
                "thickness" : 2
            },
            "pencil": {
                "color" : "#ff0000",
                "opacity" : 1.0,
                "thickness" : 2
            },
            "polygon": {
                "color" : "#ff0000",
                "opacity" : 1.0,
                "thickness" : 2
            },
            "cloud": {
                "color" : "#ff0000",
                "opacity" : 1.0,
                "thickness" : 2
            },
            "polyline": {
                "color" : "#ff0000",
                "opacity" : 1.0,
                "thickness" : 2
            },
            "typewriter": {
                "textColor" : "#0000ff",
                "opacity" : 1.0,
                "textFace" : "Courier",
                "textSize" : 18.0
            },
            "textbox": {
                "color" : "#ff0000",
                "textColor": "#0000ff",
                "opacity" : 1.0,
                "textFace" : "Courier",
                "textSize" : 18.0
            },
            "callout": {
                "color": "#ff0000",
                "textColor": "#0000ff",
                "opacity" : 1.0,
                "textFace" : "Courier",
                "textSize" : 18.0
            },
            "note": {
                "color" : "#ff6633",
                "opacity" : 1.0,
                "icon" : "Comment"
            },
            "attachment": {
                "color" : "#ff6633",
                "opacity" : 1.0,
                "icon" : "Pushpin"
            },
            "image": {
                "rotation" : 0,
                "opacity" : 1.0
            },
            "distance": {
                "color" : "#ff0000",
                "opacity" : 1.0,
                "thickness" : 2,
                "scaleFromUnit" : "inch",
                "scaleToUnit" : "inch",
                "scaleFromValue" : 1,
                "scaleToValue" : 1
            },
            "redaction": {
                "fillColor" : "#000000",
                "textColor": "#ff0000",
                "textFace" : "Courier",
                "textSize" : 12
            }
        },
        "form": {
          "textField": {
            "textColor": "#000000",
            "textFace": "Courier",
            "textSize": 0
          },
          "checkBox": {
            "textColor": "#000000"
          },
          "radioButton": {
            "textColor": "#000000"
          },
          "comboBox": {
            "textColor": "#000000",
            "textFace": "Courier",
            "textSize": 0,
            "customText": false
          },
          "listBox": {
            "textColor": "#000000",
            "textFace": "Courier",
            "textSize": 0,
            "multipleSelection": false
          }
        },
        "signature": {
        "color" : "#000000",
        "thickness" : 4
        }
    }
}
Note:
- The values in the above JSON file are the default settings for the configuration items. If some configuration items are not in the JSON file, the default settings will be used. For example, if you comment out ““highlight”: true,“, it is still enabled.
- Only the attachment annotation in the Annotation setting bar is not controlled by the subitems in “annotations”. Click Comment at the bottom toolbar to show the Annotation setting bar, and then long press
 (Note) to find the attachment annotation, which is as shown in Figure 5-1.

““attachment”: true,” controls the attachments panel and attachment annotation. If you set it to “false”, both of them will be disabled. If you want to hide “Comment” in the bottom toolbar, you should set both “annotations“ and “attachment“ to “false“.

Figure 5-1
Configuration Items Description
The JSON configuration file includes three parts: feature modules, rights management, and UI settings (for example, UI elements properties). This section will set forth the configuration items in detail.
Configure feature module
Note: The value type of the feature module items is bool, where “true” means that the feature module will be enabled, and “false” means that the feature module will be disabled. The default value is “true”.
| Feature Module | Description |
| readingbookmark | User-defined bookmark |
| outline | PDF document bookmark |
| annotations (highlight, underline, squiggly, strikeout, insert, replace, line, rectangle, oval, arrow, pencil, eraser, typewriter, textbox, callout, note, stamp, polygon, cloud, polyline, distance, image, audio, video, redaction) |
Annotation module collection |
| thumbnail | PDF page thumbnail display and page management |
| attachment | PDF document attachments and attachment annotations |
| signature | Digital signatures and handwritten signatures |
| fillSign | Fill flat forms (i.e. non-interactive forms) with text and symbols. |
| search | Text search |
| navigation | PDF page navigation |
| form | Form Filling and form data importing and exporting |
| selection | Text selection |
| encryption | PDF encryption |
| multipleSelection | Multiple annotations selection |
Configure rights management
Note: The value type of the configuration items is bool, where “true” means that the permission will be enabled, and “false” means that the permission will be disabled. The default value of runJavaScript and copyText is “true”, and the default value of disableLink is “false”.
| Rights Management | Description |
| runJavaScript | whether to allow to execute JavaScript |
| copyText | whether to allow to copy text |
| disableLink | whether to disable hyperlink |
Configure UI settings
| UI Items | Description/ Property Items | Value Type | Available Value | Default value | Note | |
| pageMode | Page display mode | String | Single/ Facing/ CoverLeft/ CoverMiddle/ CoverRight/ Reflow |
Single | For dynamic XFA files, it doesn’t support Reflow mode. | |
| continuous | Whether to view pages continuously | Bool | true/false | false | True means continuous pages, false means discontinuous pages. It is invalid for “Reflow” mode. | |
| zoomMode | Page zoom mode | String | FitWidth/FitPage | FitWidth | ||
| colorMode | Page color display mode | String | Normal/Night/Map | Normal | “Night” is a special “Map” mode. | |
| mapForegroundColor | Foreground color of page display | RGB | — | #5d5b71 | It is vaild only when “colorMode” is set to “Map”. | |
| mapBackgroundColor | Background color of page dispay | RGB | — | #00001b | It is vaild only when “colorMode” is set to “Map”. | |
| reflowBackgroundColor | Background color of reflow page | RGB | — | #ffffff | ||
| disableFormNavigationBar | Whether to disable the supplementary navigation bar of the form | Bool | true/false | false | ||
| highlightForm | Whether to highlight form field | Bool | true/false | true | ||
| highlightFormColor | The highlight color of forms | ARGB | #200066cc | It include alpha channel, and it is invalid for dynamic xfa document. | ||
| highlightLink | Whether to highlight hyperlink | Bool | true/false | true | ||
| highlightLinkColor | The highlight color of links | ARGB | #16007fff | It include alpha channel. | ||
| fullscreen | Whether to display in full screen mode | Bool | true/false | true | It will be in full screen mode immediately when opening a document if “fullscreen” is set to “true”. If the user clicks on the page, the toolbar will be displayed. After 5 seconds, if it is in full screen mode, the toolbar and other auxiliary tool buttons will be hidden automatically. |
|
| annotations | continuouslyAdd | Bool | true/false | false | Whether to add annotation continuously | |
| highlight | color | RGB | #ffff00 | |||
| opacity | numeric | [0.0-1.0] | 1.0 | |||
| underline | color | RGB | #66cc33 | |||
| opacity | numeric | [0.0-1.0] | 1.0 | |||
| squiggly | color | RGB | #ff6633 | |||
| opacity | numeric | [0.0-1.0] | 1.0 | |||
| strikeout | color | RGB | #ff0000 | |||
| opacity | numeric | [0.0-1.0] | 1.0 | |||
| insert | color | RGB | #993399 | |||
| opacity | numeric | [0.0-1.0] | 1.0 | |||
| replace | color | RGB | #0000ff | |||
| opacity | numeric | [0.0-1.0] | 1.0 | |||
| line | color | RGB | #ff0000 | |||
| opacity | numeric | [0.0-1.0] | 1.0 | |||
| thickness | numeric | [1-12] | 2 | |||
| rectangle | color | RGB | #ff0000 | |||
| opacity | numeric | [0.0-1.0] | 1.0 | |||
| thickness | numeric | [1-12] | 2 | |||
| oval | color | RGB | #ff0000 | |||
| opacity | numeric | [0.0-1.0] | 1.0 | |||
| thickness | numeric | [1-12] | 2 | |||
| arrow | color | RGB | #ff0000 | |||
| opacity | numeric | [0.0-1.0] | 1.0 | |||
| thickness | numeric | [1-12] | 2 | |||
| pencil | color | RGB | #ff0000 | |||
| opacity | numeric | [0.0-1.0] | 1.0 | |||
| thickness | numeric | [1-12] | 2 | |||
| polygon | color | RGB | #ff0000 | |||
| opacity | numeric | [0.0-1.0] | 1.0 | |||
| thickness | numeric | [1-12] | 2 | |||
| cloud | color | RGB | #ff0000 | |||
| opacity | numeric | [0.0-1.0] | 1.0 | |||
| thickness | numeric | [1-12] | 2 | |||
| polyline | color | RGB | #ff0000 | |||
| opacity | numeric | [0.0-1.0] | 1.0 | |||
| thickness | numeric | [1-12] | 2 | |||
| typewriter | textColor | RGB | #0000ff | |||
| opacity | numeric | [0.0-1.0] | 1.0 | |||
| textFace | String | Courier/ Courier-Bold/ Courier-BoldOblique/ Courier-Oblique/ Helvetica/ Helvetica-Bold/ Helvetica-BoldOblique/ Helvetica-Oblique/ Times-Roman/ Times-Bold/ Times-Italic/ Times-BoldItalic |
Courier | Text font name. If set to an invalid value, the default value will be used. |
||
| textSize | Integer | >=1 | 18 | |||
| textbox | color | RGB | #ff0000 | |||
| textColor | RGB | #0000ff | ||||
| opacity | numeric | [0.0-1.0] | 1.0 | |||
| textFace | String | Courier/ Courier-Bold/ Courier-BoldOblique/ Courier-Oblique/ Helvetica/ Helvetica-Bold/ Helvetica-BoldOblique/ Helvetica-Oblique/ Times-Roman/ Times-Bold/ Times-Italic/ Times-BoldItalic |
Courier | Text font name. If set to an invalid value, the default value will be used. |
||
| textSize | Integer | >=1 | 18 | |||
| callout | color | RGB | #ff0000 | |||
| textColor | RGB | #0000ff | ||||
| opacity | numeric | [0.0-1.0] | 1.0 | |||
| textFace | String | Courier/ Courier-Bold/ Courier-BoldOblique/ Courier-Oblique/ Helvetica/ Helvetica-Bold/ Helvetica-BoldOblique/ Helvetica-Oblique/ Times-Roman/ Times-Bold/ Times-Italic/ Times-BoldItalic |
Courier | Text font name. If set to an invalid value, the default value will be used. |
||
| textSize | Integer | >=1 | 18 | |||
| note | color | RGB | #ff6633 | |||
| opacity | numeric | [0.0-1.0] | 1.0 | |||
| icon | String | Comment/ Key/ Note/ Help/ NewParagraph/ Paragraph/ Insert |
Comment | If set to an invalid value, the default value will be used. | ||
| attachment | color | RGB | #ff6633 | |||
| opacity | numeric | [0.0-1.0] | 1.0 | |||
| icon | String | Graph/ PushPin/ Paperclip/ Tag |
PushPin | |||
| image | rotation | numeric | 0/90/180/270 | 0 | If set to an invalid value, the default value will be used. | |
| opacity | numeric | [0.0-1.0] | 1.0 | |||
| distance | color | RGB | ff0000 | |||
| opacity | numeric | [0.0-1.0] | 1.0 | |||
| thickness | numeric | [1-12] | 2 | |||
| scaleFromUnit | String | pt/m/cm/mm/inch/p/ft/yd | inch | The original unit of the scale. If set to an invalid value, the default value will be used. |
||
| scaleToUnit | String | pt/m/cm/mm/inch/p/ft/yd | inch | The target unit of the scale. If set to an invalid value, the default value will be used. |
||
| scaleFromValue | numeric | 1 | The original value of the scale | |||
| scaleToValue | numeric | 1 | The target value of the scale | |||
| redaction | fillColor | RGB | #000000 | |||
| textColor | RGB | #ff0000 | ||||
| textFace | String | Courier/ Helvetica/ Times |
Courier | Text font name. If set to an invalid value, the default value will be used. |
||
| textSize | Integer | >=1 | 12 | |||
| form | textField | textColor | RGB | #000000 | ||
| textFace | String | Courier/ Helvetica/ Times |
Courier | Text font name. If set to an invalid value, the default value will be used. |
||
| textSize | Integer | >=0 | 0 | 0 means adjusting the font size automatically. | ||
| checkBox | textColor | RGB | #000000 | |||
| radioButton | textColor | RGB | #000000 | |||
| comboBox | textColor | RGB | #000000 | |||
| textFace | String | Courier/ Helvetica/ Times |
Courier | Text font name. If set to an invalid value, the default value will be used. |
||
| textSize | Integer | >=0 | 0 | 0 means adjusting the font size automatically. | ||
| customText | false | Whether to allow to customize text. | ||||
| listBox | textColor | RGB | #000000 | |||
| textFace | String | Courier/ Helvetica/ Times |
Courier | Text font name. If set to an invalid value, the default value will be used. |
||
| textSize | Integer | >=0 | 0 | 0 means adjusting the font size automatically. | ||
| multipleSelection | false | Whether to allow to support multiple selection. | ||||
| signature | color | RGB | #000000 | |||
| thickness | numeric | [1-12] | 4 |
Instantiate a UIExtensionsManager object with the configuration file
In section 3.1.5 (Objective-C) and section 3.2.5 (Swift), we have already introduced how to instantiate UIExtensionsManager, and in this way all the built-in UI framework would be loaded by default. In this section, we will provide another method to instantiate UIExtensionsManager that uses the configuration file, so that developers can easily customize the UI as desired.
Please refer to the following code to instantiate a UIExtensionsManager object with the configuration file.
Note: You should prepare the JSON configuration file, and then add it to your project. Here, we assume that you have already added a JSON file named “uiextensions_config.json”.
In ViewController.m: (Objective-C)
UIExtensionsManager* extensionsManager;
...
// Instantiate a FSPDFViewCtrl object with the size of the entire screen.
FSPDFViewCtrl* pdfViewCtrl;
pdfViewCtrl = [[FSPDFViewCtrl alloc] initWithFrame: [self.view bounds]];

// Get the path of the JSON configuration file.
NSString* configPath = [[NSBundle mainBundle] pathForResource:@"uiextensions_config" ofType:@"json"];

// Initialize a UIExtensionsManager object and set it to pdfViewCtrl.
extensionsManager = [[UIExtensionsManager alloc] initWithPDFViewControl:pdfViewCtrl configuration:[NSData dataWithContentsOfFile:configPath]];
if (nil == extensionsManager) {
        return;
}
pdfViewCtrl.extensionsManager = extensionsManager;
In ViewController.swift: (Swift)
var extensionsManager: UIExtensionsManager!
...
// Initialize a FSPDFViewCtrl object with the size of the entire screen
var pdfViewCtrl: FSPDFViewCtrl!
pdfViewCtrl = FSPDFViewCtrl.init(frame:self.view.bounds)

// Get the path of the JSON configuration file.
let configPath = Bundle.main.path(forResource: "uiextensions_config", ofType: "json")
var data: Data?
if nil != configPath {
     data = NSData(contentsOfFile: configPath!) as Data?
}

// Initialize a UIExtensionsManager object and set it to pdfViewCtrl.
extensionsManager = UIExtensionsManager.init(pdfViewControl: pdfViewCtrl, configuration: data)
if nil == extensionsMgr  {
   return
}
pdfViewCtrl.extensionsManager = extensionsManager;
Note: Here, we use a configuration file to instantiate the UIExtensionsManager. If you do not want to use configuration file, please refer to the section 3.1.5 (Objective-C) and section 3.2.5 (Swift).
Examples for customizing UI through a configuration file
In this section, we will show you how to customize feature modules, rights management and UI settings (for example, UI elements properties) in your project. You will find it is extremely easy! You only need to modify the configuration file. Below you can see some examples of how to do it.
Note: For your convenience, we will try it in the “complete_pdf_viewer” (Objective-C) and “complete_pdf_viewer_swift” (Swift) demos found in the “samples” folder.
Open the demos in Xcode. Find the configuration file “uiextensions_config.json” under “complete_pdf_viewer\Resource” or “complete_pdf_viewer_swift\Resource”.
Example1: Disable “readingbookmark” and “navigation” feature modules.
In the JSON file, set the values of “readingbookmark” and “navigation” to “false” as follows:
"readingbookmark": true,
"navigation": true,
Then, rebuild and run the demo to see the result. Following lists the comparison diagrams:
Before:
 After:
The “readingbookmark” and “navigation” feature modules are removed.
Example2: Disable hyperlinks.
In the JSON file, set the value of “disableLink” to “true” as follows:
"permissions": {
     "runJavaScript": true,
     "copyText": true,
     "disableLink": true
},
Then, rebuild and run the demo to see the result, and you will find that there is no any response when clicking the hyperlinks.
Example3: Set the highlight color from yellow to red.
In the JSON file, set the color property of “highlight” to “#ff0000” as follows:
"highlight": {
    "color" : "#ff0000",
    "opacity" : 1.0
},
Then, rebuild and run the demo to see the result. Following lists the comparison diagrams:
Before:
 After:
The highlight color has been changed to red.
Customize UI elements through APIs
In version 4.0, Foxit PDF SDK for iOS supports customizing to show or hide the whole top or bottom toolbar, and from version 5.0, it provides APIs to customize to show or hide a specific panel, the items in the top/bottom toolbar, View setting bar and More Menu view, which is convenient for developers to modify the UI elements in the context of the built-in UI framework.
Note: For your convenience, we will show you how to customize UI elements through APIs in the “complete_pdf_viewer” (Objective-C) and “complete_pdf_viewer_swift“ (Swift) demos found in the “samples” folder. We assume that you have not modified the “uiextensions_config.json“ file in the demos, which means that all of the built-in UI in the UI Extensions Component are enabled.
Customizing top/bottom toolbar
In the top/bottom toolbar (See Figure 5-2), you can do the following operations:
- Show or hide the top/bottom toolbar.
- Show or hide a specific item in the top/bottom toolbar.

Figure 5-2
Table 5-1 lists the related APIs which are used to customize the top/bottom toolbar.
Table 5-1
| (void)enableTopToolbar:(BOOL)isEnabled | Enable or disable top toolbar. |
| (void)enableBottomToolbar:(BOOL)isEnabled | Enable or disable bottom toolbar. |
| (void)setToolbarItemHiddenWithTag: (NSUInteger)itemTag hidden:(BOOL)isHidden |
Show or hide the item in the top toolbar. |
The value of the parameter “itemTag” in setToolbarItemHiddenWithTag interface can be set as follows, which maps the features in the top/bottom toolbar.
| Item name | itemTag | NSUInteger |
| Back | FS_TOPBAR_ITEM_BACK_TAG | 101 |
| Bookmark | FS_TOPBAR_ITEM_BOOKMARK_TAG | 100 |
| Search | FS_TOPBAR_ITEM_SEARCH_TAG | 103 |
| More | FS_TOPBAR_ITEM_MORE_TAG | 102 |
| List | FS_BOTTOMBAR_ITEM_PANEL_TAG | 200 |
| View | FS_BOTTOMBAR_ITEM_READMODE_TAG | 203 |
| Comment | FS_BOTTOMBAR_ITEM_ANNOT_TAG | 201 |
| Signature | FS_BOTTOMBAR_ITEM_SIGNATURE_TAG | 202 |
| Fill | FS_BOTTOMBAR_ITEM_FILLSIGN_TAG | 204 |
In the following examples, we will show you how to customize the top/bottom toolbar through APIs in the “complete_pdf_viewer” (Objective-C) and “complete_pdf_viewer_swift” (Swift) demos found in the “samples” folder.
Open the demos in Xcode. Add the sample code to the “ViewController.m” (Objective-C) or “ViewController.swift” (Swift) (after the code that initializes UIExtensionsManager).
Example1: Hide the whole top toolbar.
Objective-C:
[self.extensionsMgr enableTopToolbar:false];
Swift:
extensionsMgr.enableTopToolbar(false)
Before:
![]()
After:

Example2: Hide the whole bottom toolbar.
Objective-C:
[self.extensionsMgr enableBottomToolbar:false];
Swift:
extensionsMgr.enableBottomToolbar(false)
Before:
![]()
After:
![]()
Example3: Hide the More menu item in the top toolbar.
Objective-C:
[self.extensionsMgr setToolbarItemHiddenWithTag:FS_TOPBAR_ITEM_MORE_TAG hidden:YES];
Swift:
extensionsMgr.setToolbarItemHiddenWithTag(UInt(FS_TOPBAR_ITEM_MORE_TAG), hidden: true)
Before:
![]()
After:

Example4: Hide the List menu item in the bottom toolbar.
Objective-C:
[self.extensionsMgr setToolbarItemHiddenWithTag:FS_BOTTOMBAR_ITEM_PANEL_TAG hidden:YES];
Swift:
extensionsMgr.setToolbarItemHiddenWithTag(UInt(FS_BOTTOMBAR_ITEM_PANEL_TAG), hidden: true)
Before:
![]()
After:
![]()
For other items in the top/bottom toolbar, you can refer to the above examples, and just need to change the value of the parameter “itemTag” in setToolbarItemHiddenWithTag interface.
To show one of the UI elements in the top/bottom toolbar, just set the opposite value for “true” and “false” in the above examples.
Customizing to show/hide a specific Panel
To show or hide a specific panel (See Figure 5-3, includes “Reading Bookmarks”, “Outline”, “Annotations”, “Attachments” and “Digital Signatures” panels, just clicks List at the bottom toolbar to find it), you only need to use the following API:
(void)setPanelHidden:(BOOL)isHidden type:(FSPanelType)type

Figure 5-3
Note: To show or hide a specific panel through APIs, please mark sure the corresponding features in the configuration file is set to “true”. Otherwise, the API settings will not have any effect.
In this section, we only give an example to show you how to show or hide a specific panel through APIs in the “complete_pdf_viewer” (Objective-C) and “complete_pdf_viewer_swift” (Swift) demos found in the “samples” folder. Just take the “Outline” panel as an example, and for others panels, you only need to change the FSPanelType. The corresponding relation between panels and FSPanelType are as follows:
| Panel | FSPanelType |
| Reading Bookmarks | FSPanelTypeReadingBookmark |
| Outline | FSPanelTypeOutline |
| Annotations | FSPanelTypeAnnotation |
| Attachments | FSPanelTypeAttachment |
| Digital Signatures | FSPanelTypeDigitalSignature |
Open the demos in Xcode. Add the sample code to the “ViewController.m” (Objective-C) or “ViewController.swift” (Swift) (after the code that initializes UIExtensionsManager).
Example: Hide the “Outline” panel.
Objective-C:
[self.extensionsMgr.panelController setPanelHidden:true type:FSPanelTypeOutline];
Swift:
extensionsMgr.panelController.setPanelHidden(true, type: .outline)
Before:
 After:
 ![]()
For Reading Bookmarks, Annotations, Attachments and Digital Signatures panels, you only need to change the FSPanelType. Just try it.
Customizing to show/hide the UI elements in the View setting bar
To show or hide the UI elements in the View setting bar (See Figure 5-4, just clicks View at the bottom toolbar to find it), you only need to use the following API:
(void)setItem:(SettingItemType)itemType hidden:(BOOL)hidden;

Figure 5-4
The value of the parameter “itemType” can be set as follows, which maps the items in the View setting bar.
| item | itemType |
| Single page mode | SINGLE |
| Double page mode | DOUBLEPAGE |
| Cover page mode | COVERPAGE |
| Continuous page mode | CONTINUOUS |
| Fit page mode | FITPAGE |
| Fit width mode | FITWIDTH |
| Auto-Brightness slider view | BRIGHTNESS |
| Night mode | NIGHTMODEL |
| Thumbnail | THUMBNAIL |
| Reflow mode | REFLOW |
| Crop mode | CROPPAGE |
| Speech | SPEECH |
| Rotate page | ROTATE |
| Screen lock | LOCKSCREEN |
| Pan and Zoom | PANZOOM |
In this section, we only take “Reflow” item as an example to show you how to show or hide the UI elements in the View setting bar through APIs in the “complete_pdf_viewer” (Objective-C) and “complete_pdf_viewer_swift” (Swift) demos found in the “samples” folder. For other UI elements, you only need to change the “itemType“.
Open the demos in Xcode. Add the sample code to the “ViewController.m” (Objective-C) or “ViewController.swift” (Swift) (after the code that initializes UIExtensionsManager).
Example1: Hide the “Reflow” item in the View setting bar.
Objective-C:
[self.extensionsMgr.settingBar setItem:REFLOW hidden:YES];
Swift:
extensionsMgr.settingBar.setItem(.REFLOW, hidden: true)
Before:
 After:
For other items in the View setting bar, you can refer to the above example, and just need to change the value of the parameter “itemType” in setItem interface.
To show one of the UI elements in the View setting bar, just set the “hidden” to “false” in the above example.
Customizing to show/hide the UI elements in the More Menu view
To show or hide the UI elements in the More Menu view (See Figure 5-5, just clicks ![]() at the right top toolbar to find it), you can use the following APIs listed in the Table 5-2.
at the right top toolbar to find it), you can use the following APIs listed in the Table 5-2.
Table 5-2
| (void)setMoreViewItemHiddenWithGroup: (NSUInteger)groupTag hidden:(BOOL)isHidden | Set the enabled state of group according to “groupTag”. |
| (void)setMoreViewItemHiddenWithGroup: (NSUInteger)groupTag andItemTag:(NSUInteger)itemTag hidden:(BOOL)isHidden | Set the enabled state of item according to “groupTag” and “itemTag”. |

Figure 5-5
The values of the parameters “groupTag” and “itemTag” in the setMoreViewItemHiddenWithGroup interface can be set as follows:
| groupTag | NSUInteger |
| TAG_GROUP_FILE | 1 |
| TAG_GROUP_PROTECT | 4 |
| TAG_GROUP_COMMENT | 6 |
| TAG_GROUP_FORM | 7 |
| groupTag | itemTag | NSUInteger |
| TAG_GROUP_FILE | TAG_ITEM_FILEINFO | 10 |
| TAG_ITEM_SAVE_AS | 11 | |
| TAG_ITEM_REDUCEFILESIZE | 12 | |
| TAG_ITEM_WIRELESSPRINT | 14 | |
| TAG_ITEM_SCREENCAPTURE | 16 | |
| TAG_GROUP_PROTECT | TAG_ITEM_PASSWORD | 17 |
| TAG_ITEM_CERTIFICATE | 18 | |
| TAG_GROUP_COMMENT | TAG_ITEM_IMPORTCOMMENT | 12 |
| TAG_ITEM_EXPORTCOMMENT | 13 | |
| TAG_GROUP_FORM | TAG_ITEM_CREATEFORM | 23 |
| TAG_ITEM_RESETFORM | 24 | |
| TAG_ITEM_IMPORTFORM | 25 | |
| TAG_ITEM_EXPORTFORM | 26 |
Note: If you want to show or hide an itemTag, please make sure the corresponding groupTag has not been hidden. Otherwise, the settings will not have any effect.
In this section, we only take “TAG_GROUP_FILE” (File in the view) and “TAG_ITEM_FILEINFO” (File Information in the view) as an example to show you how to show or hide the UI elements in the More Menu view through APIs in the “complete_pdf_viewer” (Objective-C) and “complete_pdf_viewer_swift” (Swift) demos found in the “samples” folder. For other UI elements, you can refer to the following examples and only need to change the parameter value in the setMoreViewItemHiddenWithGroup interfaces.
Open the demos in Xcode. Add the sample code to the “ViewController.m” (Objective-C) or “ViewController.swift” (Swift) (after the code that initializes UIExtensionsManager).
Example1: Hide the “File” in the More Menu view.
Objective-C:
[self.extensionsMgr.more setMoreViewItemHiddenWithGroup:TAG_GROUP_FILE hidden:YES];
Swift:
self.extensionsMgr.more.setMoreViewItemHiddenWithGroup(UInt(TAG_GROUP_FILE), hidden: true)
Before:
 After:
Example2: Hide the “File Information” in the More Menu view.
Objective-C:
[self.extensionsMgr.more setMoreViewItemHiddenWithGroup:TAG_GROUP_FILE andItemTag:TAG_ITEM_FILEINFO hidden:YES];
Swift:
self.extensionsMgr.more.setMoreViewItemHiddenWithGroup(UInt(TAG_GROUP_FILE), andItemTag: UInt(TAG_ITEM_FILEINFO), hidden: true)
Before:
 After:
For other items in the More Menu view, you can refer to the above examples, and just need to change the parameter value in the setMoreViewItemHiddenWithGroup interfaces.
To show one of the UI elements in the More Menu view, just set the “hidden” to “false” in the above examples.
Customize UI implementation through source code
In the previous sections, we have introduced how to customize the user interface through a configuration file or APIs in detail. Those changes are in the context of the built-in UI framework of Foxit PDF SDK for iOS. If you do not want to use the ready-made UI framework, you can redesign it through modifying the source code of the UI Extensions Component.
There is one thing to take note of. The source code of the UI Extensions Component is written in Objective-C, so you need to use Objective-C to modify the UI layout. If you are a Swift developer and not already familiar with Objective-C, you might only be able to customize the UI appearance that does not need writing code, such as icons and other UI resources.
To customize the UI implementation, you need to follow these steps:
First, add the following required files into your app.
- FoxitRDK.framework – The framework that includes the Foxit PDF SDK for iOS dynamic library and associated header files. It can be found in the “libs” folder.
- uiextensions project – It is an open source library that contains some ready-to-use UI module implementations, which can help developers rapidly embed a fully functional PDF reader into their iOS app. Of course, developers are not forced to use the default UI, they can freely customize and design the UI for their specific apps through the “uiextensions” project. It can be found in the “libs/uiextensions_src” folder.
Tip: The built-in UI customization can be done in the uiextensions project, and then you can add the new uiextensionsDynamic.framework generated by the modified uiextensions project to your app instead of the whole uiextensions project.
Second, find the specific code or images related to the UI that you want to customize in the uiextensions project, then modify them based on your requirements.
Now, for your convenience, we will show you how to customize the UI implementation in “viewer_ctrl_demo” project found in the “samples” folder.
UI Customization Example
Step 1: Add the uiextensions project into the demo.
Note: We will add the uiextensions project to the demo which is convenient for us to see the custom results. The demo already includes FoxitRDK.framework, so we just need to add the uiextensions project.
Load the “viewer_ctrl_demo” project in Xcode. Drag-and-drop “uiextensions.xcodeproj” found in the “libs/uiextensions_src” of the download package into the “viewer_ctrl_demo” project as shown in Figure 5.

Figure 5-6
Then, it will pop up a dialog box which prompts you whether to save the project in a new workspace as shown in Figure 5-7. Click Save.

Figure 5-7
Save the workspace to the “samples” folder, and name “custom_viewer” as shown in Figure 5-8. Click Save.

Figure 5-8
Now, the workspace looks like the Figure 5-9.

Figure 5-9
Congratulations! You have completed the first step.
Step 2: Find and modify the code or images related to the UI that you want to customize.
Now, we will show you a simple example that changes one button’s icon in the search panel as shown in Figure 5-10.
Tip: If you just want to change the icons of the UI elements, you can do it in the uiextensionsDynamic.framework directly instead of importing the source code of uiextensions project. But the same is that you also need to find the icon’s name.
![]()
Figure 5-10
To replace the icon we only need to find the place where stores the icon for this button, then use another icon with the same name to replace it.
Note: Foxit PDF SDK for iOS provides three sets of icons for different devices to make sure that your apps can run smoothly on every device. Following shows the meaning of the images with different suffix:
Image.png: used for older devices with non-Retina display (e.g. iPad 2).
Image@2x.png: used for iPhone 4/4s/5/5s/6/6s/7/7s/8/11.
Image@3x.png: used for iPhone 6/6s/7/7s/8/11 Plus and iPhone X, etc., which has the highest resolution.
An iPhone 8 Simulator will be used as an example to run the demo. In the uiextensions project, click “uiextensionsDynamic -> Resource -> png -> Search.xcassets” as shown in Figure 5-11. It’s easy to find the image that we want to replace. The resource files are stored according to the features, so you can locate the related code through the icon’s name.

Figure 5-11
Right now, just replace “[email protected]” with your own icon in the “libs\uiextensions_src\UIExtensions\Resource\png\Search.xcassets\search_showlist.imageset” folder. For example, we use the icon of the top search button ([email protected]) to replace it.
After replacing, firstly build and run the uiextensionsDynamic_aggregate project as shown in Figure 5-12.

Figure 5-12
Note: The uiextensions project can generate a universal “.a” library through building uiextensions_aggregate, or generate a universal framework through building uiextensionsDynamic_aggregate, which can be used for both simulator and iOS device. In this section, we build uiextensionsDynamic_aggregate. The scripts used for generating the universal framework in the uiextension project is shown in Figure 5-12.
The uiextensionsDynamic.framework in the “libs” folder of the download package will be overwritten after building the uiextensionsDynamic_aggregate project successfully.
Then build and run the “viewer_ctrl_demo” project. After building successfully, try the search feature and we can see that the icon of the bottom search button has changed as shown in Figure 5-13.

Figure 5-13
This is just a simple example to show how to customize the UI implementation. You can refer to it and feel free to customize and design the UI for your specific apps through the uiextensions project.
Working with SDK API
Foxit PDF SDK for iOS wrapped all of the features implementations into the UI Extensions Component. If you are interested in the detailed process of the features implementations, please go through this section.
In this section, we will introduce a set of major features and list some examples to show you how to implement the features using Foxit PDF SDK Core API.
Render
PDF rendering is realized through the Foxit renderer, a graphic engine that is used to render page to a bitmap or a platform device context. Foxit PDF SDK provides APIs to set rendering options/flags, for example set flag to decide whether to render form fields and signature, whether to draw image anti-aliasing and path anti-aliasing. To do rendering, you can use the following APIs:
- To render page and annotations, first use function FSRenderer::setRenderContentFlags to decide whether to render page and annotation both or not, and then use function FSRenderer::startRender to do the rendering. Function FSRenderer::startQuickRender can also be used to render page but only for thumbnail purpose.
- To render a single annotation, use function FSRenderer::renderAnnot.
- To render on a bitmap, use function FSRenderer::startRenderBitmap.
- To render a reflowed page, use function FSRenderer::startRenderReflowPage.
Widget annotation is always associated with form field and form control in Foxit PDF SDK. For how to render widget annotations, here is a recommended flow:
- After loading a PDF page, first render the page and all annotations in this page (including widget annotations).
- Then, if use FSFiller object to fill the form, the function FSFiller::render should be used to render the focused form control instead of the function FSRenderer::renderAnnot.
Example:
How to render a specified page to a bitmap
#import "ViewController.h"
#import <FoxitRDK/FSPDFViewControl.h>
...

-(FSBitmap*)renderPageToBitmap:(FSPDFPage*) pdfPage drawWidth:(int)drawPageWidth drawHeight:(int)drawPageHeight
{
    // If the page hasn't been parsed yet, throw an exception.
    if(![pdfPage isParsed])
        @throw [NSException exceptionWithName:NSGenericException reason:@"PDF Page should be parsed first" userInfo:nil];

    // Pepare matrix to render on the bitmap.
    FSMatrix2D* matrix = [pdfPage getDisplayMatrix:0 top:0 width:drawPageWidth height:drawPageHeight rotate:FSRotation0];
    // Create a bitmap according to the required drawPageWidth and drawPageHeight.
    FSBitmap* bitmap = [[FSBitmap alloc] initWithWidth:drawPageWidth height:drawPageHeight format:FSBitmapDIBRgb];
    // Fill the bitmap with white color.
    [bitmap fillRect:0xFFFFFFFF rect:nil];
    FSRenderer* renderer = [[FSRenderer alloc] initWithBitmap:bitmap is_rgb_order:YES];
    // Set the render flag, both page content and annotation will be rendered.
    [renderer setRenderContentFlags:FSRendererRenderPage | FSRendererRenderAnnot];
    // Start to render the page progressively.
    FSProgressive* progress = [renderer startRender:pdfPage matrix:matrix pause:nil];
    if(progress) {
        FSProgressiveState state = [progress resume];
        while (state == FSProgressiveToBeContinued) {
            state = [progress resume];
        }
        if(state != FSProgressiveFinished)
            return nil;
    }
    return bitmap;
}
How to render a specified page to a platform device context
#import "ViewController.h"
#import <FoxitRDK/FSPDFViewControl.h>
...

-(void)renderPageToContext:(FSPDFPage*) pdfPage context:(CGContextRef)context
{
    // If the page hasn't been parsed yet, throw an exception.
    if(![pdfPage isParsed])
        @throw [NSException exceptionWithName:NSGenericException reason:@"PDF Page should be parsed first" userInfo:nil];

    // We set the width of drawing page to be equal to screen width, the drawing page height is calculated according to the ratio of page height and width.
    CGFloat scale = [UIScreen mainScreen].scale;
    int drawPageWidth = (int)[[UIScreen mainScreen] bounds].size.width * scale;
    float pageWidth = [pdfPage getWidth];
    float pageHeight = [pdfPage getHeight];
    int drawPageHeight = (int)drawPageWidth * (pageHeight/pageWidth) * scale;

    // Erase the background of context with white color.
    CGContextSaveGState(context);
    CGContextSetRGBFillColor(context, 1.0, 1.0, 1.0, 1.0);
    CGContextFillRect(context, CGRectMake(0, 0, drawPageWidth, drawPageHeight));

    // Render to screen in the device coordinate, left:0, top:0, right:drawPageWidth, bottom:drawPageHeight.
    FSMatrix2D* matrix = [pdfPage getDisplayMatrix:0 top:0 width:drawPageWidth height:drawPageHeight rotate:FSRotation0];
    FSRenderer* renderer = [[FSRenderer alloc] initWithContext:context device_type:FSRendererDeviceDisplay];
    [renderer setRenderContentFlags:FSRendererRenderPage | FSRendererRenderAnnot];
    // Start to render the page progressively.
    FSProgressive* progress = [renderer startRender:pdfPage matrix:matrix pause:nil];
    if(progress) {
        FSProgressiveState state = [progress resume];
        while (state == FSProgressiveToBeContinued) {
            state = [progress resume];
        }
    }
    CGContextRestoreGState(context);
}
Text Page
Foxit PDF SDK provides APIs to extract, select, search and retrieve text in PDF documents. PDF text contents are stored in FSTextPage objects which are related to a specific page. FSTextPage class can be used to retrieve information about text in a PDF page, such as single character, single word, text content within specified character range or rectangle and so on. It also can be used to construct objects of other text related classes to do more operations for text contents or access specified information from text contents:
- To search text in text contents of a PDF page, construct a FSTextSearch object with FSTextPage object.
- To access text such like hypertext link, construct a FSPageTextLinks object with FSTextPage object.
- To highlight the selected text on the PDF page, construct a FSTextPage object for calculating text area by selection.
Example:
How to get the text area on a page by selection
#import "ViewController.h"
#import <FoxitRDK/FSPDFViewControl.h>
...

// Get the text area on a page by selection. The starting selection position and ending selection position are specified by startPos and endPos.
-(NSArray<FSRectF*>*)getTextRectsBySelection:(FSPDFPage*)page startPos:(FSPointF*)startPos endPos:(FSPointF*)endPos {
    if(![page isParsed])
        @throw [NSException exceptionWithName:NSGenericException reason:@"PDF Page should be parsed first" userInfo:nil];

    // Create a text page from the parsed PDF page.
    FSTextPage* textPage = [[FSTextPage alloc] initWithPage:page flags:FSTextPageParseTextNormal];
    if(!textPage || [textPage isEmpty])
        return nil;
    int startCharIndex = [textPage getIndexAtPos:startPos.x y:startPos.y tolerance:5];
    int endCharIndex = [textPage getIndexAtPos:endPos.x y:endPos.y tolerance:5];
    // API getTextRectCount requires that start character index must be lower than or equal to end character index.
    startCharIndex = startCharIndex<endCharIndex?startCharIndex:endCharIndex;
    endCharIndex = endCharIndex>startCharIndex?endCharIndex:startCharIndex;
    int count = [textPage getTextRectCount:startCharIndex count:endCharIndex-startCharIndex];
    if(count)
    {
        NSMutableArray<FSRectF*>* array = [[NSMutableArray<FSRectF*> alloc] init];
        for(int i=0; i<count; i++) {
            FSRectF* rect = [textPage getTextRect:i];
            if(!rect || [rect isEmpty])
                continue;
            [array addObject:rect];
        }
        // The return rects are in PDF unit, if caller need to highlight the text rects on the screen, then these rects should be converted in device unit first.
        return array;
    }
    return nil;
}
...
Text Search
Foxit PDF SDK provides APIs to search text in a PDF document, a XFA document, a text page or in a PDF annotation’s appearance. It offers functions to do a text search and get the searching result:
- To specify the searching pattern and options, use functions FSTextSearch::setPattern, FSTextSearch::setStartPage (only useful for a text search in PDF document), FSTextSearch::setEndPage (only useful for a text search in PDF document) and FSTextSearch::setSearchFlags.
- To do the searching, use function FSTextSearch::findNext or FSTextSearch::findPrev.
- To get the searching result, use function FSTextSearch::getMatchXXX().
Example:
How to search a text pattern in a PDF
#import "ViewController.h"
#import <FoxitRDK/FSPDFViewControl.h>
...

NSString *pdfPath = [[NSBundle mainBundle] pathForResource:@"Sample" ofType:@"pdf"];
FSPDFDoc *doc = [[FSPDFDoc alloc] initWithPath:pdfPath];

// Create a text search handler for searching in PDF document.
FSTextSearch *textSearch = [[FSTextSearch alloc] initWithDocument:doc  cancel:nil flag:FSTextPageParseTextNormal];
// Set the start page index which searching will begin. By default, end page will be the last page.
[textSearch setStartPage:0];
// Set the text to be searched.
[textSearch setPattern:@"foxit"];
// Set the search flags to be matching case and matching whole word.
[textSearch  setSearchFlags:FSTextSearchSearchMatchCase|FSTextSearchSearchMatchWholeWord];
// Start to search from the start page to end.
while([textSearch findNext]) {
        // If true, then we found a matched result.
        // Get the found page index.
        int pageIndx = [textSearch getMatchPageIndex];
        // Get the start character index of the matched text on the found page.
        int startCharIndex = [textSearch getMatchStartCharIndex];
        // Get the end character index of the matched text on the found page.
        int endCharIndex = [textSearch getMatchEndCharIndex];
        // Get the rectangular region of the matched text on the found page.
        FSRectFArray* matchRects = [textSearch getMatchRects];
    }
}
...
Bookmark (Outline)
Foxit PDF SDK provides navigational tools called Bookmarks to allow users to quickly locate and link their point of interest within a PDF document. PDF bookmark is also called outline, and each bookmark contains a destination or actions to describe where it links to. It is a tree-structured hierarchy, so function FSPDFDoc::getRootBookmark must be called first to get the root of the whole bookmark tree before accessing to the bookmark tree. Here, “root bookmark” is an abstract object which can only have some child bookmarks without next sibling bookmarks and any data (includes bookmark data, destination data and action data). It cannot be shown on the application UI since it has no data. Therefore, a root bookmark can only call function FSBookmark::getFirstChild.
After the root bookmark is retrieved, following functions can be called to access other bookmarks:
- To access the parent bookmark, use function FSBookmark::getParent.
- To access the first child bookmark, use function FSBookmark::getFirstChild.
- To access the next sibling bookmark, use function FSBookmark::getNextSibling.
- To insert a new bookmark, use function FSBookmark::insert.
- To move a bookmark, use function FSBookmark::moveTo.
Example:
How to travel the bookmarks of a PDF in depth first order
#import "ViewController.h"
#import <FoxitRDK/FSPDFViewControl.h>
...

- (void)DepthFistTravelBookmarkTree:(FSBookmark*)bookmark  document:(FSPDFDoc*)doc {
    if(!bookmark || [bookmark isEmpty])
        return;
    [self DepthFistTravelBookmarkTree:[bookmark getFirstChild] document:doc];
    while(true) {
        // Get bookmark title.
        NSString* title = [bookmark getTitle];
        FSDestination* dest = [bookmark getDestination];
        if(dest && ![dest isEmpty])
        {
            float left,right,top,bottom;
            float zoom;
            int pageIndex = [dest getPageIndex:doc];
            // left, right, top, bottom, zoom are only meaningful with some special zoom modes.
            FSDestinationZoomMode mode = [dest getZoomMode];
            switch (mode) {
                case FSDestinationZoomXYZ:
                    left = [dest getLeft];
                    top = [dest getTop];
                    zoom = [dest getZoomFactor];
                    break;
                case FSDestinationZoomFitPage:
                    break;
                case FSDestinationZoomFitHorz:
                    top = [dest getTop];
                    break;
                case FSDestinationZoomFitVert:
                    left = [dest getLeft];
                    break;
                case FSDestinationZoomFitRect:
                    left = [dest getLeft];
                    bottom = [dest getBottom];
                    right = [dest getRight];
                    top = [dest getTop];
                    break;
                case FSDestinationZoomFitBBox:
                    break;
                case FSDestinationZoomFitBHorz:
                    top = [dest getTop];
                    break;
                case FSDestinationZoomFitBVert:
                    left = [dest getLeft];
                    break;
                default:
                    break;
            }
        }
        bookmark = [bookmark getNextSibling];
        if(bookmark == nil || [bookmark isEmpty])
            break;
        [self DepthFistTravelBookmarkTree:[bookmark getFirstChild] document:doc];
    }
}
Reading Bookmark
Reading bookmark is not a PDF bookmark, in other words, it is not PDF outlines. It is the bookmark in applicable level. It is stored in the metadata (XML format) of catalog. It allows user to add or remove a reading bookmark according to their reading preferences and navigate to one PDF page easily by selecting one reading bookmark.
In order to retrieve the reading bookmark, function FSPDFDoc::getReadingBookmarkCount could be called to count the reading bookmarks, and function FSPDFDoc::getReadingBookmark could be called to get a reading bookmark by index.
This class offers several functions to get/set properties of reading bookmarks, such as title, destination page index and creation/modified date time.
Example:
How to add a custom reading bookmark and enumerate all the reading bookmarks
#import "ViewController.h"
#import <FoxitRDK/FSPDFViewControl.h>
...

// Add a new reading bookmark to pdf document, the returned bookmark stores the title and the page index.
- (FSReadingBookmark*)addReadingBookmark:(FSPDFDoc*)pdfDoc title:(NSString*)title pageIndex:(int)pageIndex {
    int count = [pdfDoc getReadingBookmarkCount];
    return [pdfDoc insertReadingBookmark:count title:title dest_page_index:pageIndex];
}

// Enumerate all the reading bookmarks from the pdf document.
- (void)getReadingBookmark:(FSPDFDoc*) pdfDoc {
    int count = [pdfDoc getReadingBookmarkCount];
    for(int i=0; i<count; i++) {
        FSReadingBookmark* bm = [pdfDoc getReadingBookmark:i];
        if([bm isEmpty]) continue;
        // Get bookmark title.
        NSString* title = [bm getTitle];
        // Get the page index which associated with the bookmark.
        int pageIndex = [bm getPageIndex];
        // Get the creation date of the bookmark.
        FSDateTime* creationDate = [bm getDateTime:YES];
        // Get the modification date of the bookmark.
        FSDateTime* modificationDate = [bm getDateTime:NO];
    }
}
Attachment
In Foxit PDF SDK, attachments are only referred to attachments of documents rather than file attachment annotation, which allow whole files to be encapsulated in a document, much like email attachments. Foxit PDF SDK provides applications APIs to access attachments such as loading attachments, getting attachments, inserting/removing attachments, and accessing properties of attachments.
Example:
How to embed a specified file to a PDF document
#import "ViewController.h"
#import <FoxitRDK/FSPDFViewControl.h>
...

NSString* filePath = @"/xxx/fileToBeEmbedded.xxx";
FSPDFNameTree* nameTree = [[FSPDFNameTree alloc] initWithDocument:self.fspdfdoc type:FSPDFNameTreeEmbeddedFiles];
FSAttachments* attachments = [[FSAttachments alloc] initWithDoc:self.fspdfdoc nametree:nameTree];
FSFileSpec* fileSpec = [[FSFileSpec alloc] initWithDocument:self.fspdfdoc];
[fileSpec setFileName:[filePath lastPathComponent]];
if(![fileSpec embed:filePath])
   return;
[attachments addEmbeddedFile:[filePath lastPathComponent] file_spec:fileSpec];
...
How to export the embedded attachment file from a PDF and save it as a single file
#import "ViewController.h"
#import <FoxitRDK/FSPDFViewControl.h>
...

// Extract the embedded attachment file.
int count = [attachments getCount];
for(int i=0; i<count; i++) {
   NSString* key = [attachments getKey:i];
   if(key) {
       FSFileSpec* fileSpec = [attachments getEmbeddedFile:key];
       NSString* exportedFile = [@"/somewhere/" stringByAppendingString: [fileSpec getFileName]];
       if(fileSpec && ![fileSpec isEmpty]) {
           fileSpec exportToFile:exportedFile];
       }
   }
}
...
Annotation
An annotation associates an object such as note, line, and highlight with a location on a page of a PDF document. PDF includes a wide variety of standard annotation types as listed in
Table 61. Among these annotation types, many of them are defined as markup annotations for they are used primarily to mark up PDF documents. The ‘Markup’ column in
Table 61 shows whether an annotation is a markup annotation.
Foxit PDF SDK supports most annotation types defined in PDF Reference. Foxit PDF SDK provides APIs of annotation creation, properties access and modification, appearance setting and drawing.
Table 6-1
| Annotation type | Description | Markup | Supported by SDK |
| Text(Note) | Text annotation | Yes | Yes |
| Link | Link Annotation | No | Yes |
| FreeText (TypeWriter/TextBox/Callout) |
Free text annotation | Yes | Yes |
| Line | Line annotation | Yes | Yes |
| Square | Square annotation | Yes | Yes |
| Circle | Circle annotation | Yes | Yes |
| Polygon | Polygon annotation | Yes | Yes |
| PolyLine | PolyLine annotation | Yes | Yes |
| Highlight | Highlight annotation | Yes | Yes |
| Underline | Underline annotation | Yes | Yes |
| Squiggly | Squiggly annotation | Yes | Yes |
| StrikeOut | StrikeOut annotation | Yes | Yes |
| Stamp | Stamp annotation | Yes | Yes |
| Caret | Caret annotation | Yes | Yes |
| Ink(pencil) | Ink annotation | Yes | Yes |
| Popup | Popup annotation | No | Yes |
| File Attachment | FileAttachment annotation | Yes | Yes |
| Sound | Sound annotation | Yes | No |
| Movie | Movie annotation | No | No |
| Widget* | Widget annotation | No | Yes |
| Screen | Screen annotation | No | Yes |
| PrinterMark | PrinterMark annotation | No | No |
| TrapNet | Trap network annotation | No | No |
| Watermark* | Watermark annotation | No | No |
| 3D | 3D annotation | No | No |
| Redact | Redact annotation | Yes | Yes |
Note: Foxit SDK supports a customized annotation type called PSI (pressure sensitive ink) annotation that is not described in PDF reference. Usually, PSI is for handwriting features and Foxit SDK treats it as PSI annotation so that it can be handled by other PDF products.
Example:
How to add annotations to a PDF page
#import "ViewController.h"
#import <FoxitRDK/FSPDFViewControl.h>
...

NSString *pdfPath = [[NSBundle mainBundle] pathForResource:@"Sample" ofType:@"pdf"];
FSPDFDoc *doc = [[FSPDFDoc alloc] initWithPath:pdfPath];
FSPDFPage *pdfPage = [doc getPage:0];
// Add text annot.
FSRectF *rect = [[FSRectF alloc] initWithLeft1:100 bottom1:100 right1:120  top1:120];
FSNote *note = [[FSNote alloc] initWithAnnot:[pdfPage addAnnot:FSAnnotNote  rect:rect]];
if (!note || [note isEmpty]) {
    return;
}
[note setIconName:@"Comment"];
// Set color to blue.
[note setBorderColor:0xff0000ff];
[note setContent:@"This is the note comment, write any content here."];
[note resetAppearanceStream];

// The following code demonstrates how to add hightlight annotation on the searched text.
FSTextSearch *textSearch = [[FSTextSearch alloc] initWithDocument:doc  cancel:nil flag:FSTextPageParseTextNormal];
if (!textSearch || [textSearch isEmpty]) {
    return;
}
// Suppose that the text for highlighting is "foxit".
[textSearch setPattern:@"foxit"];
BOOL bMatched = [textSearch findNext];
if (bMatched) {
    FSRectFArray *rects = [textSearch getMatchRects];
    int rectCount = [rects getSize];
    // Fill the quadpoints array according to the text rects of matched result.
    FSQuadPointsArray* arrayOfQuadPoints = [[FSQuadPointsArray alloc] init];
    for (int i = 0; i < rectCount; i++) {
        FSRectF *rect = [rects getAt:i];
        FSQuadPoints *quadPoints = [[FSQuadPoints alloc] init];
        FSPointF *point = [[FSPointF alloc] init];
        [point set:[rect getLeft] y:[rect getTop]];
        [quadPoints setFirst:point];
        [point set:[rect getRight] y:[rect getTop]];
        [quadPoints setSecond:point];

        [point set:[rect getLeft] y:[rect getBottom]];
        [quadPoints setThird:point];
        [point set:[rect getRight] y:[rect getBottom]];
        [quadPoints setFourth:point];
        [arrayOfQuadPoints add:quadPoints];
    }
    // Just set an empty rect to markup annotation, the annotation rect will be calculated according to the quadpoints that set to it later.
    FSRectF *rect = [[FSRectF alloc] initWithLeft1:0 bottom1:0 right1:0 top1:0];
    FSTextMarkup *textMarkup = [[FSTextMarkup alloc] initWithAnnot:[pdfPage  addAnnot:FSAnnotHighlight rect:rect]];
    // Set the quadpoints to this markup annot.
    [textMarkup setQuadPoints:arrayOfQuadPoints];
    // set to red.
    [textMarkup setBorderColor:0xffff0000];
    // set to thirty-percent opacity.
    [textMarkup setOpacity:0.3f];
    // Generate the appearance.
    [textMarkup resetAppearanceStream];
}
How to delete annotations in a PDF page
#import "ViewController.h"
#import <FoxitRDK/FSPDFViewControl.h>
...

NSString *pdfPath = [[NSBundle mainBundle] pathForResource:@"Sample" ofType:@"pdf"];
FSPDFDoc *doc = [[FSPDFDoc alloc] initWithPath:pdfPath];
FSPDFPage *pdfPage = [doc getPage:0];
// Remove an annot by index.
FSAnnot* annot = [pdfPage getAnnot:0];
if(!annot || [annot isEmpty])
   return;
// Remove the first annot,so the second annot will become first.
[pdfPage removeAnnot:annot];
Form
Form (AcroForm) is a collection of fields for gathering information interactively from the user. Foxit PDF SDK provides APIs to view and edit form field programmatically. Form fields are commonly used in PDF documents to gather data. The FSForm class offers functions to retrieve form fields or form controls, import/export form data and other features, for example:
- To retrieve form fields, please use functions FSForm::getFieldCount and FSForm::getField.
- To retrieve form controls from a PDF page, please use functions FSForm::getControlCount and FSForm::getControl.
- To import form data from an XML file, please use function FSForm::importFromXML; to export form data to an XML file, please use function FSForm::exportToXML.
- To retrieve form filler object, please use function FSForm::getFormFiller.
To import form data from a FDF/XFDF file or export such data to a FDF/XFDF file, please refer to functions FSPDFDoc::importFromFDF and FSPDFDoc::exportToFDF.
Example:
How to import and export form data from or to a XML file
#import "ViewController.h"
#import <FoxitRDK/FSPDFViewControl.h>
...

NSString *pdfPath = [[NSBundle mainBundle] pathForResource:@"Sample" ofType:@"pdf"];
FSPDFDoc *doc = [[FSPDFDoc alloc] initWithPath:pdfPath];

// Check if the document has a form.
BOOL hasForm = [doc hasForm];
if(hasForm) {
   // Create a form object from document.
   FSForm* form = [[FSForm alloc] initWithDocument:doc];
   // Export the form data to a XML file.
   [form exportToXML:@"/somewhere/export.xml"];
   // Or import the form data from a XML file.
   [form importFromXML:@"/somewhere/export.xml"];
}
Security
Foxit PDF SDK provides a range of encryption and decryption functions to meet different level of document security protection. Users can use regular password encryption and certificate-driven encryption, or using their own security handler for custom security implementation.
Example:
How to encrypt a PDF file with password
#import "ViewController.h"
#import <FoxitRDK/FSPDFViewControl.h>
...

// Encrypt the source pdf document with specified owner password and user password, the encrypted PDF will be saved to the path specified by parameter savePath.
- (BOOL) encryptPDF:(FSPDFDoc*) pdfDoc ownerPassword:(NSString*)ownerPassword userPassword:(NSString*)userPassword savedPath:(NSString*)savedPath
{
    if(!pdfDoc || (!ownerPassword && !userPassword) || !savedPath)
        return NO;
    // The encryption setting data. Whether to encrypt meta data: YES, User permission: modify,assemble,fill form. Cipher algorithm: AES 128.
    FSStdEncryptData* encryptData = [[FSStdEncryptData alloc] initWithIs_encrypt_metadata:YES user_permissions🙁FSPDFDocPermModify| FSPDFDocPermAssemble|FSPDFDocPermFillForm) cipher:FSSecurityHandlerCipherAES key_length:16];
    FSStdSecurityHandler * stdSecurity = [[FSStdSecurityHandler alloc] init];
    if(![stdSecurity initialize:encryptData user_password:userPassword owner_password:ownerPassword])
        return NO;
    [pdfDoc setSecurityHandler:stdSecurity];
    if(![pdfDoc saveAs:savedPath save_flags:FSPDFDocSaveFlagNormal])
        return NO;
    return YES;
}
Signature
PDF Signature can be used to create and sign digital signatures for PDF documents, which protects the security of documents’ contents and avoids it to be tampered maliciously. It can let the receiver make sure that the document is released by the signer and the contents of the document are complete and unchanged. Foxit PDF SDK provides APIs to create digital signature, verify the validity of signature, delete existing digital signature, get and set properties of digital signature, display signature and customize the appearance of the signature form fields.
Note: Foxit PDF SDK provides default Signature callbacks which supports the following two types of signature filter and subfilter:
(1) filter: Adobe.PPKLite – subfilter: adbe.pkcs7.detached
(2) filter: Adobe.PPKLite – subfilter: adbe.pkcs7.sha1
If you use one of the above signature filter and subfilter, you can sign a PDF document and verify the validity of signature by default without needing to register a custom callback.
Example:
How to sign a PDF document and verify the signature
#import "ViewController.h"
#import <FoxitRDK/FSPDFViewControl.h>
...

- (void)addNewSignatureAndSign:(FSPDFPage*)page rect:(FSRectF*)rect {
    // Add a new signature on the specified page rect.
    FSSignature* signature = [page addSignature:rect];
    // Set the appearance flags, if the specified flag is on, then the associated key will be displayed on the signature appearance.
    [signature setAppearanceFlags:FSSignatureAPFlagLabel|FSSignatureAPFlagDN|FSSignatureAPFlagText|
     FSSignatureAPFlagLocation|FSSignatureAPFlagReason|FSSignatureAPFlagSigner];
    // Set signer.
    [signature setKeyValue:FSSignatureKeyNameSigner value:@"Foxit"];
    // Set location.
    [signature setKeyValue:FSSignatureKeyNameLocation value:@"AnyWhere"];
    // Set reason.
    [signature setKeyValue:FSSignatureKeyNameReason value:@"AnyReason"];
    // Set contact info.
    [signature setKeyValue:FSSignatureKeyNameContactInfo value:@"AnyInfo"];
    // Set domain name.
    [signature setKeyValue:FSSignatureKeyNameDN value:@"AnyDN"];
    // Set description.
    [signature setKeyValue:FSSignatureKeyNameText value:@"AnyContent"];
    // Filter "Adobe.PPKLite" is supported by default.
    [signature setFilter:@"Adobe.PPKLite"];
    // SubFilter "adbe.pkcs7.sha1" or "adbe.pkcs7.detached" are supported by default.
    [signature setSubFilter:@"adbe.pkcs7.detached"];

    // The input PKCS#12 format certificate, which contains the public and private keys.
    NSString* certPath = @"/somewhere/cert.pfx";
    // Password for that certificate.
    NSString* certPassword = @"123";
    NSString* signedPDFPath = @"/somewhere/signed.pdf";
    // Start to sign the signature, if everything goes well, the signed PDF will be saved to the path specified by "save_path".
    FSProgressive* progress = [signature startSign:certPath cert_password:certPassword digest_algorithm:FSSignatureDigestSHA1 save_path:signedPDFPath client_data:nil pause:nil];
    if(progress) {
        FSProgressiveState state = [progress resume];
        while(state == FSProgressiveToBeContinued)
            state = [progress resume];
        if(state != FSProgressiveFinished)
            return;
    }

    // Get the signatures from the signed PDF document, then verify them all.
    FSPDFDoc* pdfDoc = [[FSPDFDoc alloc] initWithPath:signedPDFPath];
    FSErrorCode err = [pdfDoc load:nil];
    if(err != FSErrSuccess) return;
    int count = [pdfDoc getSignatureCount];
    for(int i=0; i<count; i++) {
        FSSignature* signature = [pdfDoc getSignature:i];
        if(signature) {
            FSProgressive *progress = [signature startVerify:nil pause:nil];
            if (progress != nil) {
                FSProgressiveState state = [progress resume];
                while (FSProgressiveToBeContinued == state) {
                    state = [progress resume];
                }
                if(state != FSProgressiveFinished)
                    continue;
            }
            int verifiedState = [signature getState];
            if(verifiedState & FSSignatureStateVerifyValid)
                NSLog(@"Signature %d is valid.", i);
        }
    }
}
Creating a Custom Tool
With Foxit PDF SDK for iOS, creating a custom tool is a simple process. There are several tools implemented in the UI Extensions Component already. These tools can be used as a base for developers to build upon or use as a reference to create a new tool. In order to create your own tool quickly, we suggest you take a look at the uiextensions project found in the “libs/uiextensions_src” folder.
To create a new tool, the most important step is to declare a class that implements the “IToolHandler” interface.
In this section, we will make a Regional Screenshot Tool to show how to create a custom tool with Foxit PDF SDK for iOS. This tool can help the users who only want to select an area in a PDF page to capture, and then save it as an image. Now, let’s do it.
Create a Regional Screenshot Tool in Objective-C
For convenience, we will build this tool based on the “viewer_ctrl_demo” project found in the “samples” folder. Steps required for implementing this tool are as follows:
- Create a class named ScreenCaptureToolHandler that implements the “IToolHandler” interface.
- Handle onPageViewLongPress and onDraw events.
- Instantiate a ScreenCaptureToolHandler object, and then register it to the UIExtensionsManager.
- Set the ScreenCaptureToolHandler object as the current tool handler.
Step 1: Create a class named ScreenCaptureToolHandler that implements the “IToolHandler” interface.
a) Load the “viewer_ctrl_demo” project in Xcode. Create a class named “ScreenCaptureToolHandler” in the “Source” folder, and create the corresponding header file.
b) Let the ScreenCaptureToolHandler class implement the IToolHandler interface as follows:
@interface ScreenCaptureToolHandler : NSObject<IToolHandler>
Step 2: Handle onPageViewLongPress and onDraw events.
Update ScreenCaptureToolHandler.h as follows:
#import <Foundation/Foundation.h>
#import <FoxitRDK/FSPDFViewControl.h>
#import <uiextensionsDynamic/UIExtensionsManager.h>
@protocol IToolHandler;
@class TaskServer;

@interface ScreenCaptureToolHandler : NSObject<IToolHandler>

- (instancetype)initWithUIExtensionsManager:(UIExtensionsManager*)extensionsManager taskServer:(TaskServer*)taskServer;
@end
Update ScreenCaptureToolHandler.m as follows:
#import "ScreenCaptureToolHandler.h"
#import <ImageIO/ImageIO.h>
#import <ImageIO/CGImageDestination.h>
#import <MobileCoreServices/UTCoreTypes.h>

@interface ScreenCaptureToolHandler ()

@end

@implementation ScreenCaptureToolHandler {
    UIExtensionsManager* _extensionsManager;
    FSPDFViewCtrl* _pdfViewCtrl;
    TaskServer* _taskServer;

    CGPoint startPoint;
    CGPoint endPoint;

}
@synthesize type;

- (instancetype)initWithUIExtensionsManager:(UIExtensionsManager*)extensionsManager taskServer:(TaskServer*)taskServer
{
    self = [super init];
    if (self) {
        _extensionsManager = extensionsManager;
        _pdfViewCtrl = extensionsManager.pdfViewCtrl;
        _taskServer = taskServer;
    }
    return self;
}

-(NSString*)getName
{
    return @" ";
}

-(BOOL)isEnabled
{
    return YES;
}

-(void)onActivate
{

}

-(void)onDeactivate
{

}

// Save the image to a specified path.
- (void)saveJPGImage:(CGImageRef)imageRef path:(NSString *)path
{
    NSURL *fileURL = [NSURL fileURLWithPath:path];
    CGImageDestinationRef dr = CGImageDestinationCreateWithURL((__bridge CFURLRef)fileURL, kUTTypeJPEG , 1, NULL);

    CGImageDestinationAddImage(dr, imageRef, NULL);
    CGImageDestinationFinalize(dr);

    CFRelease(dr);
}

// Handle the PageView Gesture and Touch event
- (BOOL)onPageViewLongPress:(int)pageIndex recognizer:(UILongPressGestureRecognizer *)recognizer
{
    if (recognizer.state == UIGestureRecognizerStateBegan)
    {
        startPoint = [recognizer locationInView:[_pdfViewCtrl getPageView:pageIndex]];
        endPoint = startPoint;
    }
    else if (recognizer.state == UIGestureRecognizerStateChanged)
    {

        endPoint = [recognizer locationInView:[_pdfViewCtrl getPageView:pageIndex]];

        // Refresh the page view, then the onDraw event will be triggered.
        [_pdfViewCtrl refresh:pageIndex];
    }
    else if (recognizer.state == UIGestureRecognizerStateEnded || recognizer.state == UIGestureRecognizerStateCancelled)
    {
        // Get the size of the Rect.
        CGSize size = {fabs(endPoint.x-startPoint.x), fabs(endPoint.y-startPoint.y)};
        CGPoint origin = {startPoint.x<endPoint.x?startPoint.x:endPoint.x, startPoint.y<endPoint.y?startPoint.y:endPoint.y};
        // Get the Rect.
        CGRect rect = {origin, size};

        int newDibWidth = rect.size.width;
        int newDibHeight = rect.size.height;
        if (newDibWidth < 1 || newDibHeight < 1)
        {
            return YES;
        }

        UIView* pageView = [_pdfViewCtrl getPageView:pageIndex];
        CGRect bound = pageView.bounds;

        // Create a bitmap with the size of the selected area.
        int imgSize = newDibWidth*newDibHeight*4;
        void* pBuff = malloc(imgSize);
        NSData* buff = [NSData dataWithBytes:pBuff length:imgSize];

        FSBitmap* fsbitmap = [[FSBitmap alloc] initWithWidth:newDibWidth height:newDibHeight format:FSBitmapDIBArgb buffer: buff pitch:newDibWidth*4];
        [fsbitmap fillRect:0xFFFFFFFF rect:nil];
        FSRenderer* fsrenderer = [[FSRenderer alloc] initWithBitmap:fsbitmap is_rgb_order:YES];
        FSPDFPage* page = [_pdfViewCtrl.currentDoc getPage:pageIndex];

        // Calculate the display matrix.
        FSMatrix2D* fsmatrix = [page getDisplayMatrix: -rect.origin.x top:-rect.origin.y width:bound.size.width height:bound.size.height rotate:0];

        // Set the render content, then start to render the selected area to the bitmap.
        [fsrenderer setRenderContentFlags:FSRendererRenderPage|FSRendererRenderAnnot];
        FSProgressive *progressive = [fsrenderer startRender:page matrix:fsmatrix pause:nil];
        if (progressive) {
            while (true) {
                if ([progressive resume] != FSProgressiveToBeContinued) {
                    break;
                }
            }
        }

        // Convert FSBitmap to CGImage.
        CGDataProviderRef provider = CGDataProviderCreateWithData(NULL, buff.bytes, imgSize, nil);
        CGColorSpaceRef colorSpace = CGColorSpaceCreateDeviceRGB();
        CGBitmapInfo bitmapInfo = kCGBitmapByteOrderDefault|kCGImageAlphaLast;

        CGImageRef image = CGImageCreate(newDibWidth,newDibHeight, 8, 32, newDibWidth * 4,
                                         colorSpace, bitmapInfo,
                                         provider, NULL, YES, kCGRenderingIntentDefault);

        // Save the image to a specified path.
        NSString* jpgPath = @"/Users/Foxit/Desktop/ScreenCapture.jpg";
        [self saveJPGImage:image path:jpgPath];

        UIAlertView *alert = [[UIAlertView alloc]initWithTitle:@""
                                                       message:@" The selected area was saved as a JPG stored in the /Users/Foxit/Desktop/ScreenCapture.jpg" delegate:nil cancelButtonTitle:NSLocalizedString(@"OK", @"OK") otherButtonTitles:nil];
        [alert show];

        return YES;
    }
    return YES;
}

// Handle the drawing event.
-(void)onDraw:(int)pageIndex inContext:(CGContextRef)context
{
    if (_extensionsManager.currentToolHandler != self) {
        return;
    }

    CGContextSetLineWidth(context, 2);
    CGContextSetLineCap(context, kCGLineCapSquare);
    UIColor *color = [UIColor redColor];
    CGContextSetStrokeColorWithColor(context, [color CGColor]);
    CGPoint points[] = {startPoint,CGPointMake(endPoint.x, startPoint.y),endPoint,CGPointMake(startPoint.x, endPoint.y)};
    CGContextAddLines(context,points,4);
    CGContextClosePath(context);
    CGContextStrokePath(context);
}

- (BOOL)onPageViewTap:(int)pageIndex recognizer:(UITapGestureRecognizer *)recognizer
{
    return NO;
}

- (BOOL)onPageViewPan:(int)pageIndex recognizer:(UIPanGestureRecognizer *)recognizer
{
    return NO;

}

- (BOOL)onPageViewShouldBegin:(int)pageIndex recognizer:(UIGestureRecognizer *)gestureRecognizer
{
    if (_extensionsManager.currentToolHandler != self) {
        return NO;
    }
    return YES;
}


- (BOOL)onPageViewTouchesBegan:(int)pageIndex touches:(NSSet*)touches withEvent:(UIEvent*)event
{
    return NO;
}

- (BOOL)onPageViewTouchesMoved:(int)pageIndex touches:(NSSet *)touches withEvent:(UIEvent *)event
{
    return NO;
}

- (BOOL)onPageViewTouchesEnded:(int)pageIndex touches:(NSSet *)touches withEvent:(UIEvent *)event
{
    return NO;
}

- (BOOL)onPageViewTouchesCancelled:(int)pageIndex touches:(NSSet *)touches withEvent:(UIEvent *)event
{
    return NO;
}

@end
Note In the above code, you should specify an existing path to save the image. Here, the path is “@”/Users/Foxit/Desktop/ScreenCapture.jpg”“, please replace it with a valid path.
Step 3: In ViewController.m, instantiate a ScreenCaptureToolHandler object and then register it to the UIExtensionsManager.
#import "ScreenCaptureToolHandler.h"
...

@property (nonatomic, strong) ScreenCaptureToolHandler* screenCaptureToolHandler;
...

self.screenCaptureToolHandler = [[ScreenCaptureToolHandler alloc] initWithUIExtensionsManager: self.extensionsManager taskServer:nil];
[self.extensionsManager registerToolHandler:self.screenCaptureToolHandler];
Step 4: In ViewController.m, set the ScreenCaptureToolHandler object as the current tool handler.
Register the Doc event listener:
@interface ViewController () <ISearchEventListener,UIExtensionsManagerDelegate, IDocEventListener>
...
[self.pdfViewCtrl registerDocEventListener:self];
Set the current tool handler in the onDocOpened function:
- (void)onDocOpened:(FSPDFDoc *)document error:(int)error {
    [self.extensionsManager setCurrentToolHandler:self.screenCaptureToolHandler];
}
Now, we have really finished creating a custom tool in Objective-C. Then, build and run the demo. An iPhone 8 Simulator will be used as an example to run the project. After building the demo successfully, long press and select a rectangular area, and then a message box will be popped up as shown in Figure 7-1. It shows where the image (selected area) was saved to.

Figure 7-1
In order to verify whether the tool captures the selected area successfully, we need to find the screenshot. Go to “desktop”, we can see the image as shown in Figure 7-2.

Figure 7-2
As you can see we have successfully created a Regional Screenshot Tool in Objective-C. This is just an example to show how to create a custom tool with Foxit PDF SDK for iOS. You can refer to it or our demos to develop the tools you want.
Create a Regional Screenshot Tool in Swift
For convenience, we will build this tool based on the “viewer_ctrl_demo_swift” project found in the “samples\swift” folder. Steps required for implementing this tool are as follows:
- Create a class named ScreenCaptureToolHandler that implements the “IToolHandler” interface.
- Handle onPageViewLongPress and onDraw events.
- Instantiate a ScreenCaptureToolHandler object, and then register it to the extensions manager.
- Set the ScreenCaptureToolHandler object as the current tool handler.
Step 1: Create a class named ScreenCaptureToolHandler that implements the “IToolHandler” interface.
a) Load the “viewer_ctrl_demo_swift” project in Xcode. Create a class named “ScreenCaptureToolHandler” in the “Source” folder.
b) Let the ScreenCaptureToolHandler class implement the IToolHandler interface as follows:
class ScreenCaptureToolHandler: NSObject, IToolHandler { }
Step 2: Handle onPageViewLongPress and onDraw events.
Update ScreenCaptureToolHandler.swift as follows:
import Foundation
import MobileCoreServices
import ImageIO

class ScreenCaptureToolHandler: NSObject, IToolHandler {
    public var type: FSAnnotType

    var extensionManager: UIExtensionsManager!
    var pdfViewCtrl: FSPDFViewCtrl!

    var startPoint = CGPoint()
    var endPoint = CGPoint()

    init(extensionsManager: UIExtensionsManager) {
        self.extensionManager = extensionsManager
        self.pdfViewCtrl = extensionsManager.pdfViewCtrl
        self.type = FSAnnotType.annotUnknownType
        super.init()
    }

    func getName() -> String {
        return " "
    }

    func isEnabled() -> Bool {
        return true
    }

    func onActivate() {
    }

    func onDeactivate() {
    }

    // Save the image to a specified path.
    func saveJPGImage(imageRef: CGImage, path: String) {
        let fileURL: CFURL = NSURL.fileURL(withPath: path) as CFURL
        let dr = CGImageDestinationCreateWithURL(fileURL, kUTTypeJPEG, 1, nil)!
        CGImageDestinationAddImage(dr, imageRef, nil)
        CGImageDestinationFinalize(dr)
    }

    // Handle the PageView Gesture and Touch event
    func onPageViewLongPress(_ pageIndex: Int32, recognizer: UILongPressGestureRecognizer) -> Bool {

        if recognizer.state == UIGestureRecognizerState.began {
            startPoint = recognizer.location(in: pdfViewCtrl.getPageView(pageIndex))
            endPoint = startPoint
        }
        else if recognizer.state == UIGestureRecognizerState.changed {

            endPoint = recognizer.location(in: pdfViewCtrl.getPageView(pageIndex))

            // Refresh the page view, then the onDraw event will be triggered.
            pdfViewCtrl.refresh(pageIndex)
        }
        else if recognizer.state == UIGestureRecognizerState.ended || recognizer.state == UIGestureRecognizerState.cancelled {

            // Get the size of the Rect.
            let size = CGSize(width: fabs(endPoint.x - startPoint.x), height: fabs(endPoint.y - startPoint.y))
            let origin = CGPoint(x: (startPoint.x < endPoint.x) ? startPoint.x : endPoint.x, y: (startPoint.y<endPoint.y) ? startPoint.y : endPoint.y)
            // Get the Rect.
            let rect = CGRect(origin: origin, size: size)

            let newDibwidth = rect.size.width
            let newDibHeight = rect.size.height
            if newDibwidth < 1 || newDibHeight < 1 {
                return true
            }

            let pageView = pdfViewCtrl.getPageView(pageIndex)
            let bound = pageView.bounds

            // Create a bitmap with the size of the selected area.
            let imgSize = newDibwidth * newDibHeight * 4
            let capacity: Int = Int(newDibwidth) * Int(newDibHeight) * 4

            let buff = UnsafeMutablePointer<UInt8>.allocate(capacity: capacity)
            let pBuff = NSData.init(bytes: UnsafeRawPointer(buff), length: capacity)


            let pitch: Int = Int(newDibwidth) * 4
            guard let fsbitmap = FSBitmap.init(width: Int32(newDibwidth), height: Int32(newDibHeight), format:FSBitmapDIBFormat.dibArgb , buffer: pBuff as Data, pitch: Int32(pitch)) else {
                return false
            }
            fsbitmap.fillRect(0xFFFFFFFF, rect: nil)
            let fsrenderer = FSRenderer.init(bitmap: fsbitmap, is_rgb_order: true)
            let page = pdfViewCtrl.currentDoc?.getPage(pageIndex)

            // Calculate the display matrix.
            let fsmatrix = page?.getDisplayMatrix(-Int32(rect.origin.x), top: -Int32(rect.origin.y), width: Int32(bound.size.width), height: Int32(bound.size.height), rotate: FSRotation.rotation0)

            // Set the render content, then start to render the selected area to the bitmap.
            fsrenderer?.setRenderContentFlags(UInt32(UInt8(FSRendererContentFlag.renderPage.rawValue) | UInt8(FSRendererContentFlag.renderAnnot.rawValue)))
            let progress = fsrenderer?.startRender(page, matrix: fsmatrix, pause: nil)
            if ((progress) != nil) {

                while (true) {
                    if (progress?.resume() != FSProgressiveState.toBeContinued)
                    {
                        break
                    }
                }
            }

            // Convert FSBitmap to CGImage.
            let releaseData: CGDataProviderReleaseDataCallback = {
                (info: UnsafeMutableRawPointer?, data:UnsafeRawPointer, size:Int) -> Void in
            }

            let provider: CGDataProvider = CGDataProvider.init(dataInfo: nil, data: pBuff.bytes, size: Int(imgSize), releaseData: releaseData)!
            let colorSpace = CGColorSpaceCreateDeviceRGB()
            let bitmapInfo: CGBitmapInfo = .byteOrderMask

            let image = CGImage(width: Int(newDibwidth), height: Int(newDibHeight), bitsPerComponent: 8, bitsPerPixel: 32, bytesPerRow: Int(newDibwidth) * 4, space: colorSpace, bitmapInfo: bitmapInfo, provider: provider, decode: nil, shouldInterpolate: true, intent: CGColorRenderingIntent.defaultIntent)

            // Save the image to a specified path.
            let jpgPath = "/Users/Foxit/Desktop/ScreenCapture.jpg"
            self.saveJPGImage(imageRef: image!, path: jpgPath)

            let alert = UIAlertView(title: "", message: " The selected area was saved as a JPG stored in the /Users/Foxit/Desktop/ScreenCapture.jpg", delegate: nil, cancelButtonTitle: NSLocalizedString("OK", comment: "OK"))
            alert.show()
            return true
        }
        return true
    }

    // Handle the drawing event.
    func onDraw(_ pageIndex: Int32, in context: CGContext) {
        context.setLineWidth(CGFloat(2))
        context.setLineCap(.square)
        let color = UIColor.red
        context.setStrokeColor(color.cgColor)
        let points = [startPoint, CGPoint(x: CGFloat(endPoint.x), y: CGFloat(startPoint.y)), endPoint, CGPoint(x: CGFloat(startPoint.x), y: CGFloat(endPoint.y))]
        context.addLines(between: points)
        context.closePath()
        context.strokePath()
    }

    func onPageViewTap(_ pageIndex: Int32, recognizer: UITapGestureRecognizer?) -> Bool {
        return false
    }

    func onPageViewPan(_ pageIndex: Int32, recognizer: UIPanGestureRecognizer) -> Bool {
        return false
    }

    func onPageViewShouldBegin(_ pageIndex: Int32, recognizer gestureRecognizer: UIGestureRecognizer) -> Bool {
        return true
    }

    func onPageViewTouchesBegan(_ pageIndex: Int32, touches: Set<AnyHashable>, with event: UIEvent) -> Bool {
        return false
    }

    func onPageViewTouchesMoved(_ pageIndex: Int32, touches: Set<AnyHashable>, with event: UIEvent) -> Bool {
        return false
    }

    func onPageViewTouchesEnded(_ pageIndex: Int32, touches: Set<AnyHashable>, with event: UIEvent) -> Bool {
        return false
    }

    func onPageViewTouchesCancelled(_ pageIndex: Int32, touches: Set<AnyHashable>, with event: UIEvent) -> Bool {
        return false
    }
}
Note In the above code, you should specify an existing path to save the image. Here, the path is “/Users/Foxit/Desktop/ScreenCapture.jpg”, please replace it with a valid path.
Step 3: In ViewController.swift, instantiate a ScreenCaptureToolHandler object and then register it to the UIExtensionsManager.
var screenCaptureToolHandler: ScreenCaptureToolHandler!
...

self.screenCaptureToolHandler = ScreenCaptureToolHandler.init(extensionsManager: self.extensionsManager)
self.extensionsManager.register(self.screenCaptureToolHandler)
Step 4: In ViewController.swift, set the ScreenCaptureToolHandler object as the current tool handler.
Register the Doc event listener.
class ViewController: UIViewController, UISearchBarDelegate, ISearchEventListener, IDocEventListener
...
self.pdfViewCtrl.register(self)
Set the current tool handler in the onDocOpened function:
func onDocOpened(_ document: FSPDFDoc?, error: Int32) {
    self.extensionsManager.currentToolHandler = self.screenCaptureToolHandler
}
Now, we have really finished creating a custom tool in Swift. Then, build and run the demo. After building the demo successfully, long press and select a rectangular area, and then a message box will be popped up (refer to Figure 7-1). Go to “desktop”, we will see the screenshot (refer to Figure 7-2).
This is just an example to show how to create a custom tool in Swift with Foxit PDF SDK for iOS. You can refer to it or our demos to develop the tools you want.
Implement Foxit PDF SDK for iOS using Cordova
When it comes to developing cross-platform mobile applications, Apache Cordova is an ideal open-source framework. The ‘cordova-plugin-foxitpdf‘ is one of the mobile framework plugins provided by us to use with Foxit PDF SDK for iOS. The plugin enables you to achieve powerful PDF viewing features using the Cordova framework. Through this plugin, you can preview any PDF file including PDF 2.0 compliant files, XFA documents, and RMS protected documents, as well as commenting and editing PDF documents.
This section will help you get started with Foxit PDF SDK for iOS 7.6.1 and the Cordova plugin 7.6.1. For the usage of plugin version before 7.6.1, please refer to the website https://github.com/foxitsoftware/cordova-plugin-foxitpdf.
System Requirements
- NPM
- Cordova
- iOS 10 or higher
- Xcode 9 or higher
- Foxit PDF SDK For iOS 7.6.1
Note: The version of Foxit PDF SDK for iOS should match the version of the ‘cordova-plugin-foxitpdf’ plugin. You can specify the plugin version when you install it. Otherwise, the latest version will be installed.
Install Cordova Command-line Tool
Please refer to the Apache Cordova website to install the Cordova command-line tool.
- Download Node.js and then install it.
- Open a terminal, and type sudo npm install -g cordova.
Build a Cordova project using Foxit PDF SDK for iOS
Create a Cordova project
Open a terminal, navigate to the directory where you wish to create your project and type cordova create <path> command. For example, type the command below to create a cordova project:
cordova create test_cordova com.app testCordova
Add Platforms
After creating a Cordova project, navigate to the project directory (cd test_cordova), and type the command below to add iOS platform to build your app.
cd test_cordova
cordova platform add ios
Note: All the subsequent commands are executed in the project directory.
Install plugin
Install ‘cordova-plugin-foxitpdf’ plugin
To install ‘cordova-plugin-foxitpdf’ plugin, choose one of the following ways:
- Download the plugin from npm and install it inside the project folder:
// Install a specific plugin version, for example the 7.6.1 version:
cordova plugin add cordova-plugin-foxitpdf@7.6.1
// Install the latest plugin version (just not specify the version):
cordova plugin add cordova-plugin-foxitpdf
- Install it via repo url directly (generally, in this way, the latest plugin version will be installed):
cordova plugin add https://github.com/foxitsoftware/cordova-plugin-foxitpdf.git
Note: This guide only introduces the usage of the plugin version 7.6.1, so make sure to install the plugin version 7.6.1
Install ‘cordova-plugin-file’ plugin
Due to the sandbox mechanism of Apple, the file paths are limited to the app’s sandbox. We need the ‘cordova-plugin-file’ plugin to do a file path conversion to obtain the absolute path of a file. Please notice the directory permission when converting. To install ‘cordova-plugin-file’ plugin, type the following command:
cordova plugin add cordova-plugin-file
Integrate Foxit PDF SDK for iOS
Note: In this section, we only introduce how to use the Cordova plugin to open a PDF document. For more APIs about the plugin, please refer to the webpage https://github.com/foxitsoftware/cordova-plugin-foxitpdf.
Download Foxit PDF SDK for iOS (7.6.1 version) package, extract it, and then follow the steps below:
1) Copy “libs” folder from the extracted package to “test_cordova/platforms/ios” directory.
2) Double-click “testCordova.xcodeproj” found in the “test_cordova/platforms/ios” folder to open the Cordova project in Xcode.
3) Add the dynamic framework FoxitRDK.framework and uiextensionsDynamic.framework in the “test_cordova/platforms/ios/libs” folder to the project. If you want to integrate the scan module, you should also add the FoxitPDFScanUI.framework dynamic framework.
Right-click the “testCordova” project, select Add Files to “testCordova“, and then find and choose the dynamic frameworks to add.
4) Embed the dynamic frameworks. Left-click the project, find Frameworks, Libraries, and Embedded Content in the General tab, and then choose “Embed & Sign” as shown in Figure 8-1.

Figure 8-1
5) Add “WebKit.framework” to Xcode’s Frameworks, Libraries, and Embedded Content.
Left-click the project, find Frameworks, Libraries, and Embedded Content, press on the + button and type “web” into the search box to find “WebKit.framework” faster (See Figure 8-2), select it and click Add.

Figure 8-2
Then, your Frameworks, Libraries, and Embedded Content will appear as in Figure 8-3.

Figure 8-3
6) Add a PDF file to the project which will be used as the test file.
Next, drag the desired PDF file to the testCordova project, or add the PDF file to Xcode’s Copy Bundle Resources directly (Left-click the project, find TARGETS -> Build Phases -> Copy Bundle Resources, press on the + button, and choose the PDF file to add). For example, add the “complete_pdf_viewer_guide_ios.pdf” in the “samples/test_files” folder of Foxit PDF SDK for iOS package (See Figure 8-4).

Figure 8-4
7) Add the code to the “test_cordova/www/js/index.js” file to open a PDF document.
You should first call window.FoxitPdf.initialize interface to initialize the SDK libraries, and then call window.FoxitPdf.openDocument interface to open a PDF document. Add the following code (See Figure 8-5).
Note: The license files “rdk_sn.txt” and “rdk_key.txt” can be found in the “libs” folder of Foxit PDF SDK for iOS package.

Figure 8-5
var foxit_sn = 'xxx'; // The value can be found in the "rdk_sn.txt" (the string after "SN=").
var foxit_key = 'xxx'; // The value can be found in the "rdk_key.txt" (the string after "Sign=").
window.FoxitPdf.initialize(foxit_sn, foxit_key);

var path = cordova.file.applicationDirectory + 'complete_pdf_viewer_guide_ios.pdf'; // The PDF file path.
var password = ' '; // The password of the PDF file.
window.FoxitPdf.openDocument(path, password);

var savePath = cordova.file.documentsDirectory + 'complete_pdf_viewer_guide_ios_saved.pdf';// The PDF file path for the new saved file.
window.FoxitPdf.setSavePath(savePath);
8) Deploy the files in “test_cordova/www” to the “www” folder of the platform (test_cordova/platforms/ios/www). In a terminal, go to the project directory, type the command below:
cordova prepare ios
Run the project
To run the project, you can use the following command or run it in Xcode directly.
Navigate to the project directory, type the command as below:
cordova run ios                                 // for device
cordova emulate ios                  // for simulator
cordova emulate ios --target iPhone-8-Plus   // for a specific simulator
Note: If your Xcode version is 10 or higher, please specify –buildFlag=”-UseModernBuildSystem=0″ when running on command-line. For example cordova run ios –buildFlag=’-UseModernBuildSystem=0′. For more information, please visit at https://github.com/apache/cordova-ios/issues/407.
After running the project successfully, the “complete_pdf_viewer_guide_ios.pdf” document will be displayed as shown in Figure 8-6.

Figure 8-6
Customize the UI
Customize the UI through a configuration file
You can customize the UI including the feature modules, rights management and the properties of UI elements through a JSON file called “uiextensions_config.json” which is located in the “test_cordova\platforms\ios\testCordova\Resources” folder.
To customize the UI, just modify the JSON file as desired, and then rerun the project. For more detailed information about the JSON file, please refer to section 4.1.2 Configuration Items Description.
Customize the UI through source code
The UI implementation is shipped in the uiextensionsDynamic.framework (under the “libs” folder). If you do not want to use the ready-made UI framework, you can redesign it through modifying the source code. Find the source project “uiextensions” in the “foxitpdfsdk_7_6_1_iOS\libs\uiextensions_src” folder, open it in Xcode, and modify it as you wish. Then, rebuild the project and repackage the uiextensionsDynamic.framework file, replace it in your cordova project.
If you want to customize the UI for scanning feature, you can find the source project “pdfscan” in the “foxitpdfsdk_7_6_1_ios\libs” folder, open it in Xcode, and modify it as you wish. Then, rebuild the project and repackage the FoxitPDFScanUI.framework file, replace it in your cordova project.
Implement Foxit PDF SDK for iOS using React Native
React Native is an open-source mobile development framework for building native apps using JavaScript and React. The ‘react-native-foxitpdf‘ is only one of the mobile framework plugins provided by us to use with Foxit PDF SDK for iOS. It allows you to achieve powerful PDF viewing features using the React Native framework. Through this plugin, you can preview any PDF file including PDF 2.0 compliant files, XFA documents, and RMS protected documents, as well as commenting and editing PDF documents.
This section will help you get started with Foxit PDF SDK for iOS 7.6.1 and the React Native plugin 7.6.1. For the usage of plugin version before 7.6.1, please refer to the website https://github.com/foxitsoftware/react-native-foxitpdf.
System Requirements
- NPM
- React-Native >= 0.60.0
- iOS 10 or higher
- Xcode 9 or newer
- Foxit PDF SDK for iOS 7.6.1
Note:
- The version of Foxit PDF SDK for iOS should match the version of the ‘react-native-foxitpdf’ plugin. You can specify the plugin version when you install it. Otherwise, the latest version will be installed.
Install React Native Command Line Interface
To build React Native app for iOS, you will need Node, Watchman, the React Native command line interface, and Xcode.
Please refer to the official getting started guide to install React Native command line interface.
- Open a terminal, install brew.
- Install Node and Watchman through brew install node and brew install watchman.
- Install React Native command line interface through sudo npm install -g react-native-cli.
Build a React Native project using Foxit PDF SDK for iOS
Create a React Native project
Open a terminal, navigate to the directory where you wish to create your project and type react-native init <ProjectName> command. For example, type the command below to create a React Native project called “testRN”:
react-native init testRN
Install ‘react-native-foxitpdf’ plugin
Download the plugin from npm and install it inside the project folder. You can install a specific plugin version or install the latest plugin version as below:
- // Install a specific plugin version, for example the 7.6.1 version:
cd testRN
npm install @foxitsoftware/react-native-foxitpdf@7.6.1
- // Install the latest plugin version (by not specifying the version):
cd testRN
npm install @foxitsoftware/react-native-foxitpdf
Note:
- All the subsequent commands are executed in the project directory.
- This guide only introduces the usage of the plugin version 7.6.1, so make sure to install the plugin version 7.6.1.
Integrate Foxit PDF SDK for iOS
Note: In this section, we only introduce how to use the React Native plugin to open a PDF document. For more APIs about the plugin, please refer to the webpage https://github.com/foxitsoftware/react-native-foxitpdf.
Download Foxit PDF SDK for iOS (7.6.1 version) package, extract it, and then follow the steps below:
1) Copy “libs” folder from the extracted package to “testRN/ios” directory.
2) Add FoxitPDF to <PROJECT_ROOT>/ios/Podfile.
Add the code below to the “Podfile” file in the “testRN/ios” folder (See Figure 9-1).
pod 'FoxitPDF', :path=>'./libs/FoxitPDF.podspec'
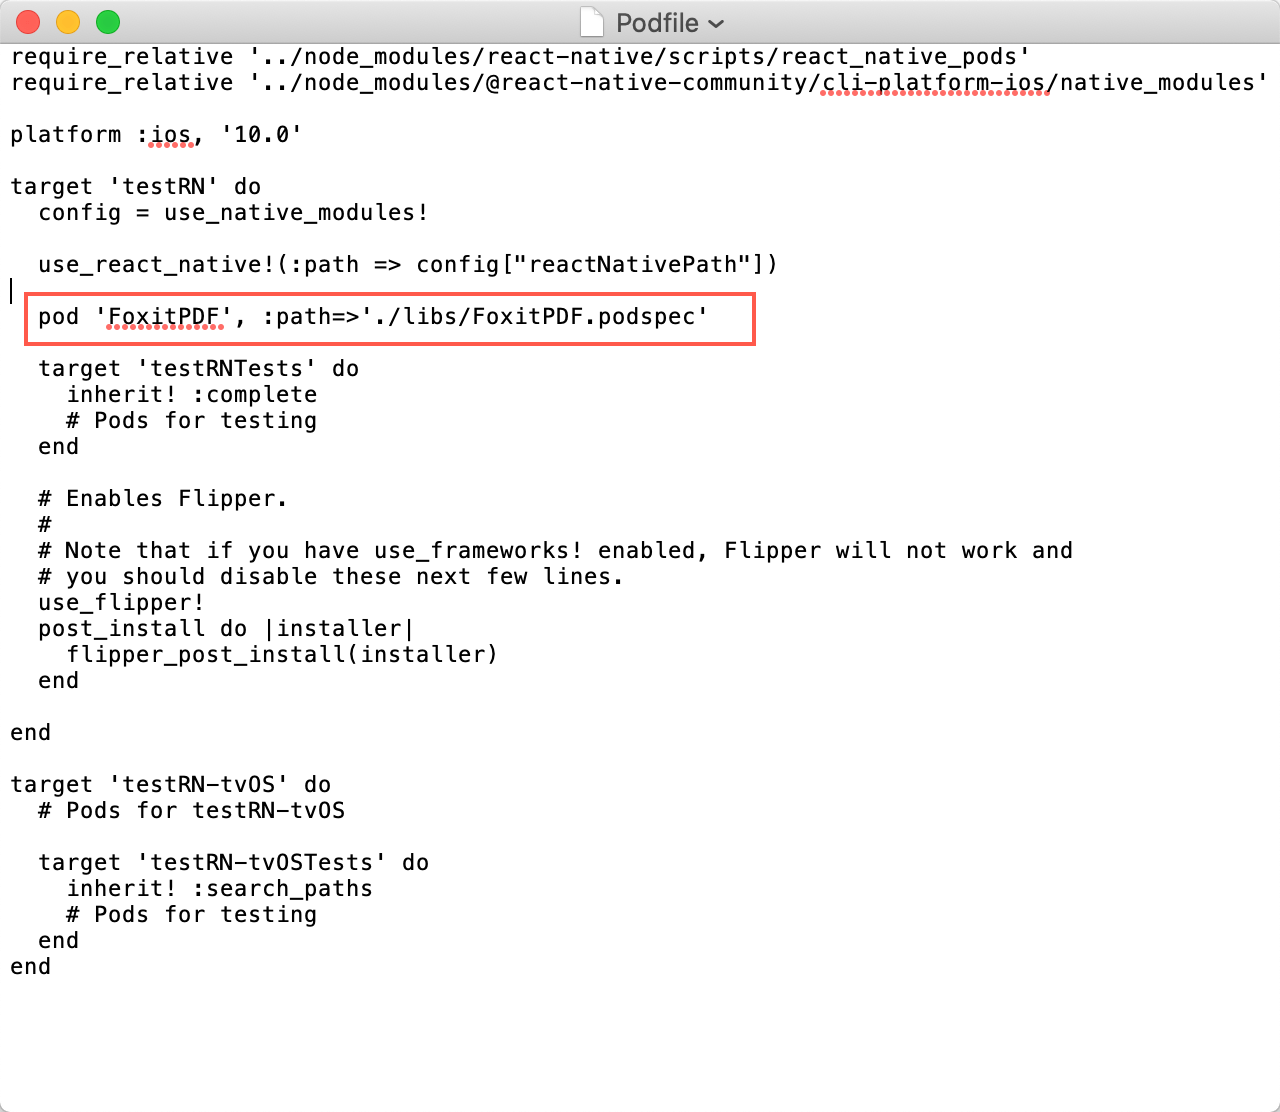
Figure 9-1
3) Navigate to the “testRN/ios” directory, type the command below to install the project dependencies:
cd testRN/ios
pod install
4) Use the plugin to open a PDF document.
In the “testRN\App.js” file, you can import the plugin using the following code:
import FoxitPDF from '@foxitsoftware/react-native-foxitpdf';
Call the function below to initialize SDK libraries:
FoxitPDF.initialize("foxit_sn", "foxit_key");
Note: The “foxit_sn” can be found in the “rdk_sn.txt” file (the string after “SN=”), and the “foxit_key” can be found in the “rdk_key.txt” file (the string after “Sign=”). The license files “rdk_sn.txt” and “rdk_key.txt” is in the “libs” folder of Foxit PDF SDK for iOS package.
Then, call the following funciton to open a PDF document:
FoxitPDF.openDocument('/sample.pdf');
Note: You should push the PDF file into the App’s Document directory in advance. In this tutorial, we use the “complete_pdf_viewer_guide_ios.pdf” document found in “samples/test_files” folder of Foxit PDF SDK for iOS package.
Update the “App.js” file as below, which adds a button to open a PDF document:
import React, {Component} from 'react';
import {Platform, StyleSheet, Text, View, TouchableOpacity} from 'react-native';
import FoxitPDF from '@foxitsoftware/react-native-foxitpdf';

const instructions = Platform.select({
  ios: 'Press Cmd+R to reload,\n' + 'Cmd+D or shake for dev menu',
  android:
    'Double tap R on your keyboard to reload,\n' +
    'Shake or press menu button for dev menu',
});

type Props = {};
export default class App extends Component<Props> {

  constructor(props) {
    super(props);
    // The "foxit_sn" can be found in the "rdk_sn.txt" file (the string after "SN=").
    // The "foxit_key" can be found in the "rdk_key.txt" file (the string after "Sign=").
    FoxitPDF.initialize("foxit_sn", "foxit_key");
  }

  onPress() {
    FoxitPDF.openDocument('/complete_pdf_viewer_guide_ios.pdf');
  }

  render() {
    return (
      <View style={styles.container}>
        <TouchableOpacity
          style={styles.button}
          onPress={this.onPress}
        >
          <Text> Open PDF </Text>
        </TouchableOpacity>
      </View>
    );
  }
}

const styles = StyleSheet.create({
  container: {
    flex: 1,
    justifyContent: 'center',
    alignItems: 'center',
    backgroundColor: '#F5FCFF',
  },
  button: {
    alignItems: 'center',
    backgroundColor: '#DDDDDD',
    padding: 10
  },

});
Note: The usage of the new interface FoxitPDF.openDocument is the same with the FoxitPDF.openPDF, but we recommend using FoxitPDF.openDocument, because FoxitPDF.openPDF may be deprecated in the future. Before calling FoxitPDF.openDocument, you should call FoxitPDF.initialize to initialize the SDK libraries at first.
Run the project
To run the project, you can use the following command or run it in Xcode directly.
Navigate to the project directory, type the command as below:
react-native run-ios
Note: The above command will automatically run the project on the iOS Simulator by default. If you want to run the project on an actual physical iOS device, please refer to the instructions.
After running the project successfully, click the “Open PDF” button. The “complete_pdf_viewer_guide_ios.pdf” document will be displayed as shown in Figure 9-2.


Figure 92
Implement Foxit PDF SDK for iOS using Xamarin
Xamarin is a cross-platform development framework for building native apps using a shared C# codebase. We provide separate bindings for Android and iOS (‘foxit_xamarin_android’ and ‘foxit_xamarin_ios’) for developers to seamlessly integrate powerful PDF functionality of Foxit PDF SDK into their Xamarin apps.
This section will help you get started with Foxit PDF SDK for iOS 7.6.1 and the Xamarin plugin 7.6.1. For the usage of plugin version before 7.6.1, please refer to the website https://github.com/foxitsoftware/xamarin-foxitpdf.
System Requirements
- Visual Studio 2019 for Mac (Recommend)
- Xcode 10.1
- MacOS 10.13.6 or higher
- iOS 10 or higher
- Foxit PDF SDK for iOS 7.6.1
Note: The version of Foxit PDF SDK for iOS should match the version of the ‘foxit_xamarin_ios‘ that you choose and download, or the version that you install from the NuGet.
Install Xamarin on Visual Studio 2019 for Mac
Please refer to the official installation instructions to install Xamarin in Visual Studio 2019 for Mac.
Integrate Foxit PDF SDK into your Xamarin project
There are two ways to integrate Foxit PDF SDK into your Xamarin project:
- Integrate with NuGet (supported from version 6.3)
- Integrate manually by building and referencing DLLs
Integrate with NuGet
It is now possible to integrate Foxit PDF SDK into your Xamarin project through NuGet packages, which is much easier than the second way “Integrate manually by building and referencing DLLs”, and can save you much time.
To integrate Foxit PDF SDK into your Xamarin project through Nuget packages, please follow the steps below:
1) In the Solution, right-click the Packages node of your project, and click Manage NuGet Packages… as shown in Figure 10-1.

Figure 10-1
2) In the Manage NuGet Packages window, search for Foxit.iOS, Foxit.iOS.UIExtensions and Foxit.iOS.Scanning.UI (Required by scan module) as shown in Figure 10-2, and click Add Packages to install the three packages with version 7.6.1.

Figure 10-2
After finishing the above installation, the Packages of your project will look like Figure 10-3.

Figure 10-3
Integrate manually by building and referencing DLLs
To integrate manually, you should first build DLLs, and then add it as a reference to your project.
Build DLLs
Download the ‘foxit_xamarin_ios’ (7.6.1 version) from GitHub, extract it, and then follow the steps below to build the Foxit.iOS, Foxit.iOS.UIExtensions and Foxit.iOS.Scanning.UI (Required by scan module) projects and get the DLLs:
1) Download Foxit PDF SDK for iOS (7.6.1 version) package, extract it, and copy the following files (libraries and licenses) in the “libs” folder of the extracted package to “foxit_xamarin_ios/libs” directory:
- FoxitRDK.framework
- uiextensionsDynamic.framework
- FoxitPDFScanUI.framework
- rdk_key.txt
- rdk_sn.txt
2) Get Foxit.iOS.dll, Foxit.iOS.UIExtensions.dll, and Foxit.iOS.Scanning.UI.dll (if need to use the scan feature).
- Foxit.iOS.dll is the heart of the SDK including the core functionalities of Foxit PDF SDK for iOS.
- Foxit.iOS.UIExtensions.dll extends more powerful PDF related features including UI and resource files.
- Foxit.iOS.Scanning.UI.dll is used for the scan module including the library and UI for the scanning feature.
Build the Foxit.iOS, Foxit.iOS.UIExtensions and Foxit.iOS.Scanning.UI projects respectively to get the DLLs. For example, double-click the Foxit.iOS.sln found in “foxit_xamarin_ios/Foxit.iOS”. Select Build -> Build Foxit.iOS, then the Foxit.iOS.dll will be generated in “foxit_xamarin_ios/Foxit.iOS/Foxit.iOS/bin/Debug (or release)” directory.
Note: To get the above three DLLs quickly, you can just double-click the Foxit.iOS.Scanning.UI.sln found in “foxit_xamarin_ios/Foxit.iOS.Scanning.UI”. Select Build -> Build All, then the Foxit.iOS.dll, Foxit.iOS.UIExtensions.dll and Foxit.iOS.Scanning.UI.dll will be generated in “foxit_xamarin_ios/Foxit.iOS.Scanning.UI/Foxit.iOS.Scanning.UI/bin/Debug (or release)” directory.
Add the built DLLs as references to your project
Please follow the steps below to add Foxit.iOS.dll, Foxit.iOS.UIExtensions.dll and Foxit.iOS.Scanning.UI.dll as references to your project. We assume that you have got the three DLLs, if not, please refer to Build DLLs section to build the Foxit.iOS, Foxit.iOS.UIExtensions and Foxit.iOS.Scanning.UI projects and generate the Foxit.iOS.dll, Foxit.iOS.UIExtensions.dll and Foxit.iOS.Scanning.UI.dll.
1) In the Solution, right-click the References node and select Add Reference… as shown in Figure 10-4.

Figure 10-4
2) In the Reference dialog, click Browse… (See Figure 10-5) to find the Foxit.iOS.dll (in the “foxit_xamarin_ios/Foxit.iOS.UIExtensions/Foxit.iOS.UIExtensions/bin/Debug (or release)” folder), select it and then click Open, which is shown in Figure 10-6.
For adding Foxit.iOS.UIExtensions.dll and Foxit.iOS.Scanning.UI.dll, do the same steps with adding Foxit.iOS.dll.

Figure 10-5

Figure 10-6
Then, the Foxit.iOS.dll, Foxit.iOS.UIExtensions.dll and Foxit.iOS.Scanning.UI.dll will appear in the list and have already been checked (See Figure 10-7). Click OK.

Figure 10-7
3) After finishing the above steps, the References of your project will look like the Figure 10-8.

Figure 10-8
Build a Xamarin iOS project using Foxit PDF SDK for iOS
This section will help you to quickly build a full-featured PDF Reader in Xamarin iOS platform with step-by-step instructions provided.
Create a new Xamarin iOS project
Open Visual Studio 2019 for Mac, choose File -> New Solution…, and then select iOS -> App -> Single View App as shown in Figure 10-9. Then, click Next.

Figure 10-9
In the Configure your iOS app dialog, set the options for your new project as desired. For example, we set the APP Name to “TestXamarin” and the Organization Identifier to “com.foxit” as shown in Figure 10-10. Then, click Next.

Figure 10-10
Choose the location where the project places to. For example, we place the project on the Desktop as shown in Figure 10-11. Click Create.

Figure 10-11
Integrate Foxit PDF SDK into the project
Please refer to section 9.3 “Integrate Foxit PDF SDK into your Xamarin project” to integrate the Foxit PDF SDK into the created project. We recommend using the first way “Integrate with NuGet”, which is more easy and convenient.
Initialize Foxit SDK Library
Before calling any APIs, you must first initialize Foxit SDK library by using the function FSLibrary::Initialize. Finish the initialization in the FinishedLaunching method within the AppDelegate.cs file.
using Foundation;
using UIKit;
using Foxit.iOS;

namespace TestXamarin
{
    // The UIApplicationDelegate for the application. This class is responsible for launching the
    // User Interface of the application, as well as listening (and optionally responding) to application events from iOS.
    [Register("AppDelegate")]
    public class AppDelegate : UIApplicationDelegate
    {
        // class-level declarations

        public override UIWindow Window
        {
            get;
            set;
        }

        public override bool FinishedLaunching(UIApplication application, NSDictionary launchOptions)
        {
            // Override point for customization after application launch.
            // If not required for your application you can safely delete this method

            // The value of "sn" can be found in the "rdk_sn.txt".
            // The value of "key" can be found in the "rdk_key.txt".
            string sn = "xxx";
            string key = "xxx";

            // Initialize the Foxit SDK library.
            var errCode = FSLibrary.Initialize(sn, key);
            if (errCode != FSErrorCode.Success)
                return false;

            return true;
        }


}
Note: The value of “sn” can be found in the “rdk_sn.txt” (the string after “SN=”) and the value of “key” can be found in the “rdk_key.txt” (the string after “Sign=”). The trial license files (rdk_sn.txt and rdk_key.txt) can be found in the “foxit_xamarin_ios/libs” folder or in the “libs” folder of Foxit PDF SDK for iOS package.
Display a PDF document using PDFViewCtrl
To display a PDF document, please first add a PDF document to the project’s Resources which will be used as the test file.
In the Solution, right-click the Resources, select Add -> Existing Files…, find the PDF document as you wish. For example, the “complete_pdf_viewer_guide_ios.pdf” under the “samples/test_files” folder of the Foxit PDF SDK for iOS package. After adding, you can see the PDF as shown in Figure 10-12.

Figure 10-12
Then, add the following code to ViewController.cs to display a PDF document. It’s really easy to present a PDF on screen. All you need is to get a PDF file, instantiate a FSPDFViewCtrl object and call FSPDFViewCtrl::OpenDoc function to open and render the PDF document.
Update ViewController.cs as follows:
using System;

using UIKit;
using Foundation;
using Foxit.iOS;

namespace TestXamarin
{
    public partial class ViewController : UIViewController
    {
        private FSPDFViewCtrl pdfViewCtrl;

        protected ViewController(IntPtr handle) : base(handle)
        {
            // Note: this .ctor should not contain any initialization logic.
        }

        public override void ViewDidLoad()
        {
            base.ViewDidLoad();

            // Instantiate a PDFViewCtrl object.
            pdfViewCtrl = new FSPDFViewCtrl(new CoreGraphics.CGRect(0, 0, View.Frame.Size.Width, View.Frame.Size.Height));

            // Open a PDF document.
            string path = NSBundle.MainBundle.PathForResource("complete_pdf_viewer_guide_ios", "pdf");
            pdfViewCtrl.OpenDoc(path, null, null);

            // Add the pdfViewCtrl to the root view.
            View.AddSubview(pdfViewCtrl);

        }

        public override void DidReceiveMemoryWarning()
        {
            base.DidReceiveMemoryWarning();
            // Release any cached data, images, etc that aren't in use.
        }
    }
}
In this chapter, we build and run the project on an iPhone 8 Simulator. After building the project, you will see that the “complete_pdf_viewer_guide_ios.pdf” document is displayed as shown in Figure 10-13. Now, this sample app has some basic PDF features, such as zooming in/out and page turning.

Figure 10-13
Build a full-featured PDF Reader
To build a full-featured PDF reader, all you need to do is to instantiate a UIExtensionsManager object, and then set it to FSPDFViewCtrl.
using Foxit.iOS.UIExtensions;
...
private UIExtensionsManager uiExtensionsManager;
...
// Instantiate a UIExtensionsManager object and set it to pdfViewCtrl.
uiExtensionsManager = new UIExtensionsManager(pdfViewCtrl);
pdfViewCtrl.ExtensionsManager = uiExtensionsManager;
The whole update of ViewController.cs is as follows:
using System;

using UIKit;
using Foundation;
using Foxit.iOS;
using Foxit.iOS.UIExtensions;

namespace TestXamarin
{
    public partial class ViewController : UIViewController
    {
        private FSPDFViewCtrl pdfViewCtrl;
        private UIExtensionsManager uiExtensionsManager;

        protected ViewController(IntPtr handle) : base(handle)
        {
            // Note: this .ctor should not contain any initialization logic.
        }

        public override void ViewDidLoad()
        {
            base.ViewDidLoad();

            // Instantiate a PDFViewCtrl object.
            pdfViewCtrl = new FSPDFViewCtrl(new CoreGraphics.CGRect(0, 0, View.Frame.Size.Width, View.Frame.Size.Height));

            // Open a PDF document.
            string path = NSBundle.MainBundle.PathForResource("complete_pdf_viewer_guide_ios", "pdf");
            pdfViewCtrl.OpenDoc(path, null, null);

            // Add the pdfViewCtrl to the root view.
            View.AddSubview(pdfViewCtrl);

            // Instantiate a UIExtensionsManager object and set it to pdfViewCtrl.
            uiExtensionsManager = new UIExtensionsManager(pdfViewCtrl);
            pdfViewCtrl.ExtensionsManager = uiExtensionsManager;

        }

        public override void DidReceiveMemoryWarning()
        {
            base.DidReceiveMemoryWarning();
            // Release any cached data, images, etc that aren't in use.
        }
    }
}
Add permissions to access camera, microphone and photo library
In order to access the camera, microphone and photo library, you need to add the permission configuration in the “Info.plist” as shown in Figure 10-14.

Figure 10-14
Run the project
After building the project, you will see that the “complete_pdf_viewer_guide_ios.pdf” document is displayed as shown in Figure 10-15. Now, it is a full-featured PDF Reader which includes all the features in Foxit PDF SDK for iOS and it also supports to open a RMS protected document.
![]()
Figure 10-15
Customize the UI
For how to customize the UI in your Xamarin iOS project, you can refer to the section 4 “Customizing User Interface”.
FAQ
Bitcode Support
What is Bitcode? Does Foxit PDF SDK for iOS support Bitcode?
Bitcode is an intermediate representation of a compiled binary. Including bitcode will allow Apple to re-optimize your app binary in the future without the need to submit a new version of your app to the store.
Yes. Foxit PDF SDK for iOS supports Bitcode since version 3.0.
Open a PDF document from a specified PDF file path
How do I open a PDF document from a specified PDF file path?
Foxit PDF SDK for iOS provides multiple interfaces to open a PDF document. You can open a PDF document from a specified PDF file path, or from a memory buffer. For from a specified PDF file path, there are two ways to do that.
The first one is that just use the openDoc interface, which includes the operations of creating a PDF document object (initWithPath ), loading the document content (load), and setting the PDF document object to view control (setDoc). Following is the sample code:
Note: The openDoc interface is only available for opening a PDF document from a file path. If you want to customize to load a PDF document, you can implement it in the callback function (FSFileReadCallback), and then create a document object with a FireRead instance using initWithHandler. Next, also load the document content using load, and set the PDF document object to view control using setDoc.
#import "ViewController.h"
#import <FoxitRDK/FSPDFViewControl.h>

@interface ViewController : UIViewController

@end

@implementation ViewController
{

    FSPDFViewCtrl* pdfViewCtrl;
}

- (void)viewDidLoad {
    [super viewDidLoad];

    // Get the path of a PDF.
    NSString* pdfPath = [[NSBundle mainBundle] pathForResource:@"Sample" ofType:@"pdf"];

    // Initilize a FSPDFViewCtrl object with the size of the entire screen.
    pdfViewCtrl = [[FSPDFViewCtrl alloc] initWithFrame: [self.view bounds]];

    // Open an unencrypted PDF document from a specified PDF file path.
    [pdfViewCtrl openDoc:pdfPath password:nil completion:nil];

    // Add the pdfView to the root view.
    [self.view addSubview:pdfViewCtrl];
}
@end
The second one is that use the initWithPath interface to create a PDF document object, use load interface to load the document content, and then use setDoc to set the PDF document object to view control. Following is the sample code:
#import "ViewController.h"
#import <FoxitRDK/FSPDFViewControl.h>

@interface ViewController : UIViewController

@end

@implementation ViewController
{

    FSPDFViewCtrl* pdfViewCtrl;
}

- (void)viewDidLoad {
    [super viewDidLoad];

    // Get the path of a PDF.
    NSString* pdfPath = [[NSBundle mainBundle] pathForResource:@"Sample" ofType:@"pdf"];

    // Initialize a PDFDoc object with the path to the PDF file.
    FSPDFDoc* pdfdoc = [[FSPDFDoc alloc] initWithPath: pdfPath];

    // Load the unencrypted document content.
    if(FSErrSuccess != [pdfdoc load:nil]) {
        return;
    }

    // Initilize a FSPDFViewCtrl object with the size of the entire screen.
    pdfViewCtrl = [[FSPDFViewCtrl alloc] initWithFrame: [self.view bounds]];

    // Set the document to view control.
    [pdfViewCtrl setDoc:pdfdoc];

    // Add the pdfView to the root view.
    [self.view addSubview:pdfViewCtrl];
}
@end
Display a specified page when opening a PDF document
What should I do if I want to display a specified page when opening a PDF document?
To display a specified page when opening a PDF file, the interface [pdfViewCtrl gotoPage: (int) animated: (BOOL)] should be used. Foxit PDF SDK for iOS utilizes multi-thread to improve rendering speed, so please make sure the document has been loaded successfully before using the gotoPage interface. There are two ways to realize the feature as follows:
The first one is that making a conditional statement in the openDoc interface to ensure that only when the document loading is complete, then call the gotoPage. If not, the gotoPage interface will not work, and the first page will be displayed. It is because the openDoc interface starts a new thread to perform the operation. Following is the sample code:
#import "ViewController.h"
#import <FoxitRDK/FSPDFViewControl.h>

@interface ViewController : UIViewController

@end

@implementation ViewController
{

    FSPDFViewCtrl* pdfViewCtrl;
}

- (void)viewDidLoad {
    [super viewDidLoad];

    // Get the path of a PDF.
    NSString* pdfPath = [[NSBundle mainBundle] pathForResource:@"Sample" ofType:@"pdf"];

    // Initilize a FSPDFViewCtrl object with the size of the entire screen.
    pdfViewCtrl = [[FSPDFViewCtrl alloc] initWithFrame: [self.view bounds]];

    // Open an unencrypted PDF document from a specified PDF file path, and go to the third page when completing the document loading.
    [pdfViewCtrl openDoc:pdfPath password:nil completion:^(enum FSErrorCode error){

        if(error == FSErrSuccess)

            // Display the third page.
            [pdfViewCtrl gotoPage:2 animated:NO];
    }];

    // Add the pdfView to the root view.
    [self.view addSubview:pdfViewCtrl];
}
@end
The second one is that implement the <IDocEventListener> protocol, and then call the gotoPage interface in the onDocOpened event. Following is the sample code:
#import "ViewController.h"
#import <FoxitRDK/FSPDFViewControl.h>

@interface ViewController : UIViewController <IDocEventListener>


@end

@implementation ViewController
{
    FSPDFViewCtrl* pdfViewCtrl;
}

- (void)viewDidLoad {
    [super viewDidLoad];

    // Get the path of a PDF
    NSString* pdfPath = [[NSBundle mainBundle] pathForResource:@"Sample" ofType:@"pdf"];

    // Initilize a FSPDFViewCtrl object with the size of the entire screen.
    pdfViewCtrl = [[FSPDFViewCtrl alloc] initWithFrame: [self.view bounds]];

    // Register the PDF document event listener.
    [pdfViewCtrl registerDocEventListener:self];

    // Open an unencrypted PDF document from a specified PDF file path.
    [pdfViewCtrl openDoc:pdfPath password:nil completion:nil];

    // Add the pdfView to the root view.
    [self.view addSubview:pdfViewCtrl];

}

#pragma IDocEventListener

-(void)onDocOpened:(FSPDFDoc *)document error:(int)error
{
    // display the third page.
    [pdfViewCtrl gotoPage:2 animated:NO];
}
@end
License key and serial number cannot work
I have downloaded the SDK package from your website without making any changes. Why can’t the license key and serial number work?
Generally, the package uploaded to the website is supposed to work. It has been tested before it is uploaded. So, if you find the license key and serial number cannot work, it may be caused by the date of your device. If the device’s date is earlier than the StartDate in the rdk_key.txt file found in the “libs” folder of the download package, the “librdk.so” library will be failed to unlock. Please check the date of your device.
Add a link annotation to a PDF file
How can I add a link annotation to a PDF file?
To add a link annotation to a PDF file, you should first call the FSPDFPage::addAnnot to add an annotation to a specified page, then call FSAction::Create to create an action, and set the action to the added link annotation. Following is the sample code for adding a URI link annotation to the first page of a PDF file:
#define DOCUMENT_PATH [NSSearchPathForDirectoriesInDomains(NSDocumentDirectory, NSUserDomainMask, YES) objectAtIndex:0]
...
// Get the path of a PDF
NSString* pdfPath = [[NSBundle mainBundle] pathForResource:@"Sample" ofType:@"pdf"];

// Initialize a PDFDoc object with the path to the PDF file.
FSPDFDoc *document = [[FSPDFDoc alloc] initWithPath: pdfPath];

// load the unencrypted document content.
 [document load:nil];

// Get the first page of the PDF file.
FSPDFPage *page = [document getPage:0];

// Add a link annotation to the first page.
FSRectF *rect = [[FSRectF alloc] initWithLeft1:250 bottom1:650 right1:450 top1:750];
FSLink *linkAnnot = [[FSLink alloc] initWithAnnot:[page addAnnot: FSAnnotLink rect:rect]];

// Create a URI action and set the URI.
FSURIAction *uriAction = [[FSURIAction alloc] initWithAction:[FSAction create:document action_type:FSActionTypeURI]];
[uriAction setURI:@"https://www.foxit.com"];

// Set the action to link annotation.
[linkAnnot setAction:uriAction];

// Reset appearance stream.
 [linkAnnot resetAppearanceStream];

// Save the document that has added the link annotaiton.
[document saveAs:[DOCUMENT_PATH stringByAppendingString:@"Sample_annot.pdf"] save_flags:FSPDFDocSaveFlagNormal];
Insert an image into a PDF file
How do I insert an image into a PDF file?
To insert an image into a PDF file, you can call FSPDFPage::addImageFromFilePath interface. Following is the sample code for inserting an image into the first page of a PDF file:
Note: Before calling FSPDFPage::addImageFromFilePath interface, you should get and parse the page that you want to add the image.
#define DOCUMENT_PATH [NSSearchPathForDirectoriesInDomains(NSDocumentDirectory, NSUserDomainMask, YES) objectAtIndex:0]
...
// Get the path of a PDF.
NSString* pdfPath = [[NSBundle mainBundle] pathForResource:@"Sample" ofType:@"pdf"];

// Initialize a PDFDoc object with the path to the PDF file.
FSPDFDoc *document = [[FSPDFDoc alloc] initWithPath: pdfPath];

// load the unencrypted document content.
[document load:nil];

// Get the first page of the PDF file.
FSPDFPage *page = [document getPage:0];

// Parse the page.
if (![page isParsed]) {
    FSProgressive* progressive = [page startParse: FSPDFPageParsePageNormal pause:nil is_reparse:NO];
    while ([progressive resume] == FSProgressiveToBeContinued) {
        continue;
    }
}

// Get the image path.
NSString* imagePath = @"/Users/xiaole/Desktop/1.png";

// Add an image to the first page.
FSPointF* point = [[FSPointF alloc] init];
[point set:100 y:300];
[page addImageFromFilePath:imagePath position:point width:100 height:120 auto_generate_content:YES];

// Save the document that has added the link annotaiton.
[document saveAs:[DOCUMENT_PATH stringByAppendingString:@"Sample_image.pdf"] save_flags:FSPDFDocSaveFlagNormal];
Highlight the links in PDF documents and set the highlight color
How can I set whether to highlight the links in PDF documents? And how to set the highlight color if I want to highlight links?
By default, highlighting links in PDF documents is enabled. If you want to disable it or to set the highlight color, you can do it in the configuration JSON file (only support for version 6.3 or higher) or by calling the APIs.
Note: If you want to set the highlight color, please make sure the highlighting links feature is enabled.
Through JSON file
Set ““highlightLink”: false,” to disable highlighting the links in PDF document.
Set ““highlightLinkColor”: “#16007000”,” to set the highlight color (input the color value as you wish).
Through calling API
UIExtensionsManager.enableHighlightLinks property is provided to set whether to enable highlighting the links in PDF documents. If you do not want to highlight links, please set the parameter to “false” as follows:
// Assume you have already Initialized a UIExtensionsManager object
extensionsManager.enableHighlightLinks = false;
UIExtensionsManager.linksHighlightColor property is used to set the highlight color. Following is a sample for setting this property:
// Assume you have already Initialized a UIExtensionsManager object
extensionsManager.linksHighlightColor = [UIColor colorWithRed:0 green:0 blue:1 alpha:0.3];
Highlight the form fields in PDF form files and set the highlight color
How can I set whether to highlight the form fields in PDF form files? And how to set the highlight color if I want to highlight form fields?
By default, highlighting form fields in PDF documents is enabled. If you want to set the highlight color, please make sure you have not disabled the highlighting form fields feature.
From version 6.3, you can disable/enable highlighting form fields or set the highlight color easily in the configuration JSON file, just set the following two items:
"highlightForm": true,
"highlightFormColor": "#200033cc",
For the version before 6.3, if you want to disable/enable highlighting form fields or set the highlight color, you should modify the source code of the UI Extensions Component using FSFormFiller::highlightFormFields and FSFormFiller::setHighlightColor interfaces.
FSFormFiller::highlightFormFields interface is provided to set whether to enable highlighting the form fields in PDF form files. Please refer to section 4.3 “Customize UI implementation through source code” to add the “uiextensions” project found in the “libs/uiextensions_src” folder to your project. Then, find the onDocOpened function in “UIExtensions/Form/FormAnnotHandler.m”, and set the parameter of FSFormFiller::highlightFormFields to “false” as follows:
- (void)onDocOpened:(FSPDFDoc* )document error:(int)error
{
...
...

    [_formFiller highlightFormFields:false];
}
FSFormFiller::setHighlightColor interface is used to set the highlight color. Following is a sample for calling this API:
- (void)onDocOpened:(FSPDFDoc* )document error:(int)error
{
...
...

    [_formFiller highlightFormFields:ture];
    [_formFiller setHighlightColor:0x4b00ff00];
}
Indexed Full Text Search support
Does Foxit PDF SDK support Indexed Full Text Search? If yes, how can I use it to search through PDF files stored offline on my mobile device?
Yes. Foxit PDF SDK for iOS supports Indexed Full Text Search.
To use this feature, follows the steps below:
a) Get document source information. Create a document source based on a directory which will be used as the search directory.
-(id)initWithDirectory: (NSString *)directory;
b) Create a full text search object, and set a path of database to store the indexed data.
-(id)init;
-(void)setDataBasePath:(NSString *)path_of_data_base;
c) Start to index the PDF documents which receive from the source.
-(FSProgressive*)startUpdateIndex: (FSDocumentsSource*)source pause: (id<FSPauseCallback>)pause reUpdate:(BOOL)reUpdate;
Note: You can index a specified PDF file. For example, if the contents of a PDF file have been changed, you can re-index it using the following API:
-(BOOL)updateIndexWithFilePath: (NSString *)file_path;
Search the specified keyword from the indexed data source. The search results will be returned to external by a specified callback function when a matched one is found.
-(BOOL)searchOf: (NSString *)match_string rank_mode:(FSFullTextSearchRankMode)rank_mode callback: (id<FSSearchCallback>)Callback;
Following is a sample for how to use it:
- (void)FullTextSearch {

    NSString *directory = @"INPUT_DIRECTORY";
    FSDocumentsSource* docs = [[FSDocumentsSource alloc] initWithDirectory:directory];
    FSFullTextSearch* fulltextSearch = [FSFullTextSearch init];

    NSString* dbPath = @"The path of data base to store the indexed data...";
    [fulltextSearch setDataBasePath:dbPath];

    FSProgressive* progressive = [fulltextSearch startUpdateIndex:docs pause:nil reUpdate:NO];
    if (progressive) {
        while (true) {
            if ([progressive resume] != FSProgressiveToBeContinued) {
                break;
            }
        }
    }

    [fulltextSearch searchOf:@"Foxit" RankMode:FSFullTextSearchRankNone callback:[[FSSearchCallbackImp alloc] init]];
}

@end
A sample callback function is as follows:
@interface FSSearchCallbackImp: NSObject<FSSearchCallback>

@end

@implementation FSSearchCallbackImp

-(int)retrieveSearchResult:(NSString*)file_path page_index:(int)page_index match_result:(NSString*)match_result match_start_text_index:(int)match_start_text_index match_end_text_index:(int)match_end_text_index
{
    NSLog (@"file_path: %@\n", file_path);
    NSLog (@"page_index: %i, match_start_text_index: %i, match_end_text_index: %i\n", page_index, match_start_text_index, match_end_text_index);
    NSLog (@"match_result: %@\n\n", match_result);
    return 0;
}

@end
Note:
- The indexed full text search provided by Foxit PDF SDK for iOS will go through a directory recursively, so that both the files and the folders under the search directory will be indexed.
- If you want to abort the index process, you can pass in a pause callback parameter to the startUpdateIndex interface. The callback function NeedPauseNow will be invoked once a PDF document is indexed, so that the caller can abort the index process when the callback NeedPauseNow return “true”.
- The location of the indexed database is set by setDataBasePath interface. If you want to clear the indexed database, you shoud do it manually. And now, removing a file from index function is not supported.
- Every search result of the searchOf interface is returned to external by a specified callback. Once the searchOf interface returns “true” or “false”, it means the searching is finished.
Print PDF document
Does Foxit PDF SDK for iOS support to print a PDF document? If yes, how can I use it?
Yes. Foxit PDF SDK for iOS supports the print feature from version 5.1. You can press the Wireless Print button on the More Menu view in the Complete PDF viewer demo to print the PDF document. Furthermore, you can call the following two APIs to print the PDF documents:
// for iPhone and iTouch
(void)printDoc:(FSPDFDoc *)doc animated:(BOOL)animated jobName:(nullable NSString *)jobName delegate:(nullable id<UIPrintInteractionControllerDelegate>)delegate completionHandler:(nullable UIPrintInteractionCompletionHandler)completion;
// for iPad
(void)printDoc:(FSPDFDoc *)doc fromRect:(CGRect)rect inView:(UIView *)view animated:(BOOL)animated jobName:(nullable NSString *)jobName delegate:(nullable id<UIPrintInteractionControllerDelegate>)delegate completionHandler:(nullable UIPrintInteractionCompletionHandler)completion;
Following is a sample for how to use it:
UIPrintInteractionCompletionHandler completion = ^(UIPrintInteractionController *_Nonnull printInteractionController, BOOL completed, NSError *_Nullable error) {
    if (error) {
       UIAlertAction* action = [UIAlertAction actionWithTitle:[@"Warning:" stringByAppendingString:error.localizedDescription] style:UIAlertActionStyleDefault handler:nil];
       UIAlertController* controller = [[UIAlertController alloc] init];
       [controller addAction:action];

       [self showViewController:controller sender:nil];
    }
};
NSString *fileName = @"xxx.pdf";
FSPDFDoc* doc = [[FSPDFDoc alloc] initWithPath:fileName];
[UIExtensionsManager printDoc: doc animated:YES jobName:fileName delegate:nil completionHandler:completion];
Night mode color settings
How can I set the night mode color?
From version 6.3, you can set the night mode color easily in the configuration JSON file, just set the following two items:
"mapForegroundColor": "#5d5b61",
"mapBackgroundColor": "#000056",
From version 5.1, if you want to set the night mode color, please first set the properties FSPDFViewCtrl.mappingModeBackgroundColor and FSPDFViewCtrl.mappingModeForegroundColor, and then set the FSPDFViewCtrl.colorMode to FSRendererColorModeMapping.
Note: If the FSPDFViewCtrl.colorMode has already been set to FSRendererColorModeMapping, you still need to set it again after updating the FSPDFViewCtrl.mappingModeBackgroundColor and FSPDFViewCtrl.mappingModeForegroundColor. Otherwise, the settings may not work.
The properties should be changed in the source code of the UI Extensions Component, please refer to section 4.3 “Customize UI implementation through source code” to add the “uiextensions” project found in the “libs/uiextensions_src” folder to your project. Then, find the settingBar function in “UIExtensions/UIExtensionsManager.m”, and set the color as you like.
Following is a sample to set the night mode color:
- (void)settingBar:(SettingBar *)settingBar setNightMode:(BOOL)isNightMode {
    if (isNightMode) {
        // Set background color.
        self.pdfViewCtrl.mappingModeBackgroundColor = [UIColor redColor];
        // Set foreground color.
        self.pdfViewCtrl.mappingModeForegroundColor = [UIColor greenColor];
        // Set color mode.
        self.pdfViewCtrl.colorMode = FSRendererColorModeMapping;
        // set the background color for the areas that are out of the pdfviewctrl.
        self.pdfViewCtrl.backgroundColor = [UIColor colorWithRed:20.0/255.0 green:20.0/255.0 blue:20.0/255.0 alpha:1.0];
    }
    else {
        self.pdfViewCtrl.colorMode = FSRendererColorModeNormal;
        self.pdfViewCtrl.backgroundColor = [UIColor colorWithRed:230.0/255.0 green:230.0/255.0 blue:230.0/255.0 alpha:1.0];
    }
    self.hiddenSettingBar = YES;
}
Upload Foxit SDK Framework to Apple App Store
Why do I meet “Invalid Binary Architecture” warning and “Code signing “FoxitRDK.framework” failed” error when I uploaded my app embedded your SDK Framework to Apple App Store?
Foxit SDK Framwork includes arm64, armv7, i386, and x86_64 architectures, but the i386, and x86_64 architectures are not allowed to be uploaded to Apple App Store so that you will meet the “Invalid Binary Architecture” warning and “Code signing “FoxitRDK.framework” failed” error if you use the framework directly.
To solve this problem, Foxit SDK provides a script named “prepare-framework-to-publish-to-appstore.sh” found in the “libs” folder to strip the arm architectures, and then output the library to the directory “./device/FoxitRDK.framework”. You should use this library in your project and then you can publish your app to Apple App Store.
Output exception/crash log information
How can I output exception/crash log information when my app throws exceptions or crashes?
If you want to output exception/crash log information, all you need is to implement the <IExceptionLogger> protocol, and then call the interface FSPDFViewControl::setExceptionLogger.
Localization settings
How to change Localization settings with Foxit PDF SDK for iOS?
By default, Foxit PDF SDK for iOS will automatically switch the UI language according to the current language of your system, provided that the language is supported by Foxit PDF SDK for iOS.
Currently, Foxit PDF SDK for iOS supports the following languages: English, Korean, and Chinese (Simplified, Traditional). Those language resource files are located in the “libs\uiextensions_src\UIExtensions\Resource\FoxitLocalizable” folder.
If you want to use your own localization language that is not supported by Foxit PDF SDK for iOS:
- For version 6.4, you can refer to the article https://developers.foxit.com/kb/article/change-localization-settings-pdf-sdk-ios/ to change the localization settings, which needs to modify the localization settings in the UIExtensions Component.
- From version 7.0 or higher, you can do it directly in your project. First, add a language to your project, and translate all the entries to the language you wish. Then, call FSLocalization::addLanguage to add the new created language that you want to support. Last, to make it work, you can change your current system language, or call FSLocalization::setCurrentLanguage to set current language.
Technical Support
Reporting Problems
Foxit offers 24/7 support for its products and are fully supported by the PDF industry’s largest development team of support engineers. If you encounter any technical questions or bug issues when using Foxit PDF SDK for iOS, please submit the problem report to the Foxit support team at https://www.foxit.com/support/ticket.html. In order to better help you solve the problem, please provide the following information:
- Contact details
- Foxit PDF SDK product and version
- Your Operating System and IDE version
- Detailed description of the problem
- Any other related information, such as log file or error screenshot
Contact Information
You can contact Foxit directly, please use the contact information as follows:
Foxit Support:
Sales contact phone number:
Phone: 1-866-680-3668
Support & General contact:
Phone: 1-866-MYFOXIT or 1-866-693-6948
Updated on March 13, 2024