Developer Guide for Foxit PDF SDK for Web (7.2)
Contents
Foxit PDF SDK for Web Overview
By using Foxit PDF SDK for Web, developers can deploy and customize a Foxit PDF SDK for Web that supports viewing PDF documents within a web browser. Integrating a Foxit PDF SDK for Web into a zero-footprint web app allows end users to view PDF documents on desktop and mobile devices without installing anything.
Why Foxit PDF SDK for Web is your choice
Foxit is a leading software provider of solutions for reading, editing, creating, organizing, and securing PDF documents. Foxit PDF SDK for Web is a cross-platform solution for PDF online viewing. Foxit PDF SDK for Web enterprise edition has been chosen by many of the world’s leading firms for integration into their solutions. Customers choose this product for the following reasons:
Fully customizable
Developers can easily design a unique style for their Foxit PDF SDK for Web interface, and make it consistent to their web applications.
Easy to integrate
Developers can easily reference Foxit PDF SDK for Web by referring to resource files and writing a small amount of code to display and edit PDF files, and have a wealth of interfaces to connect users and user data.
Standard and consistent annotation data
The annotations in Foxit PDF SDK for Web are consistent when viewing and editing in other applications.
Powered by Foxit’s high fidelity rendering PDF engine
The core technology of Foxit PDF SDK for Web is based on Foxit’s PDF engine, which is trusted by a large number of well-known companies. Foxit’s powerful engine makes document viewing fast and consistent in all environments.
In addition, Foxit’s products are offered with the full support of our dedicated support engineers if support and maintenance options are purchased. Updates are released on a regular basis. Foxit PDF SDK for Web will be the most cost-effective choice if you want to develop a cross-platform web PDF document viewer.
Audience and Scope
This document is primarily intended for developers who need to integrate the Foxit PDF SDK for Web into their web applications. It includes the direct reference examples as well as custom front-end APIs for customization.
Your Web Application
Foxit PDF SDK for Web provides a solution that enables a web application to view PDFs seamlessly without any plugins or local applications. Developers should prepare a PDF hosting server like Nginx, Apache or the HTTP server in Node.js platform and do the usual configuration before using Foxit PDF SDK for Web.
Evaluation
Foxit PDF SDK for Web allows users to download the trial version to evaluate the SDK. The trial version is the same as the standard version except for the 15-day limitation for free trial and the trial watermarks in the generated pages. After the evaluation period expires, customers should contact the Foxit sales team and purchase licenses to continue using Foxit PDF SDK for Web.
License
Developers are required to purchase licenses to use Foxit PDF SDK for Web in their solutions. Licenses grant users permission to release their applications based on Foxit PDF SDK for Web. However, users are prohibited to distribute any documents, sample codes, or source codes in the released packages of Foxit PDF SDK for Web to any third party without the permission from Foxit Software Incorporated.
Getting Started
Foxit PDF SDK for Web provides multi-level and rich features and interfaces which include the API without UI, simple UI rendering, UI customization, as well as application of complex UI interactions. This following sections introduces the package structure, integration, demos, and how to run the demos.
Understanding the Package Structure
Package Introduction
Foxit PDF SDK for Web provides two packages as follows:
- Light package: FoxitPDFSDKForWeb_7_2_0.zip (without font resources)
- Full package: FoxitPDFSDKForWeb_7_2_0_Full.zip (with font resources)
If you already have the font resources or only want to use online fonts, you can choose the light package. If you don’t want to make any change on the font library and don’t care the package size, the full package is your first choice.
The following image shows what folders or files are included in the two packages. They have virtually same folders except the “external” folder in the full package.

The package contains:
| docs: | A folder containing API references, developer guide. |
| examples: | A folder containing demos for Foxit PDF SDK for Web. |
| external | A folder containing the font resources (only for full package). |
| integrations | A folder containing the examples for integrating Foxit PDF SDK for Web into current popular JavaScript frameworks (angular/react.js/vue.js). |
| lib | A folder containing the source packages for SDK core libraries. |
| server | A folder containing http-server and the Node.js scripts for snapshot server. |
| legal.txt | Legal and copyright information. |
| package.json | Project description file. |
In the “lib” folder, it contains the files as follows:
| jr-engine | A folder containing front-end rendering engine. |
| locales | A folder containing the internationalized entries data. The entries for different languages is placed in different directories by name. |
| PDFViewCtrl | A folder containing the plugins for PDFViewCtrl. |
| stamps | Stamps templates. |
| uix-addons | A folder containing the plugins for UIExtension. |
| adaptive.js | The script file is used to make project adaptive to the device. |
| PDFViewCtrl.css | The CSS of the simple UI for SDK library. |
| PDFViewCtrl.full.js | The SDK library with simple UI. |
| PDFViewCtrl.js | The PDFViewCtrl library without third-party libraries. |
| PDFViewCtrl.polyfills.js | The script files that PDFViewCtrl relies on, used to be compliant with different browsers. |
| PDFViewCtrl.vendor.js | The third-party libraries used by PDFViewCtrl (See the lists later). |
| preload-jr-worker.js | The script file is used to load the resources of JR engine in parallel to improve the loading speed. |
| UIExtension.css | The CSS of the UI for all the features. |
| UIExtension.full.js | The full-featured SDK library. |
| UIExtension.js | The UIExtension library without third-party libraries |
| UIExtension.polyfills.js | The script files that UIExtension relies on, used to be compliant with different browsers. |
| UIExtension.vendor.js | The third-party libraries used by UIExtension (See the lists later). |
| WebPDFJRWorker.js | The script files running in the Web Worker, which are used for calling the front-end rendering engine. |
Package.json
Foxit PDF SDK for Web provides a package.json file to help developers to quickly experience the SDK product, and make it easier to be integrated into their project. The content is as follows:
{
    "name": "foxit-pdf-sdk-for-web",
    "version": "7.2.0",
    "description": "Foxit pdf sdk for web.",
    "author": "Foxit Software Inc.",
    "main": "./lib/PDFViewCtrl.full.js",
    "scripts": {
        "start": "concurrently --kill-others \"npm run start-http-server\" \"npm run start-snapshot-server\"",
        "start-snapshot-server": "node ./server/snapshot/src/index -p 3002",
        "start-http-server": "node ./server/index"
    },
    "devDependencies": {
        "boxen": "^4.1.0",
        "chalk": "^2.4.1",
        "concurrently": "^4.1.0",
        "http-proxy-middleware": "^0.19.1",
        "koa": "^2.7.0",
        "koa-body": "^4.0.4",
        "koa-body-parser": "^1.1.2",
        "koa-router": "^7.4.0",
        "koa2-connect": "^1.0.2",
        "lru-cache": "^4.1.3",
        "raw-body": "^2.3.3",
        "require-dir": "^1.0.0",
        "serve-handler": "^6.0.2"
    },
    "serve": {
        "port": 8080,
        "public": "/",
        "proxy": {
            "target": "http://127.0.0.1:3002",
            "changeOrigin": true
        }
    }
}
The third-party libraries used in Foxit PDF SDK for Web
Foxit PDF SDK for Web provides two formats of JS packages: the JS package with the third-party libraries, and the JS package without the third-party libraries. If your project has already used the same third-party libraries, you don’t need to add it for avoiding duplication.
For PDFViewCtrl.full.js package:
PDFViewCtrl.full.js – The SDK library with simple UI.
PDFViewCtrl.polyfills.js – The script files that PDFViewCtrl relies on, used to be compliant with different browsers.
PDFViewCtrl.vendor.js – The third-party libraries used by PDFViewCtrl (See the lists later).
PDFViewCtrl.js – The PDFViewCtrl library without third-party libraries.
So that, (PDFViewCtrl.polyfills.js + PDFViewCtrl.vendor.js + PDFViewCtrl.js) = PDFViewCtrl.full.js.
The following two forms are equivalent:
1)
<script src="../FoxitPDFSDKForWeb/lib/PDFViewCtrl.full.js"></script>


2)
<script src="../FoxitPDFSDKForWeb/lib/PDFViewCtrl.polyfulls.js"></script>
<script src="../FoxitPDFSDKForWeb/lib/PDFViewCtrl.vendor.js"></script>
<script src="../FoxitPDFSDKForWeb/lib/PDFViewCtrl.js"></script>
The PDFViewCtrl.vendor.js contains the following third-party libraries:
- jquery
- i18next
- i18next-chained-backend
- i18next-localstorage-backend
- i18next-xhr-backend
- jquery-contextmenu
- dialog-polyfill
- hammerjs
- eventemitter3
For UIExtension.full.js package:
UIExtension.full.js – The full-featured SDK library
UIExtension.polyfills.js – The script files that UIExtension relies on, used to be compliant with different browsers.
UIExtension.js – The UIExtension library without third-party libraries
UIExtension.vendor.js – The third-party libraries used by UIExtension (See the lists later)
So that, (UIExtension.polyfills.js + UIExtension.vendor.js + UIExtension.js) = UIExtension.full.js.
The following two forms are equivalent:
1)
<script src="../FoxitPDFSDKForWeb/lib/UIExtensions.full.js"></script>


2)
<script src="../FoxitPDFSDKForWeb/lib/UIExtensions.polyfulls.js"></script>
<script src="../FoxitPDFSDKForWeb/lib/UIExtensions.vendor.js"></script>
<script src="../FoxitPDFSDKForWeb/lib/UIExtensions.js"></script>
The UIExtension.vendor.js contains the following third-party libraries:
- jquery
- i18next
- i18next-chained-backend
- i18next-localstorage-backend
- i18next-xhr-backend
- dialog-polyfill
- hammerjs
- eventemitter3
- spectrum-colorpicker
- file-saver
Integration
This section will introduce how to integrate Foxit PDF SDK for Web to your project.
Integrate as a Global Variable
You can integrate the Foxit PDF SDK for Web to your project as a global variable:
<script src="./lib/PDFViewCtrl.full.js"></script>
var PDFViewer = PDFViewCtrl.PDFViewer;
var pdfViewer = new PDFViewer(…)
Integrate as module
You can integrate the Foxit PDF SDK for Web to your project by module. Please refer to the examples in the “examples/UIExtension/integrate-as-module/” directory.
Register License Key
The default trial license key can be found in the “examples\license-key.js” file as below:

If you want to activate Foxit PDF SDK for Web with an official license key, you only need to replace the values of “licenseSN” and “licenseKey” (in the “examples\license-key.js”) with the license files purchased from Foxit.
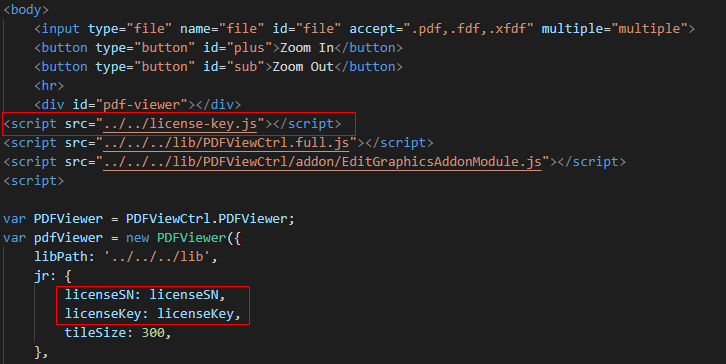
In you HTML entry file, to register license key, you need to do the two steps below:
1) Reference license-key.js file.
2) Declare “licenseSN” and “licenseKey” variables in Constructor function.
For example, you can refer to the “index.html” of the simple UI demo in the “examples\PDFViewCtrl\basic_webViewer” directory. The core code to register license key is as follows:
Quickly run Foxit PDF SDK for Web Demos
To run Foxit PDF SDK for Web Demos, you should prepare a web server at first. In this guide, we will introduce the demos and then take the Nginx and Node.js servers as examples to show you how to quickly run Foxit PDF SDK for Web demos.
Introduction to the Demos
In the “examples” folder, it provides multiple demos as references for users. After starting the http server, you can access and experience the demos in the browser by typing the corresponding address.
- An advanced web viewer demo
It is a ready-to-go demo that you can integrate it into your project with all of the featured provided by Foxit PDF SDK for Web. This demo uses the full-featured package “UIExtension.full.js” (in the “lib” folder) including the PDF view and document parsing. You can get the source code of this demo from “examples/UIExtension/advanced_webViewer/index.html”.
In the browser, quickly access the demo at http://localhost:{port}/examples/UIExtension/advanced_webViewer/index.html
- A basic web viewer demo
It is a simple UI demo that demonstrates how to call Foxit PDF SDK for Web API to load a PDF document, and zoom in/out the document. This demo uses the “PDFViewCtrl.full.js” package in the “lib” folder. You can get the source code of this demo from “examples/PDFViewCtrl/basic_webViewer/index.html”.
In the browser, quickly access the demo at http://localhost:{port}/examples/PDFViewCtrl/basic_webViewer/index.html
- Offline demo
This demo is a sample that demonstrates how to register the “service-worker.js” found in the “examples/PDFViewCtrl/service-worker” folder to better cache the core dependency files “gsdk.js” and font files in a browser supported by the service worker, in order to speed up the file secondary opening or use the offline mode. You can get the source code of this demo from “examples/PDFViewCtrl/service-worker/cache.html “.
In the browser, quickly access the demo at http://localhost:{port}/examples/PDFViewCtrl/service-worker/cache.html
- Inline DIV application demo
This demo renders the simple UI of Foxit PDF SDK for Web to a div container with a specified size. You can get the source code of this demo from “examples/PDFViewCtrl/div/index.html”.
In the browser, quickly access the demo at http://localhost:{port}/examples/PDFViewCtrl/div/index.html .
Nginx working sample
Using Windows as an example, assume that Nginx was installed on your system already. When you have Nginx server running, you can directly modify the ‘nginx.conf’ in the conf directory, here we directly write a configuration file to make Foxit PDF SDK for Web Demo run. Please follows the steps below:
1) Download FoxitPDFSDKForWeb_7_2_0.zip.
2) Unzip it to a new folder like “FoxitPDFSDKForWeb” in ‘D:/’ directory for example.
3) Create a Nginx configuration file in a location. For example, create a new ‘webpdf.conf’ file inside ‘D:/FoxitPDFSDKForWeb’.
4) Set up a virtual server and configure a location. The following configuration is an example. The ‘D:/FoxitPDFSDKForWeb/’ is the path to the SDK.
server {
listen 8080;
server_name 127.0.0.1;
location / {
alias "D:/FoxitPDFSDKForWeb/";
charset utf8;
index index.html;
}
}
5) Locate to the installed path of Nginx, find the ‘nginx.conf’ in the conf directory, use include directive to reference the contents of the new configuration file.
include D:/FoxitPDFSDKForWeb/webpdf.conf;
6) For changes to the configuration file to take effect, you need to restart the Nginx server or use ‘nginx -s reload’ to upgrade the configuration without interrupting the processing of current requests.
7) Access the demos in the browser.
For the advanced web viewer demo, please access the page at http://127.0.0.1:8080/examples/UIExtension/advanced_webViewer/index.html.
For the basic web viewer demo, please access the page at http://127.0.0.1:8080/examples/PDFViewCtrl/basic_webViewer/index.html.
Note: You can run the demo according to the above configuration, but at that time the snapshot feature cannot work correctly. The snapshot cannot be cached to clipboard, so that you cannot paste it to the location as you wish. Please follow the steps below to build the snapshot server:
a) Install node.js 9.0 or higher, if it is already installed, skip it.
b) In a command prompt, navigate to the root directory (“D:/FoxitPDFSDKForWeb”), type “npm install” to install the required dependencies, and then type “npm run start-snapshot-server” to start the snapshot server (the default port is 3002).
Note: If you want to specify the port for snapshot server as desired, you can change it in the “server/snapshot/package.json” file of Foxit PDF SDK for Web package. To find the default port 3002 as below, and change it as you wish:
"start": "node src/index -p 3002"
c) Configure Nginx reverse proxy in the ‘webpdf.conf’ file under ‘D:/FoxitPDFSDKForWeb’ folder.
server {
listen 8080;
server_name 127.0.0.1;
location / {
alias "D:/FoxitPDFSDKForWeb/";
charset utf8;
index index.html;
}
location ~ ^/snapshot/(.+)$ {
proxy_pass http://127.0.0.1:3002/snapshot/$1$is_args$args;
proxy_redirect off;
proxy_request_buffering on;
proxy_set_header Host $host;
proxy_set_header X-Real-IP $remote_addr;
proxy_set_header X-Forwarded-For $proxy_add_x_forwarded_for;
}
}
d) Restart Nginx server, and refresh your browser, the snapshot feature can work correctly.
Node.js working sample
Assume that Node.js 9.0 or higher is available on your system already. Then follow the steps below to run the Foxit PDF SDK for Web demos:
1) Download FoxitPDFSDKForWeb_7_2_0.zip.
2) Unzip it to a new folder like “FoxitPDFSDKForWeb” in ‘D:/’ directory for example.
3) In the command prompt, navigate to the above unzipped folder (“D:/FoxitPDFSDKForWeb”), type “npm install” to install the required dependencies, and then type “npm start” to start http-server.
4) Access the demos in the browser.
For the advanced web viewer demo, please access the page at http://127.0.0.1:8080/examples/UIExtension/advanced_webViewer/index.html.
For the basic web viewer demo, please access the page at http://127.0.0.1:8080/examples/PDFViewCtrl/basic_webViewer/index.html.
Note: Using this method, you do not need to configure the proxy, the snapshot feature can be used normally. If you want to specify the ports for http-server and snapshot server as desired, you can change the two ports in the “package.json” file of Foxit PDF SDK for Web package.
To change the port for http-server, find the default port 8080 as below, and change it as you wish:
"serve": {
    "port": 8080,
    "public": "/",
    "proxy": {
        "target": "http://127.0.0.1:3002",
        "changeOrigin": true
    }
}
To change the port for snapshot server, find the default port 3002 as below, and change it as you wish: (there are two places that need to be changed.)
"start-snapshot-server": "node ./server/snapshot/src/index -p 3002",

"serve": {
    "port": 8080,
    "public": "/",
    "proxy": {
        "target": "http://127.0.0.1:3002",
        "changeOrigin": true
    }
}
Building a new web project
This section will help you to quickly get started with using Foxit PDF SDK for Web to build a simple web PDF viewer and a full-featured PDF viewer with step-by-step instructions provided.
Preparations
Create a new web project
a) Create a new directory as a project folder, such as “D:/test_web”.
b) Copy the “lib“, “server“, and “external” (if you need to use the font resources) folders, as well as the “package.json” file from Foxit PDF SDK for Web package to “D:/test_web”.
c) Copy a PDF file (for example, the demo guide in the “docs” folder) to “D:/test_web”.
d) Create a html file (index.html) in the “D:/test_web” folder. Then the directory structure is:
test_web
    +-- lib          (copy from the Foxit PDF SDK for Web package)
    +-- server       (copy from the Foxit PDF SDK for Web package)
    +-- package.json (copy from the Foxit PDF SDK for Web package)
    +-- index.html
The whole content of the index.html is:
<html>
<head>
    <meta charset="utf-8">
    <style>
        .fv__ui-tab-nav li span {
            color: #636363;
        }
        .flex-row {
            display: flex;
            flex-direction: row;
        }
    </style>
    <!-- ignore other unimportant code -->
</head>
<body>
</body>
</html>
Start Http-Server
You can refer to the section called “Nginx working sample” or the section called “Node.js working sample” to start the http-server. In this project, we use the default port 8080.
Then, access http://127.0.0.1:8080/index.html in the browser, and you will see a blank page, which indicates that the preparations have been completed.
Integrate the basic web viewer demo using PDFViewCtrl
This section will describe how to integrate the basic web viewer demo using PDFViewCtrl based on the above create project. Just follow the steps below:
a) Add a style (/lib/PDFViewCtrl.css) to the <head> tag of the HTML page:
<link rel="stylesheet" type="text/css" href="./lib/PDFViewCtrl.css">
b) Import the “PDFViewCtrl.full.js” library found in the “lib” folder:
<script src="./lib/PDFViewCtrl.full.js"></script>
c) In the HTML <body> tag, add the <div> elements as the web viewer container:
<div id="pdf-viewer"></div>
d) Initialize the Foxit PDF SDK for Web:
<script>
     var licenseSN = "Your license SN";
     var licenseKey = "Your license Key";
</script>
<script>
     var PDFViewer = PDFViewCtrl.PDFViewer;
     var pdfViewer = new PDFViewer({
         libPath: './lib', // the library path of Web SDK.
         jr: {
             licenseSN: licenseSN,
             licenseKey: licenseKey,
         }
     });
     pdfViewer.init('#pdf-viewer'); // the div (id="pdf-viewer")
<script>
Note: The trial values of licenseSN and licenseKey can be found in the “example/license-key.js” file of Foxit PDF SDK for Web package.
e) Open a PDF document:
// modify the file path as your need.
fetch('/FoxitPDFSDKforWeb_DemoGuide.pdf').then(function(response) {
    response.arrayBuffer().then(function(buffer) {
        pdfViewer.openPDFByFile(buffer);
    })
})
f) The above steps are the key points of integrating the simple demo to your created project using PDFViewCtrl. After finishing it, refresh your browser (http://127.0.0.1:8080/index.html), and then you can see the demo guide as follows:

Now, it is a simple web PDF viewer, you can zoom in/out the PDF document by right-clicking anywhere on the page to select the zoom in or zoom out options.
The whole content of the index.html is:
<html>
<head>
    <meta charset="utf-8">
    <link rel="stylesheet" type="text/css" href="./lib/PDFViewCtrl.css">

    <!-- You can delete the following style because it doesn't work in this project -->
    <style>
        .fv__ui-tab-nav li span {
            color: #636363;
        }
        .flex-row {
            display: flex;
            flex-direction: row;
        }
    </style>
    <!-- ignore other unimportant code -->
</head>
<body>
    <div id="pdf-viewer"></div>
    <script src="./lib/PDFViewCtrl.full.js"></script>
    <script>
        var licenseSN = "Your license SN";
        var licenseKey = "Your license Key";
    </script>
    <script>
        var PDFViewer = PDFViewCtrl.PDFViewer;
        var pdfViewer = new PDFViewer({
            libPath: './lib', // the library path of Web SDK.
            jr: {
                licenseSN: licenseSN,
                licenseKey: licenseKey,
            }
        });
        pdfViewer.init('#pdf-viewer'); // the div (id="pdf-viewer")

        // modify the file path as your need.
        fetch('/FoxitPDFSDKforWeb_DemoGuide.pdf').then(function (response) {
            response.arrayBuffer().then(function (buffer) {
                pdfViewer.openPDFByFile(buffer);
            })
        })

    </script>
</body>
</html>
Integrate the advanced Web Viewer demo using UIExtension
The previous section integrates the basic web viewer demo using PDFViewCtrl, which is just a simple web PDF viewer. In this section, we will show you how to integrate the advanced web viewer demo using UIExtension based on the created project in another section. Just follow the steps below:
a) Add a style (/lib/UIExtension.css) to the <head> tag of the HTML page.
<link rel="stylesheet" type="text/css" href="./lib/UIExtension.css">
b) Import the “UIExtension.full.js” library found in the “lib” folder:
<script src="./lib/UIExtension.full.js"></script>
c) In the HTML <body> tag, add the <div> elements as the web viewer container:
<div id="pdf-ui"></div>
d) Initialize the Foxit PDF SDK for Web:
<script>
     var licenseSN = "Your license SN";
     var licenseKey = "Your license Key";
</script>
<script>
    var pdfui = new UIExtension.PDFUI({
        viewerOptions: {
            libPath: './lib', // the library path of web sdk.
            jr: {
                licenseSN: licenseSN,
                licenseKey: licenseKey
            }
        },
        renderTo: '#pdf-ui' // the div (id="pdf-ui").
    });
<script>
Note: The trial values of licenseSN and licenseKey can be found in the “example/license-key.js” file of Foxit PDF SDK for Web package.
e) Open a PDF document:
// modify the file path as your need.
fetch('/FoxitPDFSDKforWeb_DemoGuide.pdf').then(function(response) {
    response.arrayBuffer().then(function(buffer) {
        pdfui.openPDFByFile(buffer);
    })
})
f) The above steps are the key points of integrating the advanced web viewer demo to your created project using UIExtension. After finishing it, refresh your browser (http://127.0.0.1:8080/index.html), and then you can see the demo guide as follows:

Now, it is a full-featured web PDF viewer, you can view/edit/comment/protect the PDF document as desired.
The whole content of the index.html is:
<html>
<head>
    <meta charset="utf-8">
    <link rel="stylesheet" type="text/css" href="./lib/UIExtension.css">
    <style>
        .fv__ui-tab-nav li span {
            color: #636363;
        }
        .flex-row {
            display: flex;
            flex-direction: row;
        }
    </style>
    <!-- ignore other unimportant code -->
</head>
<body>
    <div id="pdf-ui"></div>
    <script src="./lib/UIExtension.full.js"></script>
    <script>
        var licenseSN = "Your license SN";
        var licenseKey = "Your license Key";
    </script>
    <script>
        var pdfui = new UIExtension.PDFUI({
            viewerOptions: {
                libPath: './lib', // the library path of web sdk.
                jr: {
                    licenseSN: licenseSN,
                    licenseKey: licenseKey
                }
            },
            renderTo: '#pdf-ui' // the div (id="pdf-ui").
        });

        // modify the file path as your need.
        fetch('/FoxitPDFSDKforWeb_DemoGuide.pdf').then(function (response) {
            response.arrayBuffer().then(function (buffer) {
                pdfui.openPDFByFile(buffer);
            })
        })

    </script>
</body>
</html>
Integrate the add-ons of UIExtension
Foxit PDF SDK for Web provides some extension features for UIExtension, such as file property, multi-media, password protection, redaction, PDF path objects, print, full screen, importing/exporting form, undo-redo (keyboard shortcuts: undo (Ctrl+Z), and redo (Ctrl+Y), horizontal continuous and text object (only supported by desktop). To integrate these add-ons, you should add the code snippets below:
addons: [
    './lib/uix-addons/file-property',
    './lib/uix-addons/multi-media',
    './lib/uix-addons/password-protect',
    './lib/uix-addons/redaction',
    './lib/uix-addons/path-objects',
    './lib/uix-addons/print',
    './lib/uix-addons/full-screen',
    './lib/uix-addons/import-form',
    './lib/uix-addons/export-form',
    './lib/uix-addons/undo-redo',
    './lib/uix-addons/h-continuous'
].concat(UIExtension.PDFViewCtrl.DeviceInfo.isMobile ? [] : './lib/uix-addons/text-object')
Based on the full-featured PDF viewer project, update the index.html as follows:
<html>
<head>
    <meta charset="utf-8">
    <link rel="stylesheet" type="text/css" href="./lib/UIExtension.css">
    <style>
        .fv__ui-tab-nav li span {
            color: #636363;
        }
        .flex-row {
            display: flex;
            flex-direction: row;
        }
    </style>
    <!-- ignore other unimportant code -->
</head>
<body>
    <div id="pdf-ui"></div>
    <script src="./lib/UIExtension.full.js"></script>
    <script>
        var licenseSN = "Your license SN";
        var licenseKey = "Your license Key";
    </script>
    <script>
        var pdfui = new UIExtension.PDFUI({
            viewerOptions: {
                libPath: './lib', // the library path of web sdk.
                jr: {
                    licenseSN: licenseSN,
                    licenseKey: licenseKey
                }
            },
            renderTo: '#pdf-ui', // the div (id="pdf-ui").

            addons: [
                './lib/uix-addons/file-property', // should use the relative path.
                './lib/uix-addons/multi-media',
                './lib/uix-addons/password-protect',
                './lib/uix-addons/redaction',
                './lib/uix-addons/path-objects',
                './lib/uix-addons/print',
                './lib/uix-addons/full-screen',
                './lib/uix-addons/import-form',
                './lib/uix-addons/export-form',
                './lib/uix-addons/undo-redo',
                './lib/uix-addons/h-continuous'
            ].concat(UIExtension.PDFViewCtrl.DeviceInfo.isMobile ? [] : './lib/uix-addons/text-object')

        });

        // modify the file path as your need.
        fetch('/FoxitPDFSDKforWeb_DemoGuide.pdf').then(function (response) {
            response.arrayBuffer().then(function (buffer) {
                pdfui.openPDFByFile(buffer);
            })
        })

    </script>
</body>
</html>
Refresh your browser (http://127.0.0.1:8080/index.html), and then you can see a web PDF viewer with the extension features. For example, for the Home tab, the file property, print, and import/export form features have been integrated as follows:

Make the project adaptive to the device
Foxit PDF SDK for Web can allow the project to be adaptive to the device (desktop or mobile), which means if you access the project in your desktop browser, it will be present using the desktop UI layout, and if you access the project in your mobile browser, it will be present using the mobile UI layout. To make the project adaptive to the device, you can refer to the complete example demo (adaptive-to-the-device.html) in the “examples\UIExtension\custom_appearance” directory.
For example, assume the IP address of your computer is 192.168.2.137, so that access the adaptive-to-the-device.html demo in mobile browser (http://192.168.2.137:8080/examples/UIExtension/custom_appearance/adaptive-to-the-device.html), and then you can see a mobile PDF viewer as follows:

Load the resources of JR engine in parallel to improve the loading speed
Since version 7.1.1, Foxit PDF SDK for Web provides a script file “preload-jr-worker.js” in the “lib” folder, which is our web SDK worker thread to perform tasks in the background. It loads the resources of JR engine ahead to get the potential loading performance benefits of saving initialization time, and it can run simultaneously with the SDK JS libraries to initialize data in different threads. The core code example to set up “preload-jr-worker.js” in a HTML index file is as follows:
<body>
    <div id="pdf-ui"></div>
    <script>
        var licenseSN = "Your license SN";
        var licenseKey = "Your license Key";
    </script>

    <!-- Add the preload-jr-worker.js-->
    <script src="./lib/preload-jr-worker.js"></script>
    <script>
        var readyWorker = preloadJrWorker({
            workerPath: './lib/',
            enginePath: './lib/jr-engine/gsdk',
            fontPath: './external/brotli',
            licenseSN: licenseSN,
            licenseKey: licenseKey
        })
    </script>

    <script src="./lib/UIExtension.full.js"></script>
    <script>

        var pdfui = new UIExtension.PDFUI({
            viewerOptions: {
                libPath: './lib', // the library path of web sdk.
                jr: {
                    readyWorker: readyWorker,
                }
            },
            renderTo: '#pdf-ui', // the div (id="pdf-ui").
            appearance: UIExtension.appearances.adaptive,
            addons: [
                '```'
            ]
        });
    ...
Customizing the UI
From version 7.0, Foxit PDF SDK for Web comes with built-in UI design including the feature modules UI, which are implemented using Foxit PDF SDK for Web and are shipped in the UIExtension.js. Furthermore, customizing UI is straightforward. Foxit PDF SDK for Web provides a rich set of APIs for developers to customize and style the appearance of your web viewer.
The user interface of UIExtension consists of two parts: template and fragments. Template is equivalent to the extension of HTML, the components in the template should be declared by tags. Template is used to customize the UI layout (css style, icon, text, and so on) without interactions. Fragments are a set of UI snippets, which can be used to customize the configuration items and interaction logic of the components in the template. Each snippet has an operation type “action” that specifies the action mode (append, prepend, before, after, ext, replace, insert, and remove, the default is ext.) of the snippets. Through these action modes, you can insert, delete, replace and modify the components in the template.
For all the built-in components used in the following examples, please refer to the section called “Understanding the built-in components”.
Customize the UI layout using template
Template is mainly used to customize the UI layout of the components. Following will list some examples to demonstrate the usage of template. Please note that all the examples are based on the full-featured PDF viewer project in another section.
Create a simple template
A simplest template is as follows:
var pdfui = new UIExtension.PDFUI({
    viewerOptions: {
        libPath: './lib', // the library path of web sdk.
        jr: {
            licenseSN: licenseSN,
            licenseKey: licenseKey
        }
    },
    renderTo: '#pdf-ui', // the div (id="pdf-ui").
    template: [
        '<webpdf>',
        '    <viewer></viewer>',
        '</webpdf>'
        ].join('')
});
- <webpdf> tag listens the opening/closing document events, and then trigger the enableAll or disableAll function of the Appearance object to enable or disable the related components in the UI.
- <viewer> tag is where the PDF contents are rendered. Each template must have a <viewer> tag. It can be placed anywhere you want, please refer to the examples in the following sections.
Refresh your browser (http://127.0.0.1:8080/index.html), and then you can see a simple web PDF viewer as follows:

Add a new toolbar button
Use <toolbar> tag to add a new toolbar button.
var pdfui = new UIExtension.PDFUI({
    viewerOptions: {
        libPath: './lib', // the library path of web sdk.
        jr: {
            licenseSN: licenseSN,
            licenseKey: licenseKey
        }
    },
    renderTo: '#pdf-ui', // the div (id="pdf-ui").
    template: [
    '<webpdf>',
    '    <toolbar>',
    '        <open-file-dropdown></open-file-dropdown>',
    '    </toolbar>',
    '    <viewer></viewer>',
    '</webpdf>'
        ].join('')
});
Refresh your browser (http://127.0.0.1:8080/index.html), and then you can see the new toolbar button as follows:

Add a new tab page
Use <tabs> and <tab> tags to add a new tab page.
var pdfui = new UIExtension.PDFUI({
    viewerOptions: {
        libPath: './lib', // the library path of web sdk.
        jr: {
            licenseSN: licenseSN,
            licenseKey: licenseKey
        }
    },
    renderTo: '#pdf-ui', // the div (id="pdf-ui").
    template: [
'<webpdf>',
'    <toolbar>',
'        <tabs>',
'            <tab title="Home">',
'                <open-file-dropdown></open-file-dropdown>',
'            </tab>',
'            <tab title="Comment">',
'                <div class="flex-row">',
'                    <create-strikeout-button></create-strikeout-button>',
'                    <create-underline-button></create-underline-button>',
'                    <create-squiggly-button></create-squiggly-button>',
'                    <create-replace-button></create-replace-button>',
'                    <create-caret-button></create-caret-button>',
'                    <create-note-button></create-note-button>',
'                </div>',
'            </tab>',
'        </tabs>',
'    </toolbar>',
'    <viewer></viewer>',
'</webpdf>'
].join('')
});
Refresh your browser (http://127.0.0.1:8080/index.html), and then you can see the new tab page as follows:

Add a sidebar button
Use <sidebar> tag to add a sidebar button.
var pdfui = new UIExtension.PDFUI({
    viewerOptions: {
        libPath: './lib', // the library path of web sdk.
        jr: {
            licenseSN: licenseSN,
            licenseKey: licenseKey
        }
    },
    renderTo: '#pdf-ui', // the div (id="pdf-ui").
    template: [
'<webpdf>',
'    <toolbar>',
'        <tabs>',
'            <tab title="Home">',
'                <open-file-dropdown></open-file-dropdown>',
'            </tab>',
'            <tab title="Comment">',
'                <div class="flex-row">',
'                    <create-strikeout-button></create-strikeout-button>',
'                    <create-underline-button></create-underline-button>',
'                    <create-squiggly-button></create-squiggly-button>',
'                    <create-replace-button></create-replace-button>',
'                    <create-caret-button></create-caret-button>',
'                    <create-note-button></create-note-button>',
'                </div>',
'            </tab>',
'        </tabs>',
'    </toolbar>',
'    <div class="flex-row">',
'        <sidebar>',
'            <bookmark-sidebar-panel></bookmark-sidebar-panel>',
'        </sidebar>',
'        <viewer></viewer>',
'    </div>',
'</webpdf>'
].join('')

});
Refresh your browser (http://127.0.0.1:8080/index.html), and then you can see the bookmark sidebar as follows:

Built-in layout template
The built-in layout template is placed in the “examples\UIExtension\layout_templates” directory. For desktop, reference the built-in-pc-layout-template.tpl file, and for mobile, reference the built-in-mobile-layout-template.tpl file. You can modify the template directly to customize the UI layout as desired.
In the “examples\UIExtension\custom_appearance” directory, Foxit PDF SDK for Web provides two custom template examples. “adaptive-to-the-device.html” is adaptive to the device (desktop and mobile), and “not-adaptive-to-the-device.html” is not adaptive to the device, which only supports desktop.
Customize the UI using fragments
Fragments are a set of UI snippets. It can be used to customize the configuration items and interaction logic of the components in the template.
Create a new drop-down menu item
The sample code below creates a new drop-down menu including two drop-down buttons, and append it to the end of the list of children of the group component with the name of “home-tab-group-hand”.
To get the name of a target component (only for widget), you can right-click the component in the browser, choose “Inspect”, and then find the value of the “component-name” attribute in the corresponding <a> tag. For a container component, for example “target: ‘home-tab-group-hand’,“, you can right-click one of the subcomponents in the browser, choose “Inspect”, and then find the value of the “component-name” attribute in the related <div> tag.
function CustomController() {
    UIExtension.Controller.apply(this, arguments);
}
CustomController.prototype = Object.create(UIExtension.Controller.prototype, {
    constructor: {
        value: CustomController
    }
});
Object.assign(CustomController.prototype, {
    mounted: function () {
        console.info(this.component, 'mounted');
    },
    handle: function (selectedFile) {
        alert(selectedFile.name);
    }
});

var pdfui = new UIExtension.PDFUI({
    viewerOptions: {
        libPath: './lib', // the library path of web sdk.
        jr: {
            licenseSN: licenseSN,
            licenseKey: licenseKey
        }
    },
    renderTo: '#pdf-ui', // the div (id="pdf-ui").

    fragments: [{
        // Add a component to the end of the list of children of a specified target component.
        action: UIExtension.UIConsts.FRAGMENT_ACTION.APPEND,
        // Specify the name of the target component that the new components defined in the above template will be appended to. All the target names of fragments are defined in the layout template.
        target: 'home-tab-group-hand',
        // Define the properties of the added component, such as icon, text, and css style.
        template: [
            '<dropdown icon-class="fv__icon-toolbar-stamp">',
            '    <dropdown-button name="show-hello-button" icon-class="fv__icon-toolbar-hand">say hello</dropdown-button>',
            '    <dropdown-button name="select-pdf-file-button" accept=".pdf" file-selector icon-class="fv__icon-toolbar-open">open</dropdown-button>',
            '</dropdown>'
        ].join(''),
        // Define the interaction logic of the added component.
        config: [{
            // specify the component in the above template that the configuration will be applied to.
            // For example, the configuration will be applied to the component with the name of "show-hello-button".
            target: 'show-hello-button',
            callback: function () {
                alert('hello');
            }
        },
        {
            // The configuration will be applied to the component with the name of "select-pdf-file-button" which is defined in the above template of fragments.
            target: 'select-pdf-file-button',
            // Extend Controller, and implement the handle function.
            callback: CustomController
        }]
    }]
});
Refresh your browser (http://127.0.0.1:8080/index.html), and then you can see a new created drop-down menu as follows:

Delete a toolbar button
To delete a toolbar button through fragment is fairly simple. For example, to delete the Hand tool ![]() , you only need to add a new object to the fragment. Based on the above example, add the code below:
, you only need to add a new object to the fragment. Based on the above example, add the code below:
{
    target: 'hand-tool',
    action: UIExtension.UIConsts.FRAGMENT_ACTION.REMOVE
}
Refresh your browser (http://127.0.0.1:8080/index.html), and then you can see the Hand tool has been removed from the group component as follows:

Modify a toolbar button
To modify a toolbar button through fragment is also fairly simple. Just like Delete a toolbar button, you only need to add a new object to the fragment.
Change icon of a button
For example, to change the icon of the Hand tool ![]() , just add the code below based on the example ina previous section:
, just add the code below based on the example ina previous section:
{
    target: 'hand-tool',
    config: {
        iconCls: 'fv__icon-toolbar-note' // your custom icon.
    }
}
Refresh your browser (http://127.0.0.1:8080/index.html), and then you can see the icon of the Hand tool has been changed as follows:

Change the tooltip of a button
For example, to change the tooltip of the Hand tool ![]() , just add the code below based on the example in a previous section:
, just add the code below based on the example in a previous section:
{
    target: 'hand-tool',
    config: {
        tooltip: {
            title: 'your custom tooltip'
        }
    }
}
Refresh your browser (http://127.0.0.1:8080/index.html), and then you can see the tooltip of the Hand tool has been changed to “your custom tooltip” as follows:

Change the event of a button
To change the event of a button, there are two ways:
a) Overwrite the built-in event. For example:
{
    target: 'hand-tool',
    config: {
        callback: function() {
            alert('your click event handler');
        }
    }
}
b) Add custom behavior based on the built-in event (original logic). You can configure the button using the method as follows:
{
    target: 'hand-tool',
    config: {
        callback: {
            before: function (handleMethodArguments ) {
                console.info('called before handle callback with arguments: ', handleMethodArguments);
            },
            after: function (value, handleMethodArguments ) {
                console.info('called after handle callback with returning value and arguments: ', value, handleMethodArguments);
            }
        }
    }
}
More examples
For more sample codes, please refer to the examples in the “examples\UIExtension\fragment_usage” folder.
Modularization
In order to differentiate the built-in components and user-defined components to avoid conflicts, UIExtension provides modularization feature, which allows you to register the components in different modules separately. Then, you only need to add the prefix of the module name when you declare the components in the template.
Create your own custom module
If you want to define and use a custom component which has the same name with the built-in component, you can create a custom module and then register your custom component in the custom module.
For example, in the built-in component, there is already an existing component with the name of “dropdown“, if you also want to define a custom component called “dropdown“, you can refer to the simple code below:
Create a new module “my-widgets”, and registers a user-defined component in this module:
// Create a new module. Please note that the second parameter must be an array if you create a new module.
var module = UIExtension.modular.module('my-widgets', []);

function UserDefinedDropdownComponent() {
    UIExtension.Component.apply(this, arguments);
}
UserDefinedDropdownComponent.getName = function() {
   return 'dropdown'; // Declare the tag name of the component. There is already an existing component with the same name of 'dropdown' in the built-in component.
}
UserDefinedDropdownComponent.prototype.constructor = UIExtension.Component;
UserDefinedDropdownComponent.prototype.render = function() {
UIExtension.Component.prototype.render.call(this);
       this.element.innerText = 'User-defined dropdown component';
}
module.registerComponent(UserDefinedDropdownComponent);
Then, the built-in dropdown and user-defined dropdown can be differentiated in the following way:
<!-- built-in dropdown -->
<dropdown></dropdown>
<!-- user-defined dropdown -->
<my-widgets:dropdown></my-widgets:dropdown>
For example, use the user-defined dropdown component:
var pdfui = new UIExtension.PDFUI({
    // Omit other parameters.
    fragments: [{
        action: UIExtension.UIConsts.FRAGMENT_ACTION.APPEND,
        target: 'home-tab-group-hand',
        template: '<my-widgets:dropdown></my-widgets:dropdown>' // use a colon to separate the module name and component name in the template.
    }]
});
Understanding the built-in components
In simple terms, a tag defined in the template is a component. Container and Widget also belong to the component. The different is that container can hold subcomponents, but widget cannot. All of the native HTML tags are defined as container components, so you can freely nest them.
Foxit PDF SDK for Web has already wrapped a rich set of built-in components for developers to quickly build a web viewer, and customize it as desired. This section will list and introduce the basic components and business components.
Basic components
| Type | Name | Description |
| container | toolbar | Toolbar components, like an empty div (just has bottom border) |
| tabs | Tab components, which are the parent components of tab and used to manage the tab pages. Note: Tab must exist as the subcomponents of the tabs component. |
|
| tab | Tab pages. | |
| group-list | Group list, which is used to manage group components. | |
| group | Group components, which must exist as the subcomponents of group-list. | |
| sidebar | Sidebar, which managers the sidebar panels. | |
| sidebar-panel | Sidebar panel, which allow you to specify the icon, title and content of the panel. For example, the sidebar-search, and sidebar-bookmark in the demo page. | |
| layer | Floating box component. It supports translucent backdrop and modal box, which can be used to implement dialogs. | |
| layer-header | A component for the head of a dialog, which can be set with a title and a close button. | |
| layer-toolbar | Equivalent to a div with 1.5em height and flex layout. It is usually used to store buttons or other components. | |
| layer-view | Equivalent to a div with fv_ui-layer-panel. It is usually used to store the contents of dialogs. | |
| dropdown | Dropdown component. | |
| dropdown-item | Dropdown items. | |
| contextmenu | Context menu component. The subcomponents must be contextmenu-item or contextmenu-separator. To show context menu component, you need to call showAt method. | |
| widget | dropdown-button | A type of dropdown items. It will trigger the controller’s handle method and click event after clicking. If set to file selector mode, it will trigger the change event after clicking to select a file, and also pass the selected file to the controller’s handle method. |
| container | accordion | Accordion component. |
| accordion-card | The card of accordion component. It can be set with a title, and the content can be shrunk. It must be present as the subcomponent of the accordion. | |
| webpdf | The root component of the default template. It will listen the document open and close event of pdfviewer object, and control to disable/enable all the components depending on the document state. | |
| widget | viewer | A component that renders PDF files. Each template file must be configured with a viewer component. |
| text | It will be parsed into a text node in the DOM tree. The content of the text component will be localized by i18next library. | |
| xbutton | Button component. It supports setting the icon and text. After clicking, it will trigger the click event and call the controller’s handle method. | |
| file-selector | File selection component. It supports setting icon and text. After clicking and selecting a file, it will trigger the change event, pass the selected file to the controller’s handle method and call it. | |
| number | Number input box. You can set the number range and step size. The default range is infinite, and it has no step size by default. After setting the step size, if the minimum value is not equal to infinitely small, then the value of the input box must be ( the minimum value + step size* integer). | |
| contextmenu-item | Context menu item. It must be as a subcomponent of contextmenu. Other configurations and usages are the same as xbutton. | |
| contextmenu-separator | The separator line of context menu. It has no other special effects. | |
| slot | slot | Slot can be used to implement the requirement for inserting subcomponents to the different locations of the complex container components. Note: If “for=”slotName“, slotName” is not supported, it will report the “slot does not exist” error. In this case, it depends on how the corresponding component of the slot’s parent node handle the value, please refer to the Component#appendSlot method. |
Business components
| Type | Name | Inherited Component | Description |
| widget | hand-button | xbutton | Hand tool button |
| widget | selection-button | xbutton | Text/Annotation selection tool button |
| widget | snapshot-button | xbutton | Snapshot tool button |
| widget | open-file-dropdown | dropdown | Dropdown menu for opening document |
| widget | download-file-button | xbutton | Download file button |
| widget | goto-prev-page-button | xbutton | Go to the previous page |
| widget | goto-next-page-button | xbutton | Go to the next page |
| widget | goto-page-input | number | The input box for the page number that you want to jump to. |
| widget | zoom-out-button | xbutton | Zoom out page button |
| widget | zoom-in-button | xbutton | Zoom in page button |
| widget | editable-zoom-dropdown | dropdown | The editable zoom dropdown menu |
| widget | zoom-dropdown | dropdown | Zoom dropdown menu |
| widget | continuous-page-button | xbutton | A button used to enable continuous page mode which views pages continuously with scrolling enabled |
| widget | continuous-facing-page-button | xbutton | A button used to enable continuous-facing page mode which views pages side-by-side with continuous scrolling enabled |
| widget | loupe-tool-button | xbutton | Loupe tool button |
| widget | marquee-tool-button | xbutton | Marquee tool button |
| widget | create-text-highlight-button | xbutton | Text highlight tool button |
| widget | create-strikeout-button | xbutton | Text strikeout tool button |
| widget | create-underline-button | xbutton | Text underline tool button |
| widget | create-squiggly-button | xbutton | Text squiggly tool button |
| widget | create-replace-button | xbutton | Text replace tool button |
| widget | create-caret-button | xbutton | Caret tool button |
| widget | create-note-button | xbutton | Note tool button |
| widget | create-typewriter-button | xbutton | Typewriter tool button |
| widget | create-callout-button | xbutton | Callout tool button |
| widget | create-textbox-button | xbutton | Textbox tool button |
| widget | create-drawings-dropdown | dropdown | Shapes tool dropdown |
| widget | create-pencil-button | xbutton | Pencil tool button |
| widget | eraser-button | xbutton | Eraser tool button |
| widget | create-area-highlight-button | xbutton | Area highlight tool button |
| widget | create-distance-button | xbutton | Distance tool button |
| widget | create-attachment-button | xbutton | Attachment tool button |
| widget | create-image-button | xbutton | Image tool button |
| widget | create-link-button | xbutton | Link tool button |
| widget | stamp-dropdown | dropdown | Stamp tool dropdown list |
| widget | add-image-button | xbutton | Add image tool button |
| widget | ink-sign-dropdown | dropdown | Ink signature dropdown list |
| widget | create-stamp-dialog | layer | Create stamp dialog |
| widget | loupe-tool-dialog | layer | Loupe tool dialog |
| widget | create-ink-sign-dialog | layer | Create ink signature dialog |
| widget | bookmark-sidebar-panel | sidebar-panel | Bookmark panel in the sidebar |
| widget | commentlist-sidebar-panel | sidebar-panel | Comment list panel in the sidebar |
| widget | thumbnail-sidebar-panel | sidebar-panel | Thumbnail panel in the sidebar |
| widget | layer-sidebar-panel | sidebar-panel | PDF layers panel in the sidebar |
| widget | search-sidebar-panel | sidebar-panel | Search panel in the sidebar |
| widget | attachment-sidebar-panel | sidebar-panel | Attachments panel in the sidebar |
| container | page-contextmenu | contextmenu | Page context menu |
| container | annot-contextmenu | contextmenu | Annotation context menu |
| container | action-annot-contextmenu | contextmenu | Image and link annotation context menu |
| container | default-markup-contextmenu | contextmenu | Markup annotation context menu |
| container | fileattachment-contextmenu | contextmenu | Attachment annotation context menu |
| container | media-contextmenu | contextmenu | video/audio annotation context menu |
| container | redact-contextmenu | contextmenu | Redaction context menu |
| container | textmarkup-contextmenu | contextmenu | Caret/highlight/strikeout/underline/squiggly/typewriter/callout/textbox context menu |
| widget | contextmenu-item-annot-actions | contextmenu-item | Show action settings dialog |
| widget | contextmenu-item-apply-all | contextmenu-item | Apply all redaction annotations |
| widget | contextmenu-item-apply | contextmenu-item | Apply current redaction annotation |
| widget | contextmenu-item-copy-text | contextmenu-item | Copy the content data of the current annotation |
| widget | contextmenu-item-delete-annot | contextmenu-item | Delete current annotation |
| widget | contextmenu-item-hand-tool | contextmenu-item | Switch to hand tool |
| widget | contextmenu-item-marquee-zoom | contextmenu-item | Switch to loupe tool |
| widget | contextmenu-item-media-download | contextmenu-item | Download current multimedia data streams |
| widget | contextmenu-item-place | contextmenu-item | Apply current redaction annotation to other page |
| widget | contextmenu-item-properties | contextmenu-item | Show the properties dialog of current annotation |
| widget | contextmenu-item-reply | contextmenu-item | Reply current annotation |
| widget | contextmenu-item-search | contextmenu-item | Show search sidebar |
| widget | contextmenu-item-select-tool | contextmenu-item | Switch to selection tool |
| widget | contextmenu-item-zoom-actual-size | contextmenu-item | Zoom to 100% |
| widget | contextmenu-item-fitpage | contextmenu-item | Fit page (resize the page to fit entirely in the document pane) |
| widget | contextmenu-item-fitwidth | contextmenu-item | Fit width (resize the page to fit the width of the window. Part of the page may be out of view) |
| widget | contextmenu-item-zoomin | contextmenu-item | Zoom in |
| widget | contextmenu-item-zoomout | contextmenu-item | Zoom out |
| container | text-sel:text-selection-tooltip | layer | The floating box appears when selecting texts |
| container | freetext:freetext-tooltip | layer | The floating box appears when selecting freetext annotation |
| widget | comment-list:toggle-commentlist-group-button | xbutton | Collapse/expand the comment group components (annotations in one PDF page are organized into a same group) in commentlist panel |
Business components in the add-on modules
The business components in the add-on modules are valid only when your project has already integrated the related add-on modules, please refer to the section called “Integrate the add-ons of UIExtension”.
| Type | Module:Name | Inherited Component | Add-on Module | Description |
| widget | print:print-button | xbutton | Open the print dialog | |
| widget | print:print-dialog | layer | Print dialog | |
| widget | import-form-module:import-form-button | xbutton | import-form | Import form data |
| widget | export-form-module:export-form-dropdown | xbutton | export-form | Export form data |
| widget | fpmodule:file-property-button | xbutton | file-property | Show current document information dialog |
| widget | fpmodule:file-property-dialog | layer | file-property | Document information dialog |
| widget | multi-media:multi-media-button | xbutton | multi-media | Switch to the multimedia Annotation creation tool |
| widget | edit-pageobjects:edit-all-objects-button | xbutton | path-objects | Switch to the page objects (image/path/text) editing tool |
| container | edit-pageobjects:page-objects-dropdown | dropdown | path-objects | Path objects creation tool dropdown list |
| widget | edit-text-object:add-text-button | xbutton | text-object | Text editing |
| widget | edit-text-object:text-bold-style-button | xbutton | text-object | Make text bold |
| widget | edit-text-object:text-italic-style-button | xbutton | text-object | Italicize text |
| container | edit-text-object:font-color-picker | dropdown | text-object | Set the color of text |
| container | edit-text-object:font-style-dropdown | dropdown | text-object | Set font and font size of text |
| widget | password-protect:password-protect-button | xbutton | password-protect | Open the password protect dialog |
| widget | password-protect:remove-protect-button | xbutton | password-protect | Remove password protect |
| container | redaction:create-redactions-dropdown | dropdown | redaction | Redaction options dropdown list |
| widget | redaction:apply-redactions-button | xbutton | redaction | Apply redaction |
| widget | redaction:redaction-search-button | xbutton | redaction | Open the left search panel |
| container | redaction:redaction-page-dialog | layer | redaction | Mark page to redact dialog |
| widget | h-continuous:h-continuous-button | xbutton | h-continuous | Switch to horizontal continuous page mode |
Customize Internationalization Resources
To customize internationalization resources, please follow the steps below:
1) Create a folder named “assets” in your website root directory, where you will configure the internationalization resources. Let’s call this path as websiteRoot/assets/.
2) Copy the lib/locals folder inside the SDK package to websiteRoot/assets/.
3) Set up the I18N path for loading resources.
var pdfui = new UIExtension.PDFUI({
    il8n: {

        absolutePath: 'websiteRoot/assets/locals'
    },

    // Other options...
});
4) Add more localization languages. Create a new folder in websiteRoot/assets/locals. The folder name should follow the language codes standard, such as zh-CN for Chinese, ru_RU for Russian.
5) Copy the “ui_.json” file under websiteRoot/assets/locales/en-US directory into your created folder in the above step. Translate (Localize) all the entries in the “ui_.json“ file.
6) Set up default language.
var pdfui = new UIExtension.PDFUI({
    il8n: {

        absolutePath: 'websiteRoot/assets/locals'
        lng: 'ru-RU'
    },

    // Other options...
});
7) Verify the configuration in developer environment.
- Clear your browser caches to ensure the latest I18N resources will be loaded.
- Refresh your browser, open the Network panel in DevTools, and check if the ui_.json request url points to your custom language path. If so, it means success.
Implementing Annotation Real-time collaboration
Foxit PDF SDK for Web supports annotation real-time collaboration which means when two browsers are opening a same PDF document, if one browser adds an annotation event, the event will be added synchronization to the other browser. This section will introduce how to implement annotation real-time collaboration using Foxit PDF SDK for Web.
Device requirement
Two browser terminals
A host with http-server (to handle network events and distribution)
Foxit PDF SDK for Web

Development process for implementing annotation real-time collaboration
To implement annotation real-time collaboration, please refer to the steps below:
1) Initialize the Foxit PDF SDK for Web. Please refer to the step d) in the section “Integrate the simple UI demo to your project”.
2) Add the “annotation-add” events as below:
pdfViewer.eventEmitter.on('annotation-add',function(annotations) {
    // annotations : the newly added annotations
    var xmlHttp = new XMLHttpRequest();
    var url = 'url/to/post/added/annots';
    xmlHttp.open('POST', url, true);

    var formData = new FormData();

    var annotJsons = [];
    annotations.map(function(ele) {
        annotJsons.push(ele.exportToJSON());
    });
    formData.append('annots',annotJsons);
    xmlHttp.send(formData);
    // handle loaded event.
});
3) Pull the server distribution events periodically.
setInterval(function() {
    var xmlHttp = new XMLHttpRequest();
    var url = 'url/to/get/added/annots';
    xmlHttp.open('GET', url, true);
    xmlHttp.send(null);

    xmlHttp.onload = function(e) {
        if (xhr.readyState === 4) {
            if (xhr.status === 200) {
                // Assuming that directly returns the JSON data of the annotations.
                var annotsJson = xmlHttp.response;
              pdfViewer.getCurrentPDFDoc().getPageByIndex(annotsJson.pageIndex).then(function(page)  {
                    annotsJson.annots.map(function(annotJSON) {
                        page.addAnnot(annotJSON);
                    })
                })
            }
        }
    }
}, 1000);
4) Restart the server, open a PDF document in two browsers, add an annotation event to one of the browser, then you will find that the event will be added synchronization to the other browser.
Technical Support
Reporting Problems
Foxit offers 24/7 support for its products and are fully supported by the PDF industry’s largest development team of support engineers. If you encounter any technical questions or bug issues when using Foxit PDF SDK for Web, please submit the problem report to the Foxit support team at https://www.foxit.com/support/ticket.html. In order to better help you solve the problem, please provide the following information:
- Contact details
- Foxit PDF SDK product and version
- Your Operating System and IDE version
- Detailed description of the problem
- Any other related information, such as log file or error screenshot
Contact Information
You can contact Foxit directly, please use the contact information as follows:
Foxit Support:
Sales contact phone number:
Phone: 1-866-680-3668
Support & General contact:
Phone: 1-866-MYFOXIT or 1-866-693-6948
Updated on January 3, 2025