How to Create your own iOS Mobile PDF Scanning Tool

The ability to scan direct to PDF on your mobile is a function that can revolutionize your document workflows. We’ve detailed how to do this with Android here and in this article, we will be doing the same with iOS.
The guide below describes how you can use Foxit PDF SDK for iOS (free 30 day trial available here) to quickly create an app with powerful scanning functionality. By taking multiple photos or by selecting multiple photos from an album, a PDF can be generated with just one click. You can use this project to integrate scanning into your own environment and make this a powerful addition to your mobile application.
You can fully customize the controls of the camera interface and implement additional features using the callback methods should you require to. Although simple, this project provides all of Foxit SDK’s advanced features such as flashing, image processing and rendering, dynamic monitoring and capturing, setting of image size, and saving the generated PDF file to a specified directory. Enjoy!
System Requirements
Note: starting with PDF SDK version 7.5, Foxit PDF SDK for iOS only supports 64-bit devices. This is due to the fact that in iOS 11 and beyond, all apps use the 64-bit architecture, please see the Apple developer guide here for further information.
For the foxitpdfsdk_8_1_ios.zip package:
• iOS 11.0 or higher
• Xcode 9.0 or newer
Note: iOS 13 or higher requires Xcode version 11 or higher.
Development Configuration
Please follow the steps below.
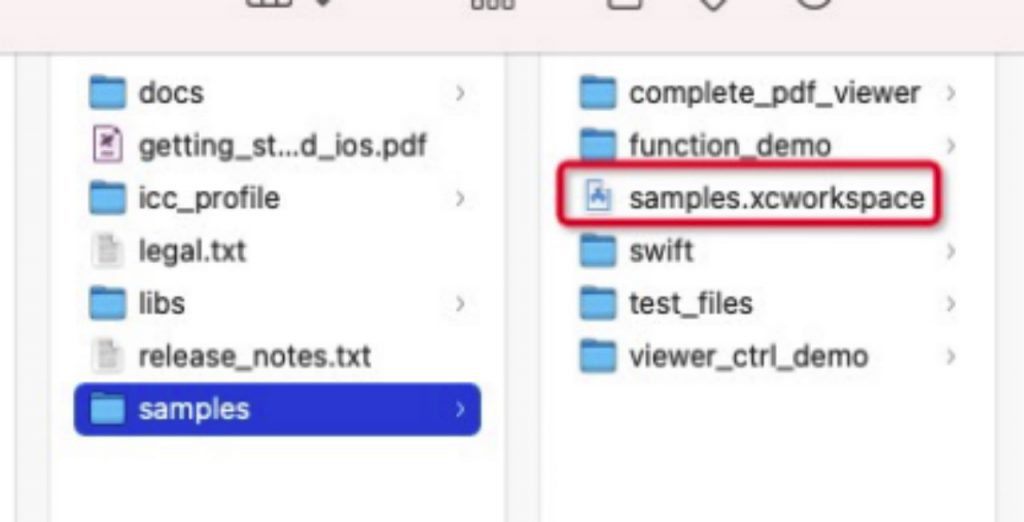
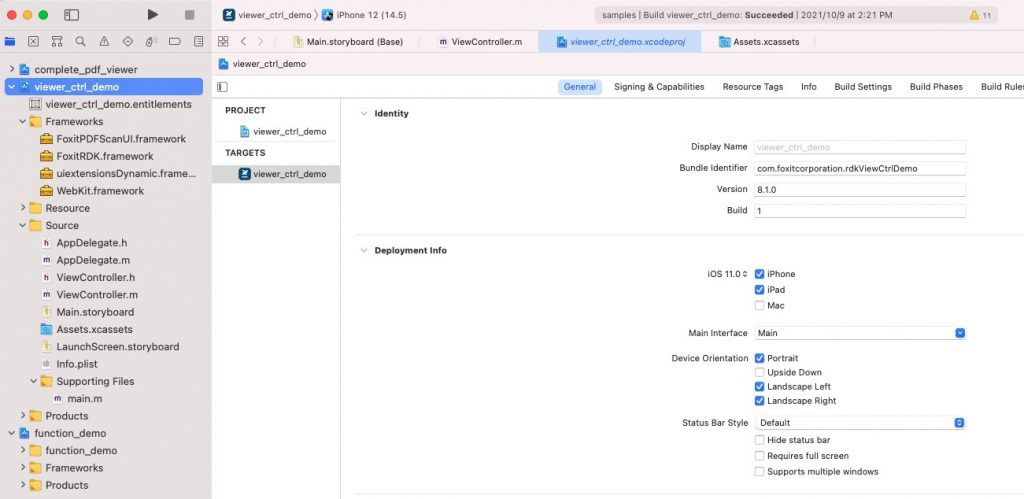
Open foxitpdfsdk_8_1_ios/samples/samples.xcworkspace.
Add the framework
The FoxitPDFScanUI.framework library depends on both the FoxitRDK.framework and uiextensionsDynamic.framework, because the viewer_ctrl_demo project has been added to the project.
There are two other libraries, so you need to add an additional FoxitPDFScanUI.framework.
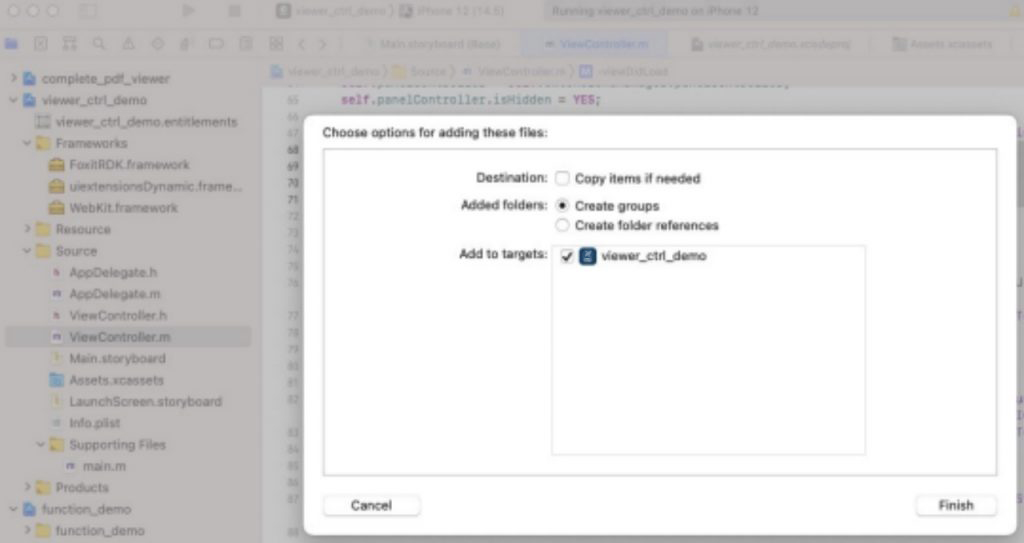
Next, drag foxitpdfsdk_8_1_ios/libs/FoxitPDFScanUI.framework to the project framework directory of viewer_ctrl_demo.
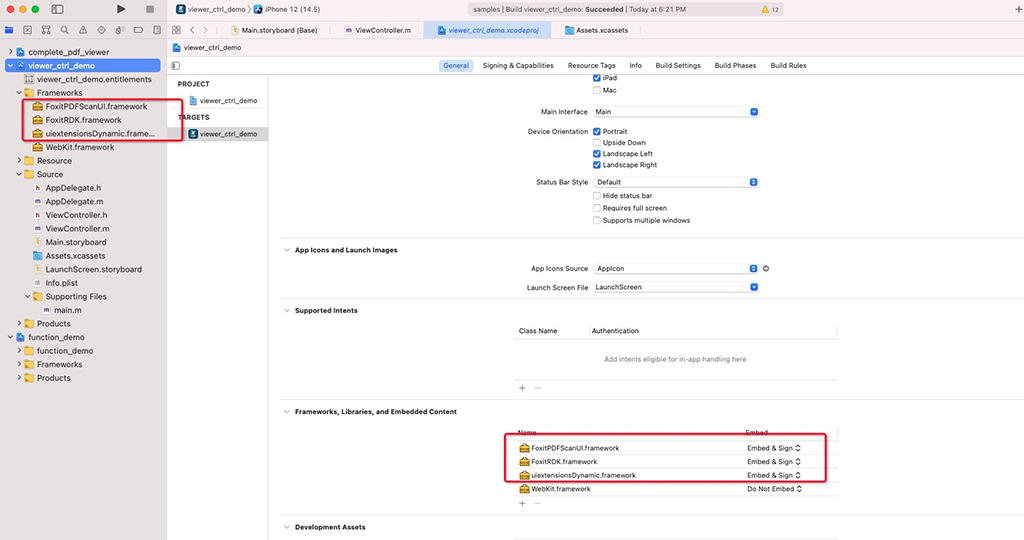
After completing this step, change the embed option of FoxitPDFScanUI.framework to Embed & Sign.
In the Info.plist file of the viewer_ctrl_demo project, add instructions for applying for camera permissions and accessing album permissions.
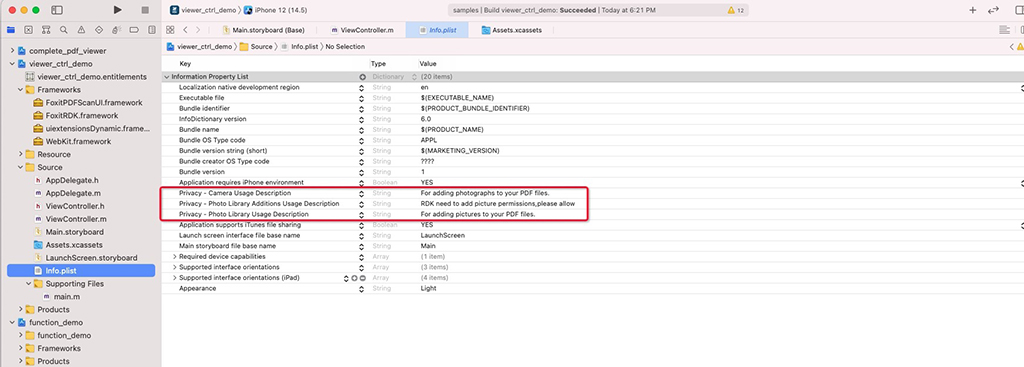
Now, add the scan button to the viewcontroller class of Main.storyboard of the viewer_ctrl_demo project, and bind the click event openScan.
Then, open the Main.storyboard file, add the button control in the view controller, and set the constraints and images.
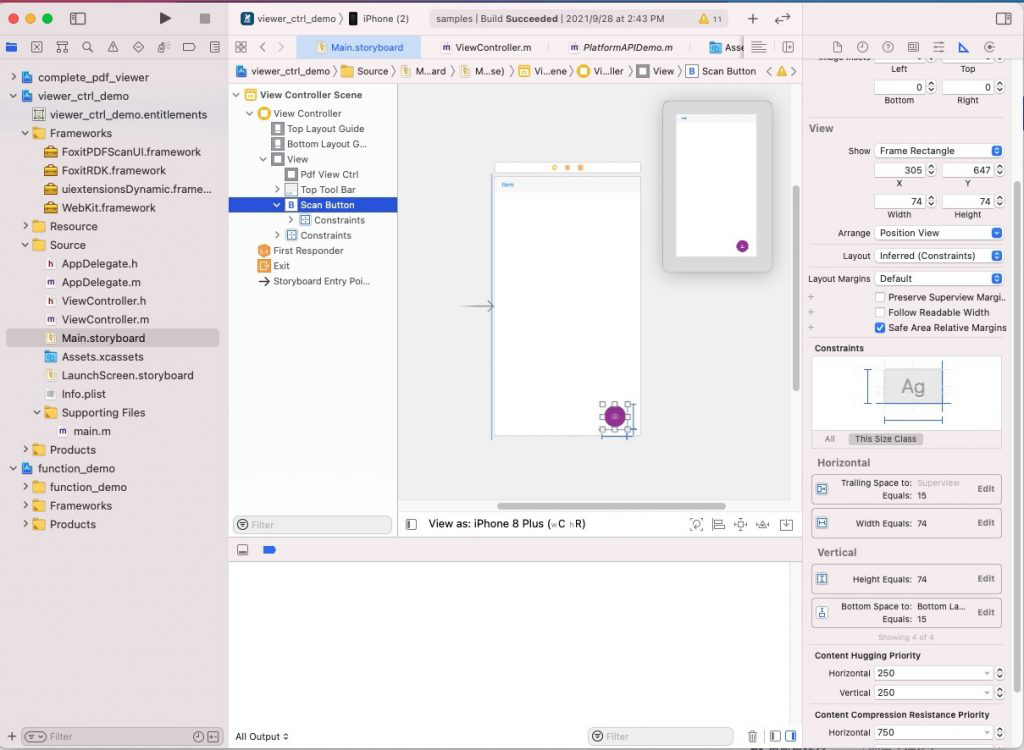
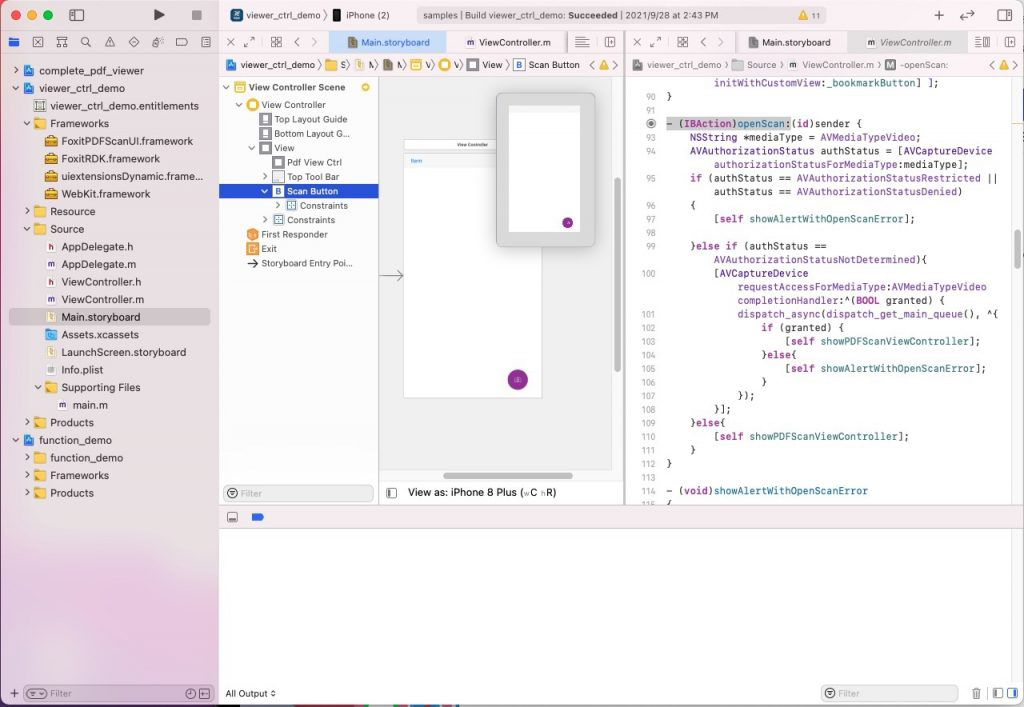
Now you can add the binding event for the scan button as per the screenshot/code below.
-(IBAction)openScan:(id)sender
The added scan button is shown in the figure below.
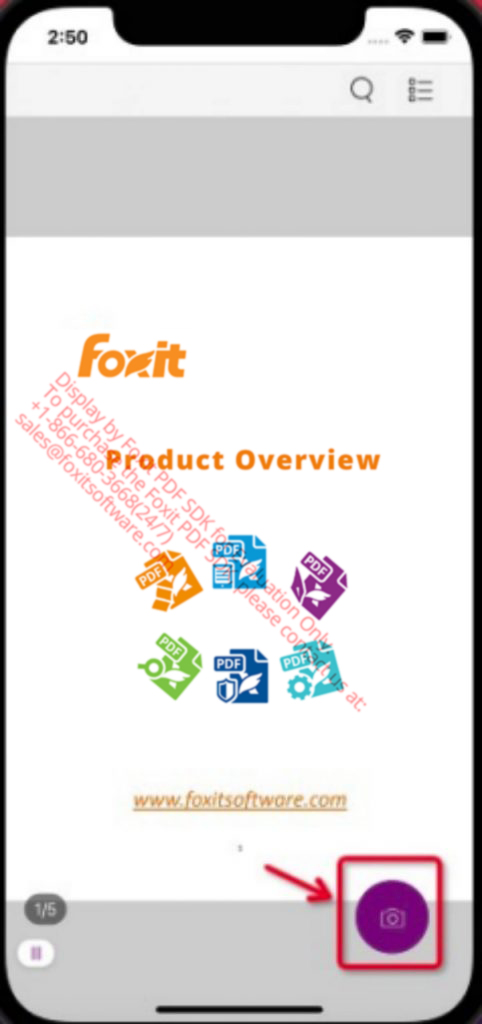
Now you can call the FoxitPDFScan function.
Initialize the function of FoxitPDFScan.
When the program starts, you need to add the code to initialize the FoxitPDFScan function. After initialization, you can use all the functions of FoxitPDFScan.
In the demo, in the viewDidLoad method in the ViewController class of the viewer_ctrl_demo project, the code to initialize the FoxitPDFScan function is added.
The snippet code to initialize the FoxitPDFScan function is as follows:
[PDFScanManager initializeScanner:0 serial2:0];
[PDFScanManager initializeCompression:0 serial2:0];
The complete code to initialize FoxitPDFScan is as follows:
#import <FoxitPDFScanUI/PDFScanManager.h>
#import <AVFoundation/AVFoundation.h>

- (void)viewDidLoad {
    [super viewDidLoad];
    // Do any additional setup after loading the view, typically from a nib.

    ...

    NSString *documentPath = [NSSearchPathForDirectoriesInDomains(NSDocumentDirectory, NSUserDomainMask, YES) objectAtIndex:0];
    NSLog(@"%@", documentPath);

    [PDFScanManager initializeScanner:0 serial2:0];
    [PDFScanManager initializeCompression:0 serial2:0];
}
In the openScan function, determine whether there is a project to use the camera and access the album permissions.
If you do not obtain the permission to use the camera and album before calling the Scan function, it will cause the Scan function to not work.
- (IBAction)openScan:(id)sender {
    NSString *mediaType = AVMediaTypeVideo;
    AVAuthorizationStatus authStatus = [AVCaptureDevice authorizationStatusForMediaType:mediaType];
    if (authStatus == AVAuthorizationStatusRestricted || authStatus == AVAuthorizationStatusDenied)
    {
        [self showAlertWithOpenScanError];

    }else if (authStatus == AVAuthorizationStatusNotDetermined){
        [AVCaptureDevice requestAccessForMediaType:AVMediaTypeVideo completionHandler:^(BOOL granted) {
            dispatch_async(dispatch_get_main_queue(), ^{
                if (granted) {
                    [self showPDFScanViewController];
                }else{
                    [self showAlertWithOpenScanError];
                }
            });
        }];
    }else{
        [self showPDFScanViewController];
    }
}
If you have the corresponding permissions, open the interface of FoxitPDFScan. Set the callback function setDoneCallBack to generate the PDF file. The example makes a simple prompt to generate the PDF successfully.
There are two callback functions for generating PDF files:
/** @brief Callback after the file is saved.*/

@property (class, nonatomic, copy) ScanPDFSaveAsCallBack saveAsCallBack;

/** @brief Callback after user click 'done' button in the camera viewcontroller of PDFScan. The callback will return pdffilePath by saveasPd.f*/

@property (class, nonatomic, copy) ScanPDFDoneCallBack doneCallBack;
Note:
@property (class, nonatomic, copy) ScanPDFSaveAsCallBack saveAsCallBack;
@property (class, nonatomic, copy) ScanPDFDoneCallBack doneCallBack;
If doneCallBack is implemented, the scan interface will be exited directly after the scan, and the default save path will be returned.
If doneCallBack is not implemented and saveAsCallBack is implemented, the interface for selecting the save directory will pop up after the scan is completed, and the saveAsCallBack callback will be called after clicking save.
- (void)showPDFScanViewController
{
    UIViewController* vc =  [[PDFScanManager shareManager] getPDFScanView];
    if (vc)
    {
        [self presentViewController:vc animated:YES completion:nil];

        [PDFScanManager setDoneCallBack:^(NSError * _Nonnull error, NSString * _Nonnull savePath) {
              if (savePath) {
                  if (vc.presentingViewController) {
                      [vc.presentingViewController dismissViewControllerAnimated:NO completion:nil];
                  }
                  [vc dismissViewControllerAnimated:NO completion:nil];
                  [self showAlertWithOpenScanSuccessfully:savePath];
            }
        }];
    }
}
If there is no permission, it will prompt the user and jump to the setting page to open the permission.
- (void)showAlertWithOpenScanError
{
    UIAlertController *alert = [UIAlertController alertControllerWithTitle:@"Cannot take photos"
                                                                   message:@"Cannot access the camera to scan. Please enable it in Privacy settings of your device."
                                                            preferredStyle:UIAlertControllerStyleAlert];
    UIAlertAction *conform = [UIAlertAction actionWithTitle:@"Go to Settings" style:UIAlertActionStyleDefault handler:^(UIAlertAction * _Nonnull action) {
            NSURL*url =[NSURL URLWithString:UIApplicationOpenSettingsURLString];
            if([[UIApplication sharedApplication] canOpenURL:url]) {
                [[UIApplication sharedApplication] openURL:url options:@{} completionHandler:nil];
            }
    }];

    UIAlertAction *cancel = [UIAlertAction actionWithTitle:@"Cancel" style:UIAlertActionStyleCancel handler:^(UIAlertAction * _Nonnull action) {

    }];
    [alert addAction:conform];
    [alert addAction:cancel];
    [self presentViewController:alert animated:YES completion:nil];
}
This will prompt the user to save successfully.
- (void)showAlertWithOpenScanError
{
    UIAlertController *alert = [UIAlertController alertControllerWithTitle:@"Cannot take photos"
                                                                   message:@"Cannot access the camera to scan. Please
- (void)showAlertWithOpenScanSuccessfully:(NSString*)filePath
{
    UIAlertController *alert = [UIAlertController alertControllerWithTitle:@"Saved successfully"
                                                                   message:[NSString stringWithFormat:@"Saved to: %@",filePath]
                                                            preferredStyle:UIAlertControllerStyleAlert];
    UIAlertAction *conform = [UIAlertAction actionWithTitle:@"OK" style:UIAlertActionStyleDefault handler:^(UIAlertAction * _Nonnull action) {
    }];

    [alert addAction:conform];
    [self presentViewController:alert animated:YES completion:nil];
}
For the description of FoxitPDFScan interface, please refer to the document in foxitpdfsdk_8_1_ios/docs.
Run viewer_ctrl_demo, start the App, click scanButton, and enter the homepage of FoxitPDFScan.
At this point, the powerful Scan function can be realized by simply calling the OS RDK.
Done! The scan functionality has been successfully added to your application. Run the app, click the Scan button you’ve created previously and start your scanning experience.
We work with you to add complete PDF library functionality to your project and develop across all platforms and environments on one core API. Take a 30 day free trial today by clicking here.